background image

14

Cleaning metal grease filters

The metal grease filters can be cleaned in hot detergent 

solution or washed in the dishwasher. They should be 

cleaned every 2 months, or more frequently if use is par-

ticularly heavy. 

• 

Remove the filter, pushing the lever towards the back of 

the unit and at the same time pulling downward.

• 

Wash the filter without bending it, leave it to dry thorou

-

ghly before replacing (if the surface of the filter changes 

color over time, this will have absolutely no effect on its 

efficiency).

•  Replace, taking care to ensure that the handle faces 

forward.

• 

Cleaning in dishwasher may dull the finish of the metal 

grease filter.

Replacing Activated Charcoal Filter

The Activated Charcoal Filters are not washable 

and cannot be regenerated, and should be replaced 

approximately every 4 months of operation, or more 

frequently with heavy usage.

• 

Remove the charcoal filter by rotating it clockwise (back

-

wards) until it unlocks from the motor housing and pull 

off sideways.

• 

To re-insert each charcoal filter, place up against the side 

of the blower and push it inward. Then turn the charcoal 

filter clockwise (forward) until it fits into place.

Replacing the two 35W Halogen GU10 bulbs

•  Turn off electrical supply before replacing bulbs, and make 

sure bulbs are cool to touch before proceeding. 

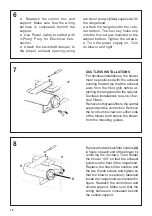
•  Carefully remove the snap-on lamp cover using a flat head 

screwdriver by levering it down from under the metal ring.

•  After the snap-on lamp cover is down remove the halogen 

lamp at the base and turn slightly to the left and the pull 

out from the connector and turn slightly to the left.

•  Replace the lamp with a new one of the same type, 

making sure that you insert the two pins properly into the 

housings on the lamp holder.

•  Replace the snap-on lamp cover. 

•  Once the bulb pins are in place turn slightly to the right 

to secure.

1

2

Summary of Contents for AGIO24PR300-B

Page 1: ...AGIO24PR300 B AGIO30PR300 B Installation Instructions Use and Care Information Instructions d installation Utilisez et d entretien AGIO 24 30...

Page 2: ...with your back to an exit Based on Kitchen Firesafety Tips published by NFPA WARNING TO REDUCE THE RISK OF FIRE OR ELECTRIC SHOCK do not use this fan with any solid state speed control device WARNING...

Page 3: ...the flow of combustion and ventilation air Failure to follow venting requirements may result in a fire WARNING VENTING REQUIREMENTS Determine which venting method is best for your application Ductwor...

Page 4: ...or grounding circuit could result in electrical shock Check with a qualified electrician if you are in doubt as to whether the rangehood is properly grounded Failure to follow electrical requirements...

Page 5: ...5 RANGEHOOD DIMENSIONS 1 12 1 3 8 1 7 8 1 1 2 2 5 8 23 5 8 29 7 8 1 2 7 1 2 6 8 1 2 47 Min 24 Min 30...

Page 6: ...lation Components 12e 4 Screws 1 8 x1 4 12f 4 Screws 1 8 x5 8 Qty Documentation 1 Instruction Manual Available Accessories Activated Charcoal Filter sku FILTER3 Kit frontal panel AGTRIM24SS Kit fronta...

Page 7: ...7 Choose your ducting method Ducting method Horizontal Vertical VERTICAL DUCTING REAR DUCTING 23 5 8 29 7 8 3 1 2 1 7 8 10 3 4 23 5 8 29 7 8 23 5 8 29 7 8 3 1 2 1 7 8 10 3 4 3 1 2 9 3 8 10 3 4...

Page 8: ...lters from the unit and set aside The rangehood is shippedfromthefactorywiththebackdraft damper attached inside Using a Phillips head screwdriver remove the backdraft damper by loosening the screw mar...

Page 9: ...out Save this plate as it must be used to blocktheductlessexhaustgrill Figure shows the location of the knockouts for both horizontal and vertical ONLY ONE must be removed Remove the central support a...

Page 10: ...ointing forward so that the exhaust exits from the front grill before at taching the rangehood to the cabinet Ductless installations require Char coal Filters Removebothgreasefilters thecentral suppor...

Page 11: ...TER3 10 11 Replace the grease filters removed previously For Non Ducted Recirculation Option Required Activated Charcoal Filter Accessory sku FILTER3 purchased separately Attacheachcharcoalfiltertothe...

Page 12: ...her the appliance is properly grounded 12 CUSTOMIZING YOUR RANGEHOOD The front strip of the rangehood can be customized The front strip is attached to the rangehoodbythreerecessedscrewsandthreekeyhole...

Page 13: ...ing MS Microswitch When the front panel of the rangehood is closed the rangehood will turn off by a microswitch This turns the rangehood On and Off without adjusting the switches for the Light or Blow...

Page 14: ...nths of operation or more frequently with heavy usage Remove the charcoal filter by rotating it clockwise back wards until it unlocks from the motor housing and pull off sideways To re insert each cha...

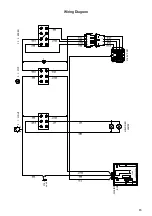
Page 15: ...15 Wiring Diagram...

Page 16: ...om accident alteration misuse abuse fire flood acts of God improper installation installation not in accordance with electrical or plumbing codes or Faber documentation or use of products not approved...

Page 17: ...nevoiedesortiesetrouvederri revouspendantquevous teignezlesflammes D apr sleguide KitchenFiresafetyTips publi parlaNFPAaux tats Unis AVERTISSEMENT POURR DUIRELERISQUED INCENDIEOUDECHOC LECTRIQUE n uti...

Page 18: ...ct des exigences en mati re de ventilation pourrait entra ner un incendie AVERTISSEMENT CRIT RESDEVENTILATION D terminez quelle m thode de ventilation est mieux adapt e votre application Les conduits...

Page 19: ...sible dans le circuit neutre ou de mise la terre peut entra ner un choc lectrique Consultez un lectricien qualifi si vous n tes pas certain de la mise la terre de la hotte Le non respect des exigences...

Page 20: ...20 DIMENSIONS DE LA HOTTE 1 12 1 3 8 1 7 8 1 1 2 2 5 8 23 5 8 29 7 8 1 2 7 1 2 6 8 1 2 47 Min 24 Min 30...

Page 21: ...12e 4 Vis 1 8 x1 4 12f 4 Vis 1 8 x5 8 Qt Documentation 1 Mode d emploi PI CES PRINCIPALES Accessoires disponibles Filtre charbon actif no d article FILTER3 Trousse panneau frontal AGTRIM24SS Trousse p...

Page 22: ...sez la m thode de canalisation Pr paration de l armoire Horizontal Vertical CONDUIT VERTICAL CONDUIT HORIZONTAL 23 5 8 29 7 8 3 1 2 1 7 8 10 3 4 23 5 8 29 7 8 23 5 8 29 7 8 3 1 2 1 7 8 10 3 4 3 1 2 9...

Page 23: ...ux filtres pour la graisse del appareiletlesmettredec t Lahotte est exp di e de l usine avec un registre de tirage volet fix l int rieur Avec un tournevis Phillips retirer le registre en d vissant les...

Page 24: ...car elle doit servir maintenir en place la grille d vacuation sans conduit La figure indique l emplace ment des pastilles enfon ables pour les mod les horizontaux et verticaux UNE SEULE doit tre enle...

Page 25: ...fasse vers l avant l vacuation sera faite par la grille avant avant de fixer la hotte l armoire Les installations sans conduit requi rent un n cessaire des Filtres au Charbon Enlever les deux filtres...

Page 26: ...version 10 11 Replacez les filtres graisse enlev s pr c demment Pour option non canalis e avec recyclage d air Filtre charbon actif accessoire requis no d article FILTER3 achet s par ment Fixez les fi...

Page 27: ...SONNALISATION DE VOTRE HOTTE La bande frontale de la hotte peut tre personnalis e La bande frontale est fix e la hotte l aide de trois vis calantes et de trois trous en poire l arri re de la bande Il...

Page 28: ...ntilateur Placer le commutateur la position 1 pour allumer le ventilateur la vitesse R DUITE Placer le commutateur la position 2 pour allumer le ventilateur la vitesse MOYENNE Placer le commutateur la...

Page 29: ...n en le faisant tourner dans le sens des aiguilles d une montre vers l arri re jusqu ce qu il se d gage du carter du moteur puis en le tirant vers le c t Pour r ins rer les filtres placez les sur le c...

Page 30: ...30 Sch ma de c blage...

Page 31: ...es d coulant d un accident d une modification de l utilisation incorrecte ou abusive d un incendie d une inondation d un cas de force majeure d une installation inad quate d une installation non confo...

Page 32: ...991 0492 032_05 190208 D00003397_04...

Reviews: