EN
9
9
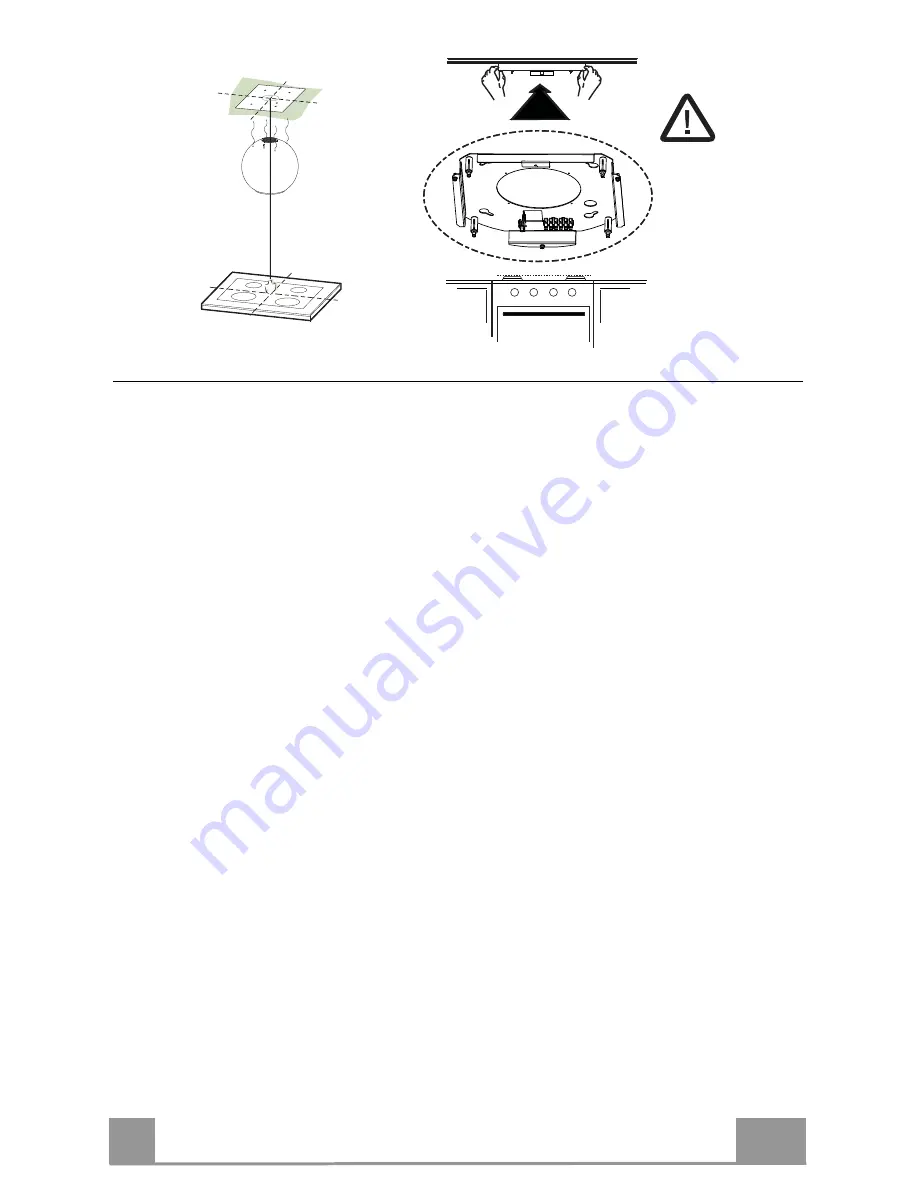
Ceiling/Shelf drilling and Plate Fixing
CEILING/SHELF DRILLING
• Use a plumb-line and mark the centre of the cooking hob on the Support Ceiling/Shelf
• Rest the Plate against the Ceiling/Shelf, making sure it is the right way up, as shown in the
figure.
• Mark the centres of the holes in the plate.
• Drill the following points:
• Ceilings in solid concrete: As per concrete plugs used.
• Ceilings in hollow bricks with 20 mm resistance thickness: Drill a hole ø 10 mm (insert
Plugs
11
supplied immediately).
• Ceilings with Wood Beams: As per Wood Screws used (not supplied).
• Wooden shelf, with a resistant thickness of 15 mm: drill a hole ø 7 mm.
• Feeding the electric supply cable: drill a hole ø 10 mm.
• Insert two screws, crossing them and leaving 4-5 mm from the ceiling:
• for solid concrete, concrete plugs, not provided.
• for hollow bricks with approx. 20 mm resistance thickness, screws
12h
, provided.
• for wooden beams, wood screws, not provided.
• for wooden shelves, screws with washers and nuts, not provided.
Summary of Contents for Arkea Plus
Page 68: ...GR 6 8 68 650 mm 120 mm...
Page 69: ...GR 6 9 69 0 04mbar 8...
Page 70: ...GR 7 0 70...
Page 71: ...GR 7 1 71 1 1 2 1 11 4 10 12h 4 4 2 x 44 4 1 2...
Page 72: ...GR 7 2 72 650 mm...
Page 73: ...GR 7 3 73 20 mm 10 mm 11 15 mm 7 mm 10 mm 4 5 mm 20 mm 12h...
Page 74: ...GR 7 4 74...
Page 75: ...GR 7 5 75 650 mm 4 3 a b c 4 b c a...
Page 76: ...GR 7 6 76 c b B C...
Page 77: ...GR 7 7 77 a b 4 4...
Page 78: ...GR 7 8 78 2 3 mm...
Page 79: ...GR 7 9 79 L T1 L T1 2 Led T1 2 Led T1 Led T1 250ms Led T1...
Page 81: ...GR 8 1 81 2 4 A B A B...
Page 82: ...GR 8 2 82 B C 1 A 2 3 A B C...
Page 83: ...GR 8 3 83 1 2 4 6 3 4 2 6 5 6 On 1 3 5 3 1 3 5 3 1 2 3 4 5 6...
Page 84: ...RU 8 4 84 650 I 120...
Page 85: ...RU 8 5 85 0 04 8...
Page 86: ...RU 8 6 86...
Page 87: ...RU 8 7 87 1 1 2 1 11 4 10 12h 4 4 2 x 44 4 1 2...
Page 88: ...RU 8 8 88 650...
Page 89: ...RU 8 9 89 20 10 11 15 7 10 4 5 20 12h...
Page 90: ...RU 9 0 90...
Page 91: ...RU 9 1 91 650 4 3 a b c 4 b c...
Page 92: ...RU 9 2 92 c b B C...
Page 93: ...RU 9 3 93 a b 4 4...
Page 94: ...RU 9 4 94 2 3 e...
Page 95: ...RU 9 5 95 L T1 L T1 2 T1 T1 2 T1 250 T1...
Page 96: ...RU 9 6 96 3 CR2032 2 2 2 24h 6 6 1 24h 30 0 5 2 24H 24 10 24 2...
Page 97: ...RU 9 7 97 2 4 A B A B...
Page 98: ...RU 9 8 98 B C 1 A 2 3 A B C...
Page 99: ...RU 9 9 99 1 2 4 6 3 4 2 6 5 6 1 3 5 3 1 3 5 3 1 2 3 4 5 6...
Page 132: ......
Page 133: ......
Page 134: ......
Page 135: ......


