background image

Version 12/04 - Page 5


DUCTED 

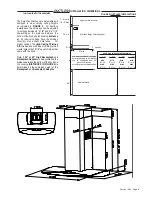
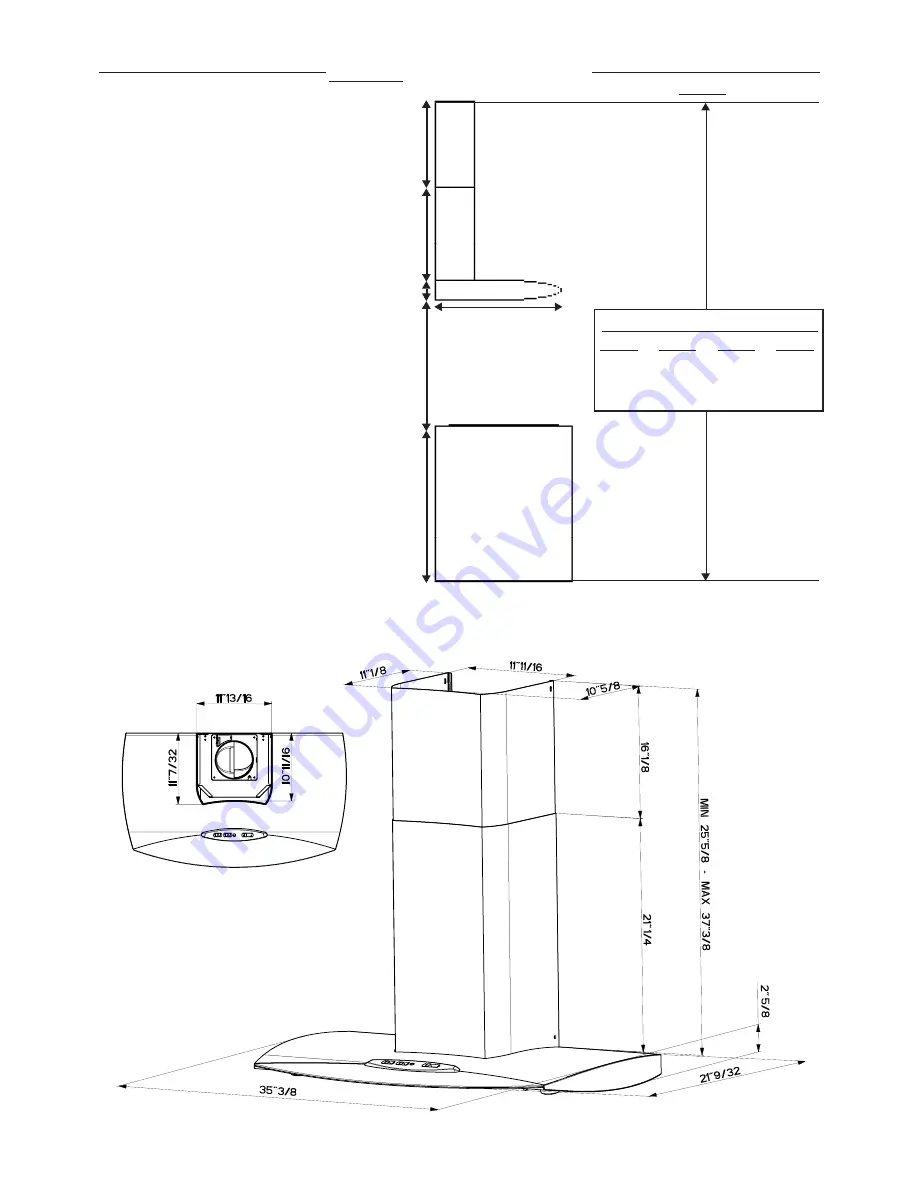
INSTALLATION  DIMENSIONS

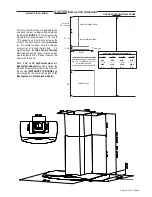
The Axia Plus chimneys are adjustable and 

designed to meet varying ceiling heights as 

indicated in 

FIGURE 4

.  The chimneys can be 

adjusted for ceilings between 7' 4 1/4" and 8' 

10" depending on the distance between the 

bottom of the hood and the cooktop

 (distance 

x)

.  For shorter ceilings, have the chimney 

cover(s) cut at a sheet metal shop.    For 

higher ceilings, the 

High Ceiling Chimney 

Kit

 includes a new 40” upper chimney which 

would replace the 16 1/8” upper chimney that 

came with the hood.

Note: If 

24" or 30" High Backsplash

 and 

Backsplash Adapter

 are being installed, the 

distance between the bottom of the hood and 

the cooktop 

(DISTANCE X IN FIGURE 4)

 is 

determined  by  the  combined  height  of  the 

Backsplash

 and 

Backsplash Adapter.

upper chimney cover

lower chimney cover

canopy

x = distance from hood to cooktop

(varies depending on installation)

min - 24”, suggested max - 30”

cabinet base

3/8”

 min

16 

1/8”

 max

21 

1/4"

5/8”

36”

FIGURE 4 

DUCTED 

INSTALLATIONS

21 

9/32”

x

also consult cooktop

manufacturer's recommendation


(vented to the outside)

min & max ceiling height examples

x = 30"

min

7'

 10 1/4"

max

8'

 10"

x = 28"

min

7'

 8 1/4"

max

8' 

8"

x = 26"

min

7' 

6 1/4"

max

8' 

6"

x = 24"

min

7' 

4 1/4"

max

8' 

4"

Summary of Contents for Axia plus

Page 1: ...24 HUD Part 280 Four wire power supply must be used and the appliance wiring must be revised See Electrical Requirements LISEZ BIEN CETTE FICHE AVANT D INSTALLER LA HOTTE AVERTISSEMENT POURMINIMISERL...

Page 2: ...ng means to prevent power from being switched on accidentally Whentheservicedisconnectingmeanscannotbelocked securely fasten a prominent warning device such as a tag to the service panel CAUTION For G...

Page 3: ...les conseils et mesuresdes curit dufournisseurtelsqueceuxpubli s par l Association Nationale de la Sauvegarde contre l Incendie et l Association Am ricaine d Ing nieurs de Chauffage Frigorifaction et...

Page 4: ...s Power Supply Cable 1 Wall or Roof Cap All Metal Ductwork OPTIONAL ACCESSORIES AVAILABLE Backsplash must also order adapter below Choose either 24 or 30 high mounts to the wall beneath the rangehood...

Page 5: ...ney that came with the hood Note If 24 or 30 High Backsplash and BacksplashAdapter are being installed the distance between the bottom of the hood and the cooktop DISTANCE X IN FIGURE 4 is determined...

Page 6: ...imney that came with the hood Note If 24 or 30 High Backsplash and BacksplashAdapter are being installed the distance between the bottom of the hood and the cooktop DISTANCE X IN FIGURE 4 is determine...

Page 7: ...wall using the MOUNTING SCREWS D provided 7 Forthemostsecureinstallation the MOUNTINGSCREWS D which mount the CANOPY SECTION A in FIGURE 1 should be installed into wood Mark the wall along the hori z...

Page 8: ...artment with a phil lipsscrewdriver FeedthePowerSupplyCablethroughtheelectrical knockout ConnectthePowerSupplyCabletotherangehoodcable Attach the White lead of the power supply to the White lead of th...

Page 9: ...at hold the light support and gently pull the support down from the hood Remove the lamp from the light support and replace with new lamp Replace the light support and x it into place with the 2 screw...

Reviews: