Version 12/04 - Page 8
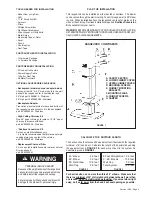
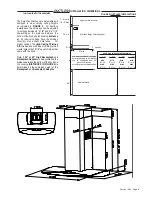
FIGURE 9
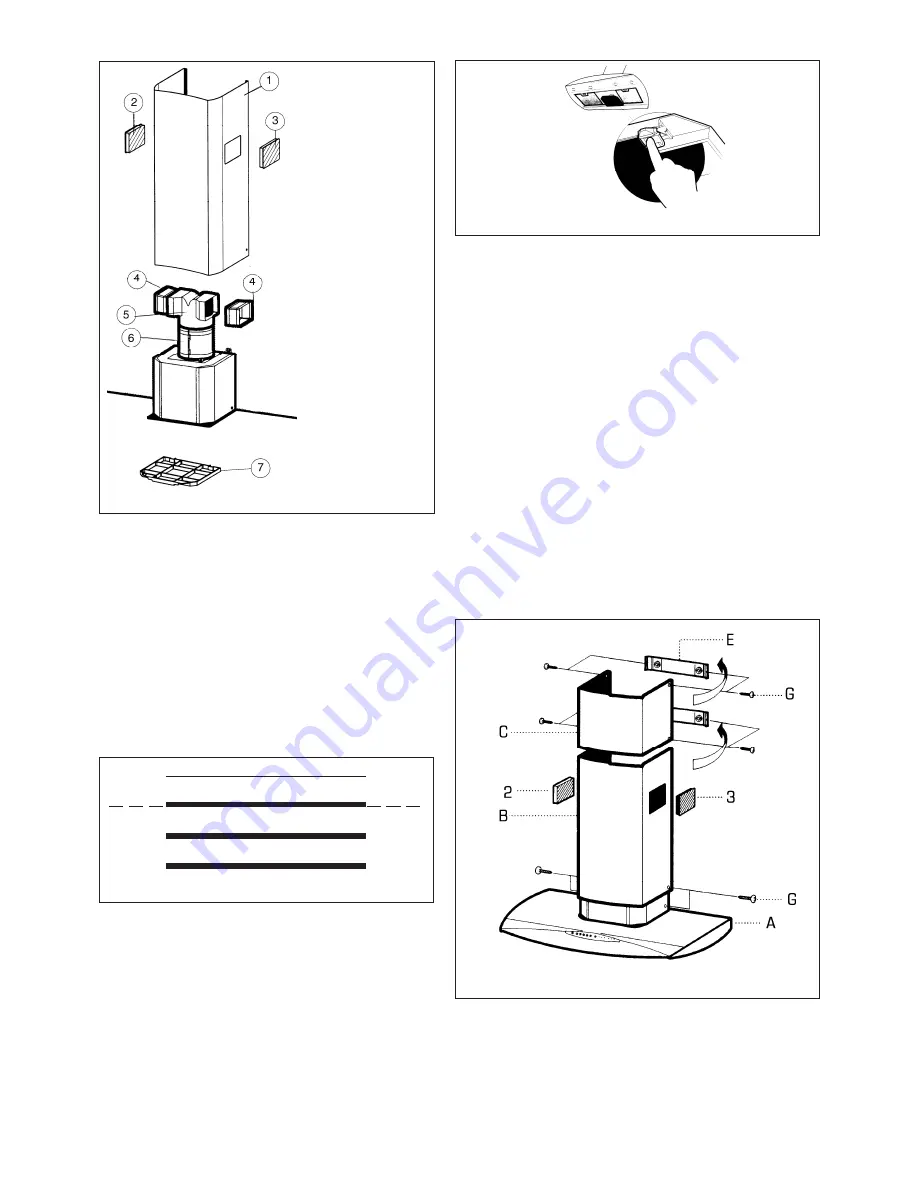
FOR DUCTLESS INSTALLATIONS
Ductless installations require a
Ductless Conversion Kit
whose components are pictured in
FIGURE 8
. Do not use
the DAMPER
(H in FIGURE 1)
for ductless installations.
The LOWER CHIMNEY COVER
(B in FIGURE 1)
should be
discarded and replaced by a new one with holes
(1)
.
1.
The DIVERTER EXTENSION VERTICAL
(6)
comes in two
pieces which must be cut before assembling. Using a pair of
scissors, cut each piece just under the ridge under the number
1 as indicated by the dotted line in
FIGURE 9.
1
2
2.
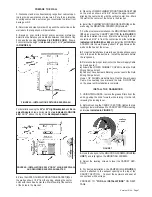
As indicated in
FIGURE 8
, snap the two DIVERTER
EXTENSION VERTICAL pieces
(6)
together and fit over
the duct outlet. Fit the DUCTLESS DIVERTER
(5)
over the
DIVERTER EXTENSION VERTICAL
(6)
. Fit the 2 DIVERTER
EXTENSION HORIZONTAL pieces
(4)
on either side of the
DUCTLESS DIVERTER.
3
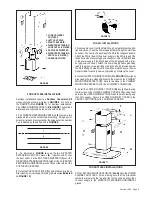
. Install the CHARCOAL FILTER
(7)
behind the center grease
filter opening by inserting and locking into place
(as indicated
in FIGURE 10)
.
1. LOWER CHIMNEY
2. LEFT VENT GRID
3. RIGHT VENT GRID
4. DIVERTER EXTENSION
5. DUCTLESS DIVERTER
6. DIVERTER EXTENSION
7. CHARCOAL FILTER
DUCTLESS
HORIZONTAL (2 PIECES)
VERTICAL (2 PIECES)
FOR ALL INSTALLATIONS
1.
Remove the cover from the Field Wiring Compartment with a phil-
lips screwdriver. Feed the Power Supply Cable through the electrical
knockout. Connect the Power Supply Cable to the rangehood cable.
Attach the White lead of the power supply to the White lead of the
rangehood with a twist-on type wire connector. Attach the Black lead
of the power supply to the Black lead of the rangehood with a twist-
on type wire connector. Attach the Power Supply Cable grounding
lead to the green screw provided. Using the 4 holes provided screw
the Field Wiring Compartment to the wall as dictated by your Power
Supply Cable location (screws not provided). Replace the cover.
2.
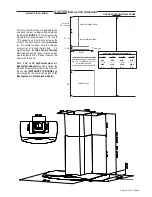
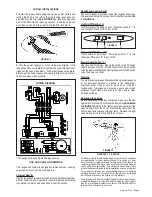
Install the UPPER CHIMNEY COVER
(C in FIGURE 11)
by slightly
widenening the two sides and hooking them behind the CHIMNEY
MOUNTING BRACKETS
(E)
. Secure the sides to the CHIMNEY
MOUNTING BRACKETS with the 4 CHIMNEY SCREWS
(G)
.
3.
Install the LOWER CHIMNEY COVER
(B)
by slightly widening
the two sides of the LOWER CHIMNEY COVER and hooking them
between the UPPER CHIMNEY COVER and the wall making sure
that it fits snugly. Secure the LOWER CHIMNEY COVER to the
CANOPY SECTION
(A)
with 2 CHIMNEY SCREWS.
FIGURE 8
FIGURE 10
FOR DUCTLESS INSTALLATIONS
Fit the LEFT AND RIGHT VENT GRIDS (
2 and 3)
into the LOWER
CHIMNEY DUCTLESS holes, making sure that the directional
symbols are towards the top and front of the hood and that they
connect snugly to the DIVERTER EXTENSION HORIZONTAL
pieces.
FIGURE 11


