
Version 12/04 - Page 9
1 2 3
1 2
1 2
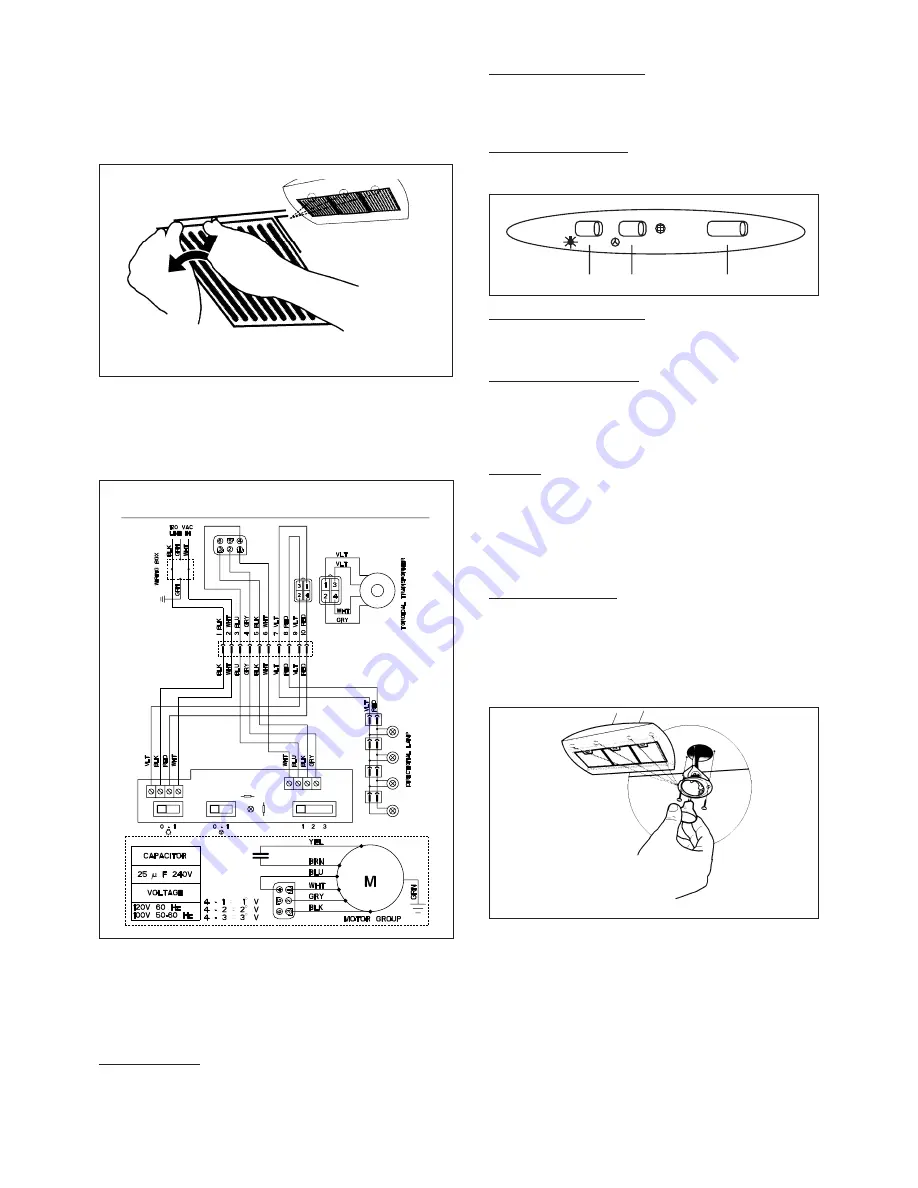
L
M
V
• This rangehood uses 20 watt halogen lamps.
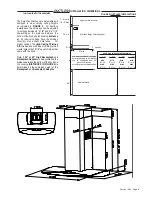
FOR ALL INSTALLATIONS
1.
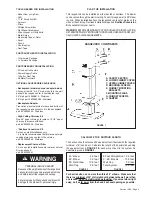
Install the grease filters using two hands by first pulling and
turning the knob to the left so that the locking lever does not
protrude from the filter
(as in FIGURE 12)
. Insert the opposite
end of the filter into the retaining channel. Insert the knob end
next, then turn knob to the right to lock the filter into place.
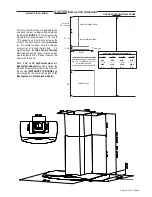
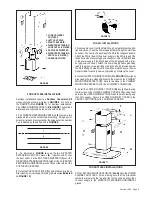
Rangehood Control Panel
The control panel is located on top of the rangehood canopy.
The position and function of each control button are indicated
in
FIGURE 13
.
Light On/Off Button ( L )
On/Off switch for the halogen light. Move the switch to "1" to
turn the light ON and to "0" to turn it OFF.
Blower On/Off Button ( M )
On/Off switch for the blower. Move the switch to "1" to turn
the blower ON and to "0" to turn it OFF.
Blower Speed Button ( V )
Speed control for blower. Moving the switch to the 1 Position
turns the blower on LOW. Moving the switch to the 2 Position
turns the blower on MEDIUM. Moving the switch to the 3 Position
turns the blower on HIGH.
Cleaning
The stainless steel grease filters should be cleaned frequently
in hot detergent solution or washed in the dishwasher.
Stainless steel cleaner should be used on stainless
rangehoods. Abrasives and scouring agents can scratch
stainless steel finishes and should not be used to clean
finished surfaces.
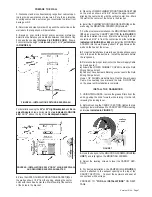
Replacing the Lamps
Before attempting to replace the lamps, make sure that the
light switch is turned off. Remove the 2 screws
(as indicated
in FIGURE 14)
that hold the light support and gently pull the
support down from the hood. Remove the lamp from the
light support and replace with new lamp. Replace the light
support and fix it into place with the 2 screws.
FIGURE 12
WARRANTY & SERVICE
All Faber products are warranteed against any defect in materials
or workmanship for the original purchaser for a period of 1 year
from the date of original purchase. This warranty covers labor and
replacement parts. The warranty does not cover consumable parts
such as filters and light bulbs. This warranty does not apply if this
product has been subjected to faulty installation, misuse, or neglect.
This warranty excludes any consequential expense or damage
resulting from any use or malfunction of the product. All implied
warranties are limited to the duration of this warranty.
To obtain warranty service, contact the dealer from whom you pur-
chased the rangehood, or the local Faber distributor. If you cannot
identify a local Faber distributor, contact us at (508) 358-5353 for
the name of a distributor in your area.
2.
Turn the power supply on. Turn on blower and lights. If the
rangehood does not operate, check that the circuit breaker is not
tripped or the house fuse blown. If the unit still does not operate,
disconnect the power supply and check that the wiring connec-
tions have been made properly.
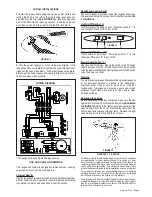
WIRING DIAGRAM
FIGURE 13
FIGURE 14
USE AND CARE INFORMATION
This rangehood system is designed to remove smoke, cooking
vapors and odors from the cooktop area.
For Best Results
Start the rangehood several minutes before cooking to develop proper
airflow. Allow the unit to operate for several minutes after cooking
is complete to clear all smoke and odors from the kitchen.


