background image

2

READ AND SAVE THESE  INSTRUCTIONS  BEFORE  YOU  START  

INSTALLING  THIS  RANGEHOOD

WARNING: - TO REDUCE THE RISK OF A RANGE TOP GREASE FIRE:  

a) Never leave surface units unattended at high settings. Boilovers cause smoking and 

greasy spillovers that may ignite.  Heat oils slowly on low or medium setting.  

b) Always turn hood ON when cooking at high heat or when flambeing food (i.e. Crepes 

Suzette, Cherries Jubilee, Peppercorn Beef Flambé).  

c) Clean ventilating fans frequently.  Grease should not be allowed to accumulate on fan 

or filter.  

d) Use proper pan size.  Always use cookware appropriate for the size of the surface element.

WARNING: - TO REDUCE THE RISK OF INJURY TO PERSONS IN THE EVENT OF A 

RANGE TOP GREASE FIRE, OBSERVE THE FOLLOWING*:  

a) SMOTHER FLAMES with a close-fitting lid, cookie sheet, or metal tray, then turn off the burner.  

BE CAREFUL TO PREVENT BURNS.  If the flames do not go out immediately EVACUATE 

AND CALL THE FIRE DEPARTMENT.  

b) NEVER PICK UP A FLAMING PAN - You may be burned.  

c) DO NOT USE WATER, including wet dishcloths or towels - a violent steam explosion will 

result.

d) Use an extinguisher ONLY if: 

    1.  You know you have a Class ABC extinguisher, and you already know how  to operate it.  

    2.  The fire is small and contained in the area where it started.  

    3.  The fire department is being called.  

    4.  You can fight the fire with your back to an exit.

* Based on "Kitchen Firesafety Tips" published by NFPA

WARNING - TO REDUCE THE RISK OF FIRE OR ELECTRIC SHOCK, do not use this 

fan with any solid-state speed control device.

WARNING - TO REDUCE THE RISK OF FIRE, ELECTRICAL SHOCK, OR INJURY TO 

PERSONS, OBSERVE THE FOLLOWING:  

1.  Use this unit only in the manner intended by the manufacturer. If you have any 

questions, contact the manufacturer.

2.  Before servicing or cleaning unit, switch power off at service panel and lock the 

service disconnecting means to prevent power from being switched on acciden-

tally. When the service disconnecting means cannot be locked, securely fasten a 

prominent warning device, such as a tag, to the service panel.

CAUTION: For General Ventilating Use Only.  Do Not Use To Exhaust Hazardous  or  

Explosive Materials and Vapors.

WARNING - TO REDUCE THE RISK OF FIRE, ELECTRICAL SHOCK, OR INJURY TO 

PERSONS, OBSERVE THE FOLLOWING: 

1. 

Installation Work And Electrical Wiring Must Be Done By Qualified Person(s) In Accor

-

dance With All Applicable Codes And Standards, Including Fire-Rated Construction.  

2. 

Sufficient air is needed for proper combustion and exhausting of gases through 

the flue (chimney) of fuel burning equipment to prevent backdrafting. Follow the 

heating equipment manufacturer's guideline and safety standards such as those 

published by the National Fire Protection Association (NFPA), and the American 

Society for Heating, Refrigeration and Air Conditioning Engineers (ASHRAE), and 

the local code authorities.

Summary of Contents for DAMA30SSV

Page 1: ...DAMA30SSV DAMA36SSV Installation Instructions Use and Care Information Instructions d installation Utilisez et d entretien Instrucciones de instalaci n Informaci n de uso y cuidado DAMA...

Page 2: ...with your back to an exit Based on Kitchen Firesafety Tips published by NFPA WARNING TO REDUCE THE RISK OF FIRE OR ELECTRIC SHOCK do not use this fan with any solid state speed control device WARNING...

Page 3: ...DO NOT terminate the ductwork in an attic or other enclosed space DO NOT use 4 laundry type wall caps Flexible type ductwork is not recommended DO NOT obstruct the flow of combustion and ventilation a...

Page 4: ...or grounding circuit could result in electrical shock Check with a qualified electrician if you are in doubt as to whether the rangehood is properly grounded Failure to follow electrical requirements...

Page 5: ...5 RANGEHOOD DIMENSIONS Min 24 29 1 2 35 7 8 Min 30...

Page 6: ...Qty Documentation 1 Instruction Manual Available Accessories Parts needed 6 Round Metal ductwork Direct Connect Wiring Box sku WIREBOX High Ceiling Chimney Kit Upper and Lower Chimney Flue to replace...

Page 7: ...Ducted Venting Installation I Remove the filters one at a time supporting them with one hand and turning the safety knobs pull and turn 1 Choose your ducting method Non Ducted Recirculation Ducted Ve...

Page 8: ...ertical reference line and mark the wall at the centers of the holes in the bracket Place the second bracket 7 2 1 on the wall as shown below the first bracket at the height of the upper chimney secti...

Page 9: ...wo screws Hookthehoodbodyontothehoodbody fixingscrews 9 Install Roof or Wall Cap purchased separately Con nect the 6 metal ductwork to the Roof or Wall Cap and then attach ductwork Vertical or Horizon...

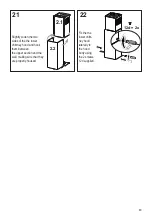
Page 10: ...brackets 7 2 1 making sure that they are well seated Secure the sides to the brackets by using the 2 screws 12b 12a N 2x 2 2 2 1 14 Slightly widen the two sides of the the lower chimney hood and hook...

Page 11: ...ind the brackets and connect to the Ductless Diverter mak ing sure that they are well seated 15 16 12a Only for the recirculation version connect the hood to the Air outlet Fix the lower Bracket 7 2 1...

Page 12: ...tric shock Consult a qualified electrician if the grounding instructions are not completely understood or if doubt exists as to whether the appliance is properly grounded Do not use an extension cord...

Page 13: ...the two sides of the the lower chimney hood and hook them between the upper section and the wall making sure that they are properly housed Fix the the lower chim ney hood laterally to the hood body us...

Page 14: ...off function which will keep the fan on for 15 minutes and automatically shut off T2 Fan settings buttons Low speed T3 Fan settings buttons Medium speed T4 Fan settings buttons High speed Intensive s...

Page 15: ...e install ing back in hood Replacing Activated Charcoal Filter The filter is not washable and cannot be regenerated and must be replaced approximately every 4 months of operation ormorefrequentlyforpa...

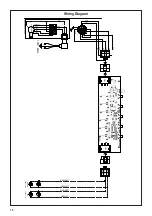
Page 16: ...16 Wiring Diagram 120V 60Hz...

Page 17: ...om accident alteration misuse abuse fire flood acts of God improper installation installation not in accordance with electrical or plumbing codes or Faber documentation or use of products not approved...

Page 18: ...nevoiedesortiesetrouvederri revouspendantquevous teignezlesflammes D apr sleguide KitchenFiresafetyTips publi parlaNFPAaux tats Unis AVERTISSEMENT POURR DUIRELERISQUED INCENDIEOUDECHOC LECTRIQUE n uti...

Page 19: ...ou un autre endroit ferm N UTILISEZ PAS un clapet de s cheuse mural de 4 po Il n est pas recommand d utiliser des conduits flexibles N ENTRAVEZ PAS le flux de l air de combustion et de ventilation Le...

Page 20: ...sible dans le circuit neutre ou de mise la terre peut entra ner un choc lectrique Consultez un lectricien qualifi si vous n tes pas certain de la mise la terre de la hotte Le non respect des exigences...

Page 21: ...21 DIMENSIONS DE LA HOTTE Min 24 29 1 2 35 1 2 Min 30...

Page 22: ...onibles Pi ces requises Conduit m tallique 6 circulaire Bo tier de connexion directe No d article WIREBOX Trousse de chemin e pour plafonds hauts Conduit de chemin e sup rieur et inf rieur pour rempla...

Page 23: ...canalis e uniquement Retirez les filtres un un en les soutenant d une main et en tournant les boutons de s curit tirez vers vous et tournez 1 Choisissez la m thode de canalisation Recyclage sans cana...

Page 24: ...entre encoche avec la ligne de r f rence verticale Marquez l emplacement du centre des trous du support sur le mur Attention Si la position de la deuxi me bride 7 2 1 sous la premi re bride se trouve...

Page 25: ...vis de fixation du b ti de la hotte 9 Installez le clapet de toiture ou le cla pet mural achet s par ment Rac cordez le conduit m tallique de 6 au clapet de toiture ou au clapet mural puis raccordez l...

Page 26: ...2 1 en vous assurant qu ils sont solidement ancr s Fixez les c t s aux brides l aide des 2 vis 12b 12a N 2x 2 2 2 1 14 cartez l g rement les deux c t s de la section inf rieure de la chemin e de hotte...

Page 27: ...er ri re les brides et raccordez le d flecteur de re cyclage en vous assurant qu ils sont solidement ancr s 15 16 12a Pour la version recyclage d air uniquement branchez la hotte la sortie d air Fixez...

Page 28: ...si vous ne comprenez pas parfaitement les instructions de mise la terre ou si vous avez des doutes quant la mise la terre de l appareil N utilisez pas de rallonge Si le cordon d alimentation est trop...

Page 29: ...inf rieure de la chemin e de hotte et assemblez les entre la section sup rieure et le mur en vous assur ant qu ils sont correcte ment install s Fixez la section inf rieure de la chemin e de hotte lat...

Page 30: ...ivation retard e qui teindra automatiquement le ventilateur apr s 15 minutes de marche T2 Boutons de r glage du ventilateur vitesse r duite T3 Boutons de r glage du ventilateur vitesse moyenne T4 Bout...

Page 31: ...a r installation dans la hotte Remplacement du filtre charbon actif Lefiltren estpaslavableetnepeutpas trer g n r Ildoit tre remplac environ tous les 4 mois d utilisation ou plus souvent en cas d util...

Page 32: ...32 Sch ma de c blage 120V 60Hz...

Page 33: ...es d coulant d un accident d une modification de l utilisation incorrecte ou abusive d un incendie d une inondation d un cas de force majeure d une installation inad quate d une installation non confo...

Page 34: ...go con la espalda dirigida hacia una salida Basado en Consejos para luchas contra los incendios en las cocinas publicado por NFPA ADVERTENCIA PARAREDUCIRELRIESGODEDESCARGASEL CTRICASOINCEN DIOS no use...

Page 35: ...combusti n y ventilaci n El incumplimiento de los requisitos de ventilaci n puede provocar un incendio ADVERTENCIA REQUISITOS DE VENTILACI N Determinequ m tododeventilaci nesmejorparasuaplicaci n Elc...

Page 36: ...para que el aparato pueda moverse si es necesario realizar alg n tipo de mantenimiento En cada extremo del cable de alimentaci n en el aparato y en la caja de empalmes debe encontrarse un conector de...

Page 37: ...37 DIMENSIONES DE LA CAMPANA Min 24 29 1 2 35 1 2 Min 30...

Page 38: ...ciones Accesorios disponibles Piezas necesarias conductomet licoredondode6 Caja de cableado de conexi n directa sku WIREBOX Kit de chimenea de techo alto Chimenea superior e inferior para reemplazar l...

Page 39: ...ci n de ventilaci n con conductos Retire los filtros de a uno por vez sosteni ndolos con una mano y girando las perillas de seguridad tire y gire 1 Elija su m todo de conducci n Requiere compra de acc...

Page 40: ...n la l nea de referencia vertical y marque la pared en el centro del agujeros en el soporte Coloque el segundo soporte 7 2 1 en la pared como se muestra debajo del primer soporte a la altura de la sec...

Page 41: ...en los tornillos de fijaci n del cuerpo de la campana 9 Instale el techo o la tapa de pared comprados por separado Conecte los conductos met licos de 6 al techo o a la tapa de pared y luego conecte lo...

Page 42: ...r tes 7 2 1 asegur n dose de que est n bien asentados Asegure los lados a los soportes con los 2 tornillos 12b 12a N 2x 2 2 2 1 14 Agrande ligeramente los dos lados de la campana de la chimenea inferi...

Page 43: ...de los soportes y con ctelos al desviador sin conducto ase gur ndose de que est n bien asentados 15 16 12a Solo para la versi n de recirculaci n conecte la campana a la salida de aire Fije el soporte...

Page 44: ...a un electricista calificado si las instrucciones de conexi n a tierra no se comprenden completamente o si existe una duda acerca de si el equipo est correctamente conectado a tierra No utilice un cab...

Page 45: ...e la campana de la chimenea inferior y eng nchelos entre la secci n superior y la pared asegur ndose de que est n debidamente alojados Fije la campana inferior de la chimenea lateralmente al cuerpo de...

Page 46: ...antendr el ventilador encendido durante 15 minutos y se apagar autom ticam ente T2 Botones de ajuste del ventilador velocidad baja T3 Botones de ajuste del ventilador velocidad media T4 Botones de aju...

Page 47: ...despu s de la limpieza Reemplazo del filtro de carb n activado El filtro no es lavable no puede ser regenerado y debe ser reemplazadoaproximadamentecada4mesesdeoperaci n o m s frecuentemente con uso i...

Page 48: ...48 Diagrama de cableado 120V 60Hz...

Page 49: ...r est n garantizados contra cualquier defecto de materiales o mano de obra para el comprador original por un per odo de 1 a o a partir de la fecha de compra original requiere prueba de compra Esta gar...

Page 50: ......

Page 51: ......

Page 52: ...991 0559 780_07 190730 D00005160_06...

Reviews: