15
Installation
Connect the Water Supply
The e-MatriX fireplace is equipped with the following
water overflow protections:
•
Electromechanical valve in the control
box activated by an overflow sensor in the
water tank.
•
Absorption valve activated by an overflow sensor
in the water sump.
To connect the water supply:
1.
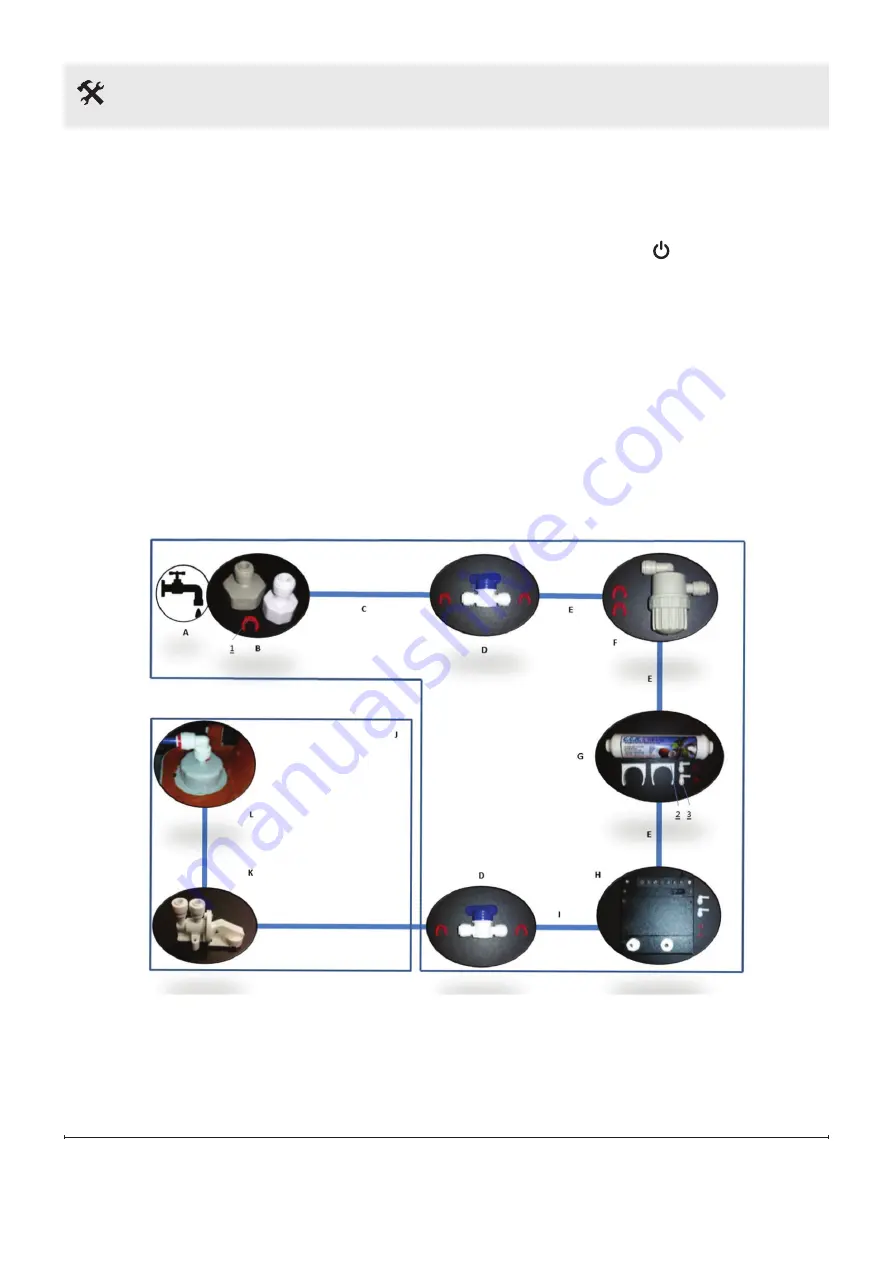
Connect all water supply components according
to the diagram shown below. All parts are included
with the product.
2.
Place the water filters at an accessible location
in correct alignment. Follow the “flow” direction
markings on the filters and control box.
!
NOTE:
C
heck all connections for water leakage
before placing the fuel bed and front glass.
Check Water Connections for Leaks
1.
Make sure all ball valves are open.
2.
Turn on the water supply.
3.
Press the Main switch [ ] on the control box to
the ON position.
•
If the water level is high enough, the flames will
automatically start after 45 sec.
•
If the water level is not high enough the LEDs will
blink twice after 45 sec. Press the Main switch to
the OFF position, wait 5 sec and repeat the step
above. (This process may need to be repeated
several times).
4.
Make sure all water connections are tight and do
not leak.
e-MatriX Engine
A = Mains Water
E = To be cut from ¼” 1m pipe
I = ¼” 1.5m Pipe
B = ½ or ¾” Connector
F = Mesh Filter
J = e-MatriX engine
C = ¼” 1m Pipe
G = In-line Filter
K = Absorption Valve. User does not need to connect.
Reference for service only.
D = Ball Valve
H = Control Box
L = Fill Cap. User does not need to connect.
Reference for service only.
1 = Safety Clips (11x)
2 = In-line Filter Brackets (2x)
3 = Elbows (4x)


