background image

3

  1. SAFETY

INFORMATION

For your safety and correct 

operation of the appliance, 

read this manual carefully before 

installation and use. Always 

keep these instructions with the 

appliance even if you move or 

sell it. Users must fully know 

the operation and safety features 

of the appliance.

 The wire connection has to 

be done by specialized 

technician.

• The manufacturer will not be

held liable for any damages

resulting from incorrect or

improper installation.

• The minimum safety distance

between the cooker top and

the extractor hood is 650 mm

(some models can be installed

at a lower height, please refer

to the paragraphs on working

dimensions and installation).

•  If the instructions for installation 

of the gas hob specify a

greater distance, this must be

respected.

• Check that the mains voltage

corresponds to that indicated

RQWKHUDWLQJSODWH¿[HGWRWKH

inside of the hood.

• Means for disconnection must

EH LQFRUSRUDWHG LQ WKH ¿[HG

wiring in accordance with the

wiring rules.

• For Class I appliances, check

that the domestic power supply 

guarantees adequate earthing.

• Connect the extractor to the

H[KDXVWÀXHWKURXJKDSLSHRI

minimum diameter 120 mm.

7KHURXWHRIWKHÀXHPXVWEH

as short as possible.

• Regulations concerning the

discharge of air have to be

IXO¿OOHG

• Do not connect the extractor

hood to exhaust ducts carrying

combustion fumes (boilers,

¿UHSODFHVHWF

• If the extractor is used in

conjunction with non-electrical

appliances (e.g. gas burning

DSSOLDQFHVDVXI¿FLHQWGHJUHH

of aeration must be guaranteed 

in the room in order to prevent

WKH EDFNÀRZ RI H[KDXVW JDV

When the cooker hood is used

in conjunction with appliances

supplied with energy other than 

electric, the negative pressure

in the room must not exceed

0,04 mbar to prevent fumes

being drawn back into the room 

by the cooker hood.

•  The air must not be discharged

LQWR D ÀXH WKDW LV XVHG IRU

exhausting fumes from

appliances burning gas or

other fuels.

• If the supply cord is damaged,

it must be replaced from the

manufacturer or its service

agent.

• Connect the plug to a socket

complying with current

regulations, located in an

EN

27

Summary of Contents for FABULA PLUS BK 90

Page 1: ...EN COOKER HOOD MK AL KAPAK TENXHERE BG SR RU...

Page 2: ...EN USER MANUAL 3 27 RU 42 33 d BG 89 3 SR 104 9 MK 97 15 AL UDH ZUES P R P RDORIMIN 101 21...

Page 3: ...148 PEDU BG 3...

Page 4: ...149 4...

Page 5: ...150 12 4 kW 2 6 kW 1 kW 5 kW 1 9 kW 1 9 kW 11 5 kW 5 kW 1 75 kW 1 kW 1 75 kW 3 kW 16 6 kW 2 8 kW 4 6 kW 4 6 kW 4 6 kW 17 7 kW 4 9 kW 3 kW 3 8 kW 3 kW 3 kW 5...

Page 6: ...151 W Z 6...

Page 7: ...152 A B C D E F G H 7...

Page 8: ...153 5 9 8...

Page 9: ...172 PP PP PEDU SR 9...

Page 10: ...173 10...

Page 11: ...174 kW 2 6 kW 1 kW 5 kW 1 9 kW 1 9 kW kW 5 kW 1 75 kW 1 kW 1 75 kW 3 kW kW 2 8 kW 4 6 kW 4 6 kW 4 6 kW kW 4 9 kW 3 kW 3 8 kW 3 kW 3 kW 11...

Page 12: ...175 W Z 12...

Page 13: ...176 V A B C D E F G H 13...

Page 14: ...177 5 9 14...

Page 15: ...PP PP PEDU MK 15...

Page 16: ...161 16...

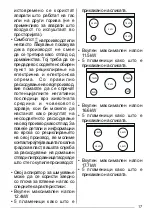
Page 17: ...162 12 4kW 2 6 kW 1 kW 5 kW 1 9 kW 1 9 kW 11 5kW 5 kW 1 75 kW 1 kW 1 75 kW 3 kW 16 6kW 2 8 kW 4 6 kW 4 6 kW 4 6 kW 17 7kW 17...

Page 18: ...163 4 9 kW 3 kW 3 8 kW 3 kW 3 kW W Z 18...

Page 19: ...164 A B OHG C D E F G H 19...

Page 20: ...165 9 5 20...

Page 21: ...r brenda aspiratorit Mekanizmat e ndarjes duhet Ws LQVWDORKHQ WHN LPSLDQWL NV n p rputhje me normativat e sistemeve t kabllimit P raparateteKlas sI kontrolloni q rrjeti i ushqimit t sht pis t ket nj l...

Page 22: ...n me aparatin Pastrimi e mir mbajtja nga ana e p rdoruesit nuk duhet t b hen nga f mij t p rve rasteve kur jan t kontrolluar Kontrollonif mij t dukeusiguruar q t mos luajn me aparatin Ky aparat nuk du...

Page 23: ...rgjithshme 16 6kW YDWUD VL Qs JXUs 2 8 kW 4 6 kW 4 6 kW 4 6 kW Fuqia maksimale e p rgjithshme 17 7kW YDWUD VL Qs JXUs 4 9 kW 3 kW 3 8 kW 3 kW 3 kW Shtrijeni t rhiqeni aparatin Rrezik aksidenti Rrezik...

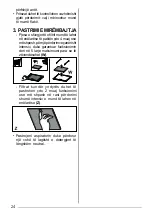
Page 24: ...n lar se t pakt n do 4 muaj ose m shpesh p rnj p rdorimve an risht intensiv duke garantuar funksionimin deri n 5 larje maksimumi para se t z vend sohet W Filtrat kund r yndyr s duhet t pastrohen do 2...

Page 25: ...QNVLRQRQ YHWsP PH GHUs Ws KDSXU 6KW SMD H VKNXUWsU NWLYL RQ VKSHMWsVLQs H NDWsUW XWRQL HG NV XQNVLRQRQ YHWsP PH GHUs Ws KDSXU 6KW SMD SUHM 6HNRQGDVK 0XQGsVRQ HT VKSHMWsVLQs QWHQVLYH MR VKSHMWsVL sVKWs...

Page 26: ...qehet me bateri prej 3 V t llojit CR2032 nuk p rfshihet Mos e vini telekomand n af r burimeve t nxeht sis Mos i hidhni baterit n mjedis dor zojini n vendet e caktuara p r k t q llim 6 NDRI IMI P r z v...

Page 27: ...ccordance with the wiring rules For Class I appliances check thatthedomesticpowersupply guaranteesadequateearthing Connect the extractor to the H KDXVW XH WKURXJK D SLSH RI minimum diameter 120 mm 7KH...

Page 28: ...not be made by children without supervision Children should be supervised to ensure that they do not play with the appliance The appliance is not to be used by persons including children withreducedph...

Page 29: ...ng the appliance Risk of injury Risk of jamming when retractingandextendingthe appliance Neverreachinto the moving area of the appliance while it is being retractedorextended Keep children at a safe d...

Page 30: ...ust be replaced W 7KH UHDVH OWHUV PXVW EH FOHDQHG every 2 months of operation or more frequently for particularly heavy usage and can be washed in a dishwasher Z Clean the hood using a damp cloth and...

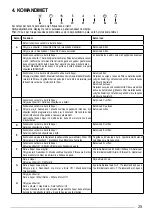
Page 31: ...NLQJ KRXUV C 2QO ZRUNV ZLWK WKH RRU 2SHQ 3UHVV EULH FWLYDWHV VSHHG IRXU L HG EXWWRQ 2QO ZRUNV ZLWK WKH RRU 2SHQ 3UHVV DQG KROG IRU VHFRQGV QDEOHV LVDEOHV WKH Intensive speed This VSHHG LV WLPHG WR UXQ...

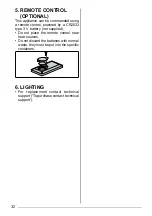
Page 32: ...owered by a CR2032 type 3 V battery not supplied Do not place the remote control near heat sources Do not discard the batteries with normal ZDVWH WKH PXVW EH SXW LQWR WKH VSHFL F containers 6 LIGHTING...

Page 33: ...67 RU 33...

Page 34: ...68 34...

Page 35: ...69 35...

Page 36: ...70 W Z 36...

Page 37: ...71 A B C D E F G H 37...

Page 38: ...72 5 38...

Page 39: ...LIMIT XMGHV 3DUD VH Ws YLMRQL PH LQVWDOLPLQ OH RQL LQIRUPDFLRQHW H VLJXULVs Qs 0DQXDOLQ H 3sUGRUXHVLW SQ INSTALLATION MANUAL Warning Before proceeding with installation read the safety information in...

Page 40: ...3 O C 2x E G 2x F C 6x 4x15 B 6x M4x8 A 12x 3 5x9 5 I1 2x 2 9x9 5 I E C 6x 4x15 B 6x M4x8 A 12x 3 5x9 5 40...

Page 41: ...4 1x 1x 150 120 150 120 W I I1 41...

Page 42: ...5 42...

Page 43: ...6 A B 109 mm 527 mm Min 30 Max 50 mm 1 2 43...

Page 44: ...7 A 4x F 2x 1 B 2x D 2x C 2x C 2x 2 3 4 44...

Page 45: ...8 B 4x A 4x F A 5 6 45...

Page 46: ...9 8x 1 8x 2 4 3 B 7 46...

Page 47: ...10 8 47...

Page 48: ...11 1 2 11 120 120 O 150 O I 1x 125 I1 2x 2 9x9 5 150 I 1x I1 2x 2 9x9 5 9 10 48...

Page 49: ...12 2 Z W 1 1 Z W W0 W 3 2 Z 49...

Page 50: ...991 0585 565_02 201028 D00005923_01 991 0585 564_01 190514 D000000005929_00...

Reviews: