background image

11

January 4, 2016 

FABER CONSUMER WARRANTY & SERVICE  

All Faber products are warranted against any defect in materials or workmanship for the original purchaser 
for a period of 1 year from the date of original purchase (requires proof of purchase).  This warranty covers 
labor and replacement parts.  Faber, at its option, may repair or replace the product or components 
necessary to restore the product to good working condition.  To obtain warranty service, contact the dealer 
from whom you purchased the range hood, or the local Faber distributor. If you cannot identify a local Faber 
distributor, contact us at (508) 358-5353 for the name of a distributor in your area. 

The following is not covered by Faber's warranty: 

1. Service calls to correct the installation of your range hood, to instruct you how to use your range hood, to 
replace or repair house fuses or to correct house wiring or plumbing. 
2. Service calls to repair or replace range hood light bulbs, fuses or filters. Those consumable parts are 
excluded from warranty coverage. 
3. Repairs when your range hood is used for other than normal, single-family household use. 
4. Damage resulting from accident, alteration, misuse, abuse, fire, flood, acts of God, improper installation, 
installation not in accordance with electrical or plumbing codes or Faber documentation, or use of products 
not approved by Faber. 
5. Replacement parts or repair labor costs for units operated outside the United States or Canada, including 
any non-UL or C-UL approved Faber range hoods. 
6. Repairs to the hood resulting from unauthorized modifications made to the range hood. 
7. Expenses for travel and transportation for product service in remote locations and pickup and delivery 
charges. Faber range hoods should be serviced in the home. 

THIS WARRANTY DOES NOT ALLOW RECOVERY OF INCIDENTAL OR CONSEQUENTIAL DAMAGES, INCLUDING, WITHOUT 
LIMITATION, DIRECT, INDIRECT, INCIDENTAL, SPECIAL OR CONSEQUENTIAL DAMAGES, PERSONAL INJURY/WRONGFUL 
DEATH OR LOST PROFITS FABER  WARRANTY IS LIMITED TO THE ABOVE CONDITIONS AND TO THE WARRANTY PERIOD 
SPECIFIED HEREIN AND IS EXCLUSIVE. EXCEPT AS EXPRESSLY SPECIFIED IN THIS AGREEMENT, FABER DISCLAIMS ALL 
EXPRESS OR IMPLIED CONDITIONS, REPRESENTATIONS, AND WARRANTIES INCLUDING, WITHOUT LIMITATION, ANY 
IMPLIED WARRANTIES OF MERCHANTABILITY OR FITNESS FOR A PARTICULAR PURPOSE

.

This warranty gives you specific legal rights that may vary from state to state. 

Model#: ______________________________                  Serial #: _____________________________ 

Summary of Contents for INSM28GR250-B

Page 1: ...INSM24GR250 B INSM28GR250 B Installation Instructions Use and Care Information Instructions d installation Utilisez et d entretien ...

Page 2: ...fire with your back to an exit Based on Kitchen Firesafety Tips published by NFPA WARNING TO REDUCE THE RISK OF FIRE OR ELECTRIC SHOCK do not use this fan with any solid state speed control device WARNING TO REDUCE THE RISK OF FIRE ELECTRICAL SHOCK OR INJURY TO PERSONS OBSERVE THE FOLLOWING 1 Use this unit only in the manner intended by the manufacturer 2 If you have any questions contact the manu...

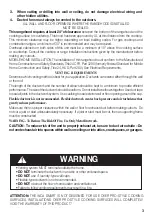
Page 3: ...ts may result in a fire WARNING VENTING REQUIREMENTS Determine which venting method is best for your application Ductwork can extend either through the wall or the roof The length of the ductwork and the number of elbows should be kept to a minimum to provide efficient performance Thesizeoftheductworkshouldbeuniform Donotinstalltwoelbowstogether Useducttape to seal all joints in the ductwork syste...

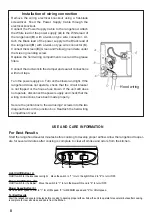
Page 4: ...copper cable Allow some slack in the cable so the appliance can be moved if servicing is ever necessary A UL Listed 1 2 conduit connector must be provided at each end of the power supply cable at the appliance and at the junction box When making the electrical connection cut a 1 1 4 hole in the wall A hole cut through wood must be sanded until smooth A hole through metal must have a grommet Electr...

Page 5: ...E VIEW LA PERSPECTIVE DE CÔTÉ FRONT VIEW LA PERSPECTIVE DE FRONT BOTTOM VIEW LA PERSPECTIVE DE BAS Standard Liner 36 Stainless LINE36ST designed for 36 wide installations Cadre Standard 36 Axier Inoxydable LINE36ST peut être employée les hottes encastrable sur mesure de 36 Standard Liner 30 Stainless LINE30ST designed for 30 wide installations Cadre Standard 30 Axier Inoxydable LINE30ST peut être ...

Page 6: ...uration of the custom wood hood See RANGEHOODDIMENSIONSAND LINER DIMENSIONS on Page 4 FOR INSTALLATIONS WITH LINERS PARTS SUPPLIED FOR INSTALLATION 1 Backdraft Damper 10 Screws Field Wiring Box 1 Literature Package PARTS NEEDED FOR INSTALLATION 2 Conduit Connectors Power Supply Cable Scews for Field Wiring Box 1 Wall or Roof Cap All Metal Ductwork OPTIONAL ACCESSORIES AVAILABLE Charcoal Filter Kit...

Page 7: ...located on either side 4 Fix the rangehood to the cabinet using the two spring loaded brackets one on each side of the rangehood B in FIGURE 4 Using a philips screwdriver tighten theadjustmentscrew CinFIGURE4 untilthebracketsadheretightlytothesurface For thicknesses of LESS than 3 4 the cabinet bottom and the spring loaded bracket 5 IMPORTANT FIGURE 4 6 Replace the bottom of the rangehoodand secur...

Page 8: ...hot detergent solution or washed in the dishwasher moved by pressing the handle of the filter as indicated in FIGURE 6 When replacing make sure that the filte with the handles in front and visible Clean exterior surfaces with hot soapy water Abrasives and scouring age finishes and should not be used to clean finished surfaces USE AND CARE INFORMATION This rangehood system is designed to remove smo...

Page 9: ...ximately every 4 months of operation or more frequently with heavy usage Remove the grease filters Remove the saturated carbon filter Fit the new filter by hooking it into its seating Replace the grease filters Replacing the bulbs E 14 Base 28 W halogen Remove the metal grease filters Replace the bulb with a new one of the same type Replace the metal grease filters EN fixing pin lever Remove greas...

Page 10: ... by pulling out the handles A in FIGURE 7 Unscrew the two RE 6 WIRING DIAGRAM This rangehood uses two 40W incandescent bulbs Electric Diagram Esquema Eléctrico Schéma Electrique Esquema Eléctrico Schema Elektrisch 991 0319 110 H90_237 r1 Wiring Diagram ...

Page 11: ...rom accident alteration misuse abuse fire flood acts of God improper installation installation not in accordance with electrical or plumbing codes or Faber documentation or use of products not approved by Faber 5 Replacement parts or repair labor costs for units operated outside the United States or Canada including any non UL or C UL approved Faber range hoods 6 Repairs to the hood resulting from...

Page 12: ...4 Unevoiedesortiesetrouvederrièrevouspendantquevouséteignezlesflammes D aprèsleguide KitchenFiresafetyTips publiéparlaNFPAauxÉtats Unis AVERTISSEMENT POURRÉDUIRELERISQUED INCENDIEOUDECHOCÉLECTRIQUE n utilisez jamaisceventilateurenassociationavecundispositifderéglagedevitesseàsemi conducteurs AVERTISSEMENT POURRÉDUIRELESRISQUESD INCENDIE DECHOCÉLECTRIQUEOUDE BLESSURECORPORELLE RESPECTEZLESINSTRUCTI...

Page 13: ...deuxcoudesensemble Utilisezunrubanpourcanalisationsafindescellertouslesjointsdusystèmedeconduits Utilisezuncalfeutrage pourscellerlesouverturesdanslemurextérieurouleplancher autourduclapet Iln estpasrecommandéd utiliserdesconduitsflexibles Lesconduitsflexiblesprovoquentunecontre pression etdelaturbulencequidiminuentgrandementl efficacitédel appareil Assurez vousquel espacelibredanslemurouleplanche...

Page 14: ... permettre le déplacement de l appareil si des travaux d entretien s avéraient nécessaires Un raccord de conduit homologué par l UL de 1 2 doit être installé aux deux extrémités du câble d alimentation au niveau de l appareil et de la boîte de liaison Lors de la réalisation du branchement électrique réalisez un trou de 1 1 4 dans le mur S il s agit d un trou dans le bois il doit être poncé pour le...

Page 15: ...E VIEW LA PERSPECTIVE DE CÔTÉ FRONT VIEW LA PERSPECTIVE DE FRONT BOTTOM VIEW LA PERSPECTIVE DE BAS Standard Liner 36 Stainless LINE36ST designed for 36 wide installations Cadre Standard 36 Axier Inoxydable LINE36ST peut être employée les hottes encastrable sur mesure de 36 Standard Liner 30 Stainless LINE30ST designed for 30 wide installations Cadre Standard 30 Axier Inoxydable LINE30ST peut être ...

Page 16: ...eurs de conduit Câble d alimentation Vis pour compartiment de filage 1 Capuchon de mur ou de toit Conduit en métal ACCESSOIRES POUR L INSTALLATION Filtres au Charbon Pour installations sans conduit part FILTER4 Cadres 16 17 7 8 prof ajustable Cadre Standard 30 part LINE30ST Cadre Standard 36 part LINE36ST HOTTE ENCASTRABLE CADRE STANDARD INCA SMART AVERTISSEMENT En constuisant une hotte encastrabl...

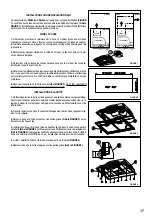
Page 17: ...eter la boîte 2 Placer le registre rond dans l ouverture d échappement de la hotte et appuyer forte ment sur le registre 3 Retirer le bas de la hotte en tirant sur les pattes grises A de la FIGURE 3 qui se trouvent sur les deux côtés 4 Installerlahottesurl armoireàl aidededeuxfixationsàressort unedechaquecôté delahotte BdelaFIGURE 4 UtiliseruntournevisPhillipsetserrerlavisdereglement CdelaFIGURE4 ...

Page 18: ...requently in hot detergent solution or washed in the dishwasher moved by pressing the handle of the filter as indicated in FIGURE 6 When replacing make sure that the filte with the handles in front and visible Clean exterior surfaces with hot soapy water Abrasives and scouring age finishes and should not be used to clean finished surfaces USE AND CARE INFORMATION This rangehood system is designed ...

Page 19: ... être régénérés Ils doivent être remplacés environ tous les 4 mois d utilisation ou plus souvent en cas d utilisation intensive Retirez les filtres à graisse Retirez le filtre à charbon saturé Posez le nouveau filtre en l installant à son emplacement Replacez les filtres à graisse Remplacement des ampoules Halogène 28 W avec culot E14 Retirez les filtres à graisse métalliques Remplacez l ampoule a...

Page 20: ...by pulling out the handles A in FIGURE 7 Unscrew the two RE 6 WIRING DIAGRAM This rangehood uses two 40W incandescent bulbs Electric Diagram Esquema Eléctrico Schéma Electrique Esquema Eléctrico Schema Elektrisch 991 0319 110 H90_237 r1 Schéma de câblage ...

Page 21: ...ages découlant d un accident d une modification de l utilisation incorrecte ou abusive d un incendie d une inondation d un cas de force majeure d une installation inadéquate d une installation non conforme aux codes en matière d électricité ou de plomberie ou à la documentation fournie par Faber ou encore d une utilisation du produit non approuvée par Faber 5 Les frais de main d œuvre ou de rempla...

Page 22: ......

Page 23: ......

Page 24: ...991 0457 357_07 190206 D00002842_06 ...

Reviews: