Version 3/15 - Page 13
PRODUCT INSTALLATION CONTINUED
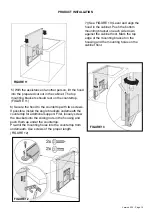
FIGURE 14
FIGURE 15
8) Remove the screws from the countertop
and lift the hood back out of the cabinet.
Pre-drill the marked mounting holes in the
cabinet floor.
9) Tighten the mounting brackets on the
hood at the pre-marked positions
10) Lay the hood on the floor on a
protected surface to prevent damage in
order to install the motor. At this point
the ductwork venting direction should be
decided (thru the floor, right, left or thru the
rear of the cabinet).
IF USING A REMOTE BLOWER, TURN
TO "REMOTE BLOWER INSTALLATION
ON PAGE 15
- See FIGURE 14 for venting left, right or down.
Disconnect the cable from inside the hood. Plug
in that same cable from the hood into the motor
kit.
- Turn the venting collar on the blower box to the
desired direction - left, right or down.
- Mount the blower box to the housing using 4
screws (FIGURE 15)
Continue to Page 14 for Electrical
Connections
INSTALLING IBDD600
-B
IN FRONT OF THE HOOD
•
Cut
the cable both internally and externally to
the metallic case.
Disconnect the connector from the blower.
Throw away the two pieces of cable.
Use the cable from the hood to power the
motor.
•
•
•


