background image

Version 3/13 - Page 1

SCIROCCO PLUS

Downdraft Range hood 

Internal or Remote Blower

• Installation Instructions

• Use and Care Information

READ  THESE  INSTRUCTIONS  BEFORE  YOU  START  INSTALLING  THIS  RANGE HOOD

WARNING: - TO REDUCE THE RISK OF A RANGE TOP GREASE FIRE:  

a) Never leave surface units unattended at high settings. Boilovers cause smoking and greasy spillovers that may ignite. 

Heat oils slowly on low or medium setting. 

b) Always turn hood ON when cooking at high heat or when flambeing food 

(i.e. Crepes Suzette, Cherries Jubilee, Peppercorn Beef Flambé). 

c) Clean ventilating fans frequently. Grease should not be allowed to accumulate on fan or filter. 

d) Use proper pan size. Always use cookware appropriate for the size of the surface element. 

WARNING: - TO REDUCE THE RISK OF INJURY TO PERSONS IN THE EVENT OF A RANGE TOP GREASE FIRE, OBSERVE 

THE FOLLOWING (*): 

a) SMOTHER FLAMES with a close-fitting lid, cookie sheet, or metal tray, then turn off the burner. 

BE CAREFUL TO PREVENT BURNS. If the flames do not go out immediately EVACUATE AND CALL THE 

FIRE DEPARTMENT. 

b) NEVER PICK UP A FLAMING PAN - You may be burned. 

c) DO NOT USE WATER, including wet dishcloths or towels - a violent steam explosion will result. 

d) Use an extinguisher ONLY if: 


1) You know you have a Class ABC extinguisher, and you already know how to operate it. 


2) The fire is small and contained in the area where it started. 


3) The fire department is being called. 


4) You can fight the fire with your back to an exit.(*) Based on “Kitchen Firesafety Tips” published by NFPA.

ALL  WALL  AND  FLOOR  OPENINGS  WHERE  THE  Range Hood  IS  INSTALLED  MUST  BE  SEALED.

CAUTION: TO REDUCE THE RISK OF FIRE AND ELECTRIC SHOCK, Install This Range hood Only With Remote Blower Models Rated Maximum 

2.8 A suitable for use with solid state speed controls.

Consult the cooktop or range installation instructions given by the manufacturer before making any cutouts. 

LISEZ  BIEN  CETTE  FICHE  AVANT  D'INSTALLER  LA  HOTTE

AVERTISSEMENT - POUR MINIMISER LE RISQUE D’UN FEU DE GRAISSE SUR LA TABLE DE CUISSON : a) Ne jamais laisser 

un élément de la table de cuisson fonctionner sans surveillance à la puissance de chauffage maximale; un renversement/

débordement de matière graisseuse pourrait provoquer une inflammation et le génération de fumée. Utiliser toujours une 

puissance de chauffage moyenne ou basse pour le chauffage d’huile. b) Veiller à toujours faire fonctionner le ventilateur 

de la hotte lors d’une cuisson avec une puissance de chauffage élevée ou lors de la cuisson d’un mets à flamber (i.e. 

Crepes Suzette, Cherries Jubilee, Peppercorn Beef Flambé).  c) Nettoyer fréquemment les ventilateurs d’extraction. Veiller 

à ne pas laisser de la graisse s’accumuler sur les surfaces du ventilateur ou des filtres. d) Utiliser toujours un ustensile 

de taille appropriée. Utiliser toujours un ustensile de taille adapté à la taille de l’élément chauffant.
AVERTISSEMENT: - POUR PRÉVENIR LES BLESSURES EN CAS DE FEU SUIVRE LES RECOMMANDATIONS SUIVANTES  

(

*)

:  a) ÉTOUFFEZ LE FEU avec un couvercle métallique et fermez le brûleur.  Si le feu ne s'éteint pas tout de suite, QUIT-

TEZ LES LIEUX ET APPELEZ LES POMPIERS.  b) NE TOUCHEZ JAMAIS UNE CASSEROLE EN FLAMMES.  c) N'UTILISEZ 

JAMAIS DE L'EAU ou un torchon mouillé pour éteindre le feu - ce qui pourrait causer une explosion de vapeur.  d) N'utilisez 

un extincteur que si: 1.  Vous avez un modèle ABC et vous connaissez bien son mode d'emploi.  2.  Le feu est petit et peu 

répandu.  3.  Les pompiers sont déjà prévenus.  4.  Vous avez une sortie derrière vous. (*) Basé sur la "cuisine Firesafety 

incline" édité par NFPA.

TOUTE  OUVERTURE  DANS  LE  MUR  OU  LE  PLANCHER  À  PROXIMITÉ  DE  LA  HOTTE  DOIT ÊTRE SCELLÉ

AVERTISSEMENT: POUR RÉDUIRE LE RISQUE D'INCINDIE ET DE CHIC ÉLEXTRIQUE, prière d’installer cette hotte uniquement avec un 

aspirateur détaché maximum 2.8 A apte à l’utilisation avec un dispositif de réglaeg de vitesse à semiconducteurs.

Consultez la fiche technique avant de découper les armoires.  

READ  AND  SAVE  THESE  INSTRUCTIONS

The Installer must leave these instructions with the 

homeowner.    The  homeowner  must  keep  these 

instructions for future reference and for local electrical 

inspectors' use.

Summary of Contents for SCIROCCO PLUS

Page 1: ...AVERTISSEMENT POURMINIMISERLERISQUED UNFEUDEGRAISSESURLATABLEDECUISSON a Nejamaislaisser un l ment de la table de cuisson fonctionner sans surveillance la puissance de chauffage maximale un renverseme...

Page 2: ...each end of the power supply cable at the appliance and at the junction box Whenmakingtheelectricalconnection cuta11 4 holeinthe wall A hole cut through wood must be sanded until smooth A hole throug...

Page 3: ...cipaux Afind obtenirunrendementmaximalencequiatrait lacombustion ainsi qu l vacuation des gaz par la conduite de chemin e une bonnea rationestn cessairepourtouslesappareils combustion Suivez les conse...

Page 4: ...he box with the downdraft package and must be attached over the opening of the front back of the downdraft blower box Remote blower can be mounted on either an outside wall or the roof of the home CAL...

Page 5: ...4 FIGURE 3 Dimensions with IBDD600 Internal blower box The blower box can be mounted in such a way that the vent collar is aligned to the left the right downwards or towards the rear as desired FIGUR...

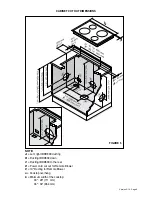
Page 6: ...36 30 36 FIGURE 5 NOTE A Left right IBDD600 ducting B Ducting IBDD600 down C Ducting IBDD600 to the rear D Power cord cut out for Remote Blower E 10 Ducting for Remote Blower a Cooktop overhang b Min...

Page 7: ...installing the exhaust ducting to the front appropriate clearances must be maintained in the cabinet INSTALLATION NOTES The specified dimensions minimum cut out dimensions must be observed If an oven...

Page 8: ...irocco Plus Right Side of the diagram shows the IBDD600 mounted behind the Scirocco Plus The blower must be accessible to install the ductwork Note When using with cooking applainces other than cook t...

Page 9: ...co Plus Right side of the diagram shows the remote blower ducting to the rear of the Scirocco Plus Note that the back must be accessible to install ductwork Note Whenusingwithcookingapplaincesother th...

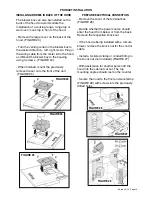
Page 10: ...must not be installed in an area where there are strong drafts for instance near windows doors etc 2 Remove the 10 round connection plate from the front of the downdraft FIGURE 9 3 Put the top mounti...

Page 11: ...untertop for additional support First loosely screw the brackets into the sliding nuts in the housing and push them up under the countertop Pre drill the mounting holes into the countertop from undern...

Page 12: ...motor At this point the ductwork venting direction should be decided thru the floor right left or thru the rear of the cabinet IF USING A REMOTE BLOWER TURN TO REMOTE BLOWER INSTALLATION ON PAGE 15 S...

Page 13: ...the front of the hood using two screws while positioning the vent collar in the opening of the cover FIGURE 18 FIGURE 18 Disconnect the cable from inside the hood Plug in that same cable from the hoo...

Page 14: ...nt the previously removed cover onto the front of the unit FIGURE 25 FIGURE 23 FIGURE 24 FIGURE 25 PREPARE ELECTRICAL CONNECTION Remove the cover of the terminal box FIGURE 26 Decide whether the power...

Page 15: ...t 6 round ducting to the unit FIGURE 29 REMOTE BLOWER INSTALLATION When using the remote blower a connection plate must be installed on the hood instead of a blower box It can be mounted to the front...

Page 16: ...owndraft vent fuse located under the power board 4 Connect the vent system to 6 IBDD600 blower or 10 remote blowers round vent collar plate Position the vent to avoid wall studs and floor joists Compl...

Page 17: ...into the knock out Connect the home power into the box as described on the previous page Using FIGURE 34 as a guide connect the remote blower wiring as follows into the downdraft box Blue on the righ...

Page 18: ...ft vent you must turn the downdraft vent off immediately It is possible to cause damage to the downdraft vent if water is allowed inside the downdraft vent while it is operating Please follow these st...

Page 19: ...of the downdraft vent 2 Place fingertips into the embossment at the top of the filters and push down and back to allow the top tabs to snap in place NOTE Downdraft vent will not operate if the filters...

Page 20: ...mbing 2 Service calls to repair or replace range hood light bulbs fuses or filters Those consumable parts are excluded from warranty coverage 3 Repairs when your range hood is used for other than norm...

Page 21: ...hotte Dessinez la fois la table de cuisson et des d coupes hotte sur le comptoir avant de faire des coupures V rifier qu il ya assez de place dans l armoire pour les deux Le non respect de ces consig...

Page 22: ...du ventilateur La bo te de ventilateur peut tre mont dans de telle sorte que la collerette d vacuation est align s sur la gauche la droite vers le bas ou vers l arri re comme vous le souhaitez FIGURE...

Page 23: ...e droite IBDD600 conduits B Canalisation IBDD600 bas C Canalisation IBDD600 l arri re D Cordon d alimentation taill pour la soufflerie t l commande E 10 Conduits pour soufflerie distance un surplomb T...

Page 24: ...Si vous installez le conduits d chappement l avant les autorisations appropri es doivent tre maintenu dans l armoire REMARQUES SUR L INSTALLATION Le minimum sp cifi les dimensions d coup es dimensions...

Page 25: ...diagramme montre la IBDD600 mont derri re le plus Scirocco Le ventilateur doit tre accessible installer le r seau de conduits Remarque Lors de l utilisation avec applainces de cuissonautresquetablesd...

Page 26: ...t du diagramme montre la soufflerie distance conduits l arri re de la plus Scirocco Notez que l arri re doit tre accessible installer les conduits Remarque Lors de l utilisation avec applainces de cui...

Page 27: ...doit pas tre install dans une zone o il ya des courants forts par exemple pr s des fen tres portes etc 2 Retirez le 10 plaque de raccordement ronde l avant de l courant descendant FIGURE 9 3 Mettre l...

Page 28: ...ire Tout d abord visser sans serrer les supports dans les crous coulissants dans le logement et les pousser sous le comptoir Pr percer les trous de montage dans le comptoir de en dessous Utilisez des...

Page 29: ...tion conduits devrait tre d cid par l entremise du sol droite gauche ou travers l arri re de l armoire SI VOUS UTILISEZ UN soufflerie distance se tourner vers VENTILATEUR Installation distance sur PAG...

Page 30: ...7 Monter le ventilateur l avant de la hotte l aide de deux vis tout en positionnant la bague de ventilation dans l ouverture du couvercle FIGURE 18 FIGURE 18 Branchez le c ble lectrique de la hotte da...

Page 31: ...avez termin montez le pr alable capot retir sur l avant de l unit FIGURE 25 FIGURE 23 FIGURE 24 FIGURE 25 PR PARER BRANCHEMENT ELECTRIQUE Retirer le couvercle de la bo te bornes FIGURE 26 D cider si l...

Page 32: ...e 35 figure 36 Raccorder 6 Conduit rond l unit FIGURE 29 DISTANCE INSTALLATION DE LA SOUFFLERIE Lorsque vous utilisez la soufflerie distance une plaque de connexion doit tre install sur le capot au li...

Page 33: ...itu e sous la carte de puissance 4 Branchez le syst me de ventilation 6 IB DD600 ventilateur ou 10 soufflerie t l com mande conduit rond collerette Positionner l vent pour viter les montants du mur et...

Page 34: ...s raccords de conduit dans le knock out Branchez l alimentation domicile dans la zone telle que d crite la page pr c dente En utilisant la figure 34 comme un guide connecter le c blage du ventilateur...

Page 35: ...e d extraction vous devez ac tiver le syst me d extraction imm diatement Il est possible de causer des dommages l I appareil si l eau est autoris s l int rieur du syst me d extraction alors qu il est...

Page 36: ...le bossage au sommet des filtres et pousser vers le bas et le dos pour permettre aux languettes sup rieures enclencher en place REMARQUE I appareil ne fonctionne pas si les filtres ne sont pas dans l...

Page 37: ...les fusibles de votre maison ou pour corriger votre c blage ou votre syst me de plomberie 2 Les appels de service pour remplacer ou r parer les ampoules les fusibles ou les filtres de votre hotte de...

Reviews: