background image

11

15

14

Replace the grease filters removed 

previously.

Direct Connect Wiring Box 

Accessory sku # WIREBOX 

(purchased separately)

Created by 

-

Denomination

-

Lang 

EN

Sheet 

1/1

Modif.by 


Approved by 

Approval date 

Doc. status 

Drawing N.

NEW_DRAWING_BOX

Rev

01

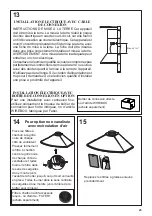
ELECTRICAL  INSTALLATION WITH CONNECTION 

CABLE

GROUNDING INSTRUCTIONS This appliance must 

be grounded. In the event of an electrical short circuit, 

grounding reduces the risk of electric shock by providing 

an escape wire for the electric current. This appliance 

is equipped with a cord having a grounding wire with a 

grounding plug. The plug must be plugged into an outlet 

that is properly installed and grounded.

WARNING - Improper grounding can result in a risk of 

electric shock.

Consult a qualified electrician if the grounding instructions 

are not completely understood, or if doubt exists as to 

whether the appliance is properly grounded.

Do not use an extension cord. If the power supply cord 

is too short, have a qualified electrician install an outlet 

near the appliance.

ELECTRICAL  INSTALLATION WITH 

OPTIONAL WIRING BOX

For Permanent wiring Installation-Use only 

with Listed rangehood Wiring Box kit 

sku # WIREBOX, manufactured by Faber.

Max. 33 

7/16

For Non-Ducted Recirculation 

Option

Required Activated Charcoal Filter 

Accessory - sku # - FILTER1 

(purchased separately)

Attach each 

charcoal 

filter to the 

black grid on 

each side of 

the blower. 

Press the 

charcoal 

filter tightly 

to the black 

grid on the blower side and rotate the filter 

clockwise (towards the front of the hood) until it 

locks into place. Turn counterclockwise (towards 

the back of the hood) to remove.

13


1

2


Summary of Contents for TENDER TEND30SS300-B

Page 1: ...TEND30SS600 B TEND36SS600 B TEND30SS300 B TEND36SS300 B Installation Instructions Use and Care Information Instructions d installation Utilisez et d entretien TENDER...

Page 2: ...with your back to an exit Based on Kitchen Firesafety Tips published by NFPA WARNING TO REDUCE THE RISK OF FIRE OR ELECTRIC SHOCK do not use this fan with any solid state speed control device WARNING...

Page 3: ...o minimize conduction of outside temperatures as part of the vent system The damper should be on the cold air side of the thermal break The break should be as close as possible to where the vent syste...

Page 4: ...or grounding DO NOT ground to a gas pipe DO NOT have a fuse in the neutral or grounding circuit A fuse in the neutral or grounding circuit could result in electrical shock Check with a qualified elect...

Page 5: ...5 RANGEHOOD DIMENSIONS Min 24 9 7 16 22 1 16 Min 28 3 4 Max 43 5 16 Min 28 3 4 Max 43 5 16 13 16 5 7 8 14 13 16 18 17 8 19 5 8 29 15 16 35 11 16 3 15 16 9 8 1 4...

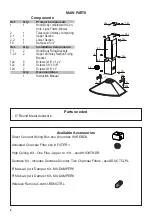
Page 6: ...8 x 3 8 12d 2 Screws 3 16 x 1 Qty Documentation 1 Instruction Manual Available Accessories Direct Connect Wiring Box sku number WIREBOX Activated Charcoal Filter sku FILTER1 High Ceiling Kit One Flue...

Page 7: ...culation Option Ducted Venting Options Installation Requires purchase of Activated Charcoal Accessory Horizontal Vertical 6 H I Install Damper that is included with the Hood before connecting to the d...

Page 8: ...the other bracket 7 2 1 on the wall as shown below the first bracket at the height of the upper chimney section supplied and aligning the centers notch with the vertical line Mark the wall at the cent...

Page 9: ...ody fixing holes as shown Screw the two screws 12d supplied onto the brackets 7 1 Hook the hood body onto the bracket 7 1 centering it around the vertical line Use the adjusting screws 12d underneath...

Page 10: ...Ensure that the activated charcoal filters have been inserted 12 Fix the bracket 7 2 1 using the screws 12a supplied 11 Slightly widen the two sides of the lower section and hook them between the uppe...

Page 11: ...dinginstructions are not completely understood or if doubt exists as to whether the appliance is properly grounded Do not use an extension cord If the power supply cord is too short have a qualified e...

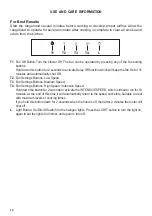
Page 12: ...imed to run for 10 minutes At the end of this time it will automatically return to the speed set before Suitable to deal with maximum levels of cooking fumes If you hold this button down for 2 seconds...

Page 13: ...color over time this will have absolutely no effect on its efficiency Replace taking care to ensure that the handle faces forward Cleaning in dishwasher may dull the finish of the metal grease filter...

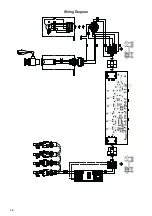
Page 14: ...14 Wiring Diagram...

Page 15: ...om accident alteration misuse abuse fire flood acts of God improper installation installation not in accordance with electrical or plumbing codes or Faber documentation or use of products not approved...

Page 16: ...nevoiedesortiesetrouvederri revouspendantquevous teignezlesflammes D apr sleguide KitchenFiresafetyTips publi parlaNFPAaux tats Unis AVERTISSEMENT POURR DUIRELERISQUED INCENDIEOUDECHOC LECTRIQUE n uti...

Page 17: ...ation doit pr voir un registre antirefoulement suppl mentaire pour r duire le flux d air froid inverse ainsi qu une barri re thermique non m tallique pour r duire la conduction destemp raturesext rieu...

Page 18: ...ILISEZ PAS une conduite de gaz pour la mise la terre N INSTALLEZ PAS un fusible sur le circuit neutre ou le circuit de mise la terre La pr sence d un fusible dans le circuit neutre ou de mise la terre...

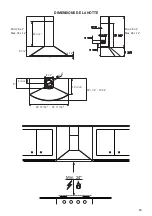
Page 19: ...19 DIMENSIONS DE LA HOTTE Min 24 9 7 16 22 1 16 Min 28 3 4 Max 43 5 16 Min 28 3 4 Max 43 5 16 13 16 5 7 8 14 13 16 18 17 8 19 5 8 29 15 16 35 11 16 3 15 16 9 8 1 4...

Page 20: ...s3 16 x1 Qt Documentation 1 Moded emploi Accessoires disponibles Bo tier de connexion directe no d article WIREBOX Filtre charbon actif No d article FILTER1 Trousse de chemin e pour plafonds hauts un...

Page 21: ...der aux conduits Pour installation avec ventilation canalis e uniquement Choisissez la m thode de canalisation Exige l achat de l accessoire charbon actif Hori zontale Verticale Sans canalisation Opti...

Page 22: ...ligne de r f rence verticale Marquez l emplacement du centre des trous de la bride sur le mur Placez la bride 7 2 1 sur le mur comme illustr sous la premi re bride la hauteur de la section sup rieure...

Page 23: ...hotte comme illustr Posez les deux vis 12d sur les brides 7 1 Engagez le b ti de la hotte sur la bride 7 1 en le centrant autour de la ligne verticale Utilisez les vis de r glage 12d sous la hotte po...

Page 24: ...e de 6 au clapet de toiture ou au clapet mural puis raccordez les conduits Installation avec canalisation verticale ou horizontale cartez l g rement les deux c t s de la chemin e sup ri eure et engage...

Page 25: ...as de rallonge Si le cordon d alimentation est trop court demandez un lectricien qualifi d installer une prise proximit de l appareil INSTALLATION LECTRIQUEAVEC BO TIER DE CONNEXION EN OPTION Pour une...

Page 26: ...fonc pendantenviron2secondespouractiverlaVITESSEINTENSIVE pour une dur e de 10 minutes Apr s ce d lai la vitesse retournera automatiquement la vitesse s lectionn e pr c demment Utile pour contrer les...

Page 27: ...e produit au fil du temps il n a aucun impact sur son efficacit Remettez leenplace envousassurantque la poign e se trouve vers l avant Lelave vaissellepourraitternirlefinidufiltre graisse m tallique R...

Page 28: ...28 Sch ma de c blage...

Page 29: ...es d coulant d un accident d une modification de l utilisation incorrecte ou abusive d un incendie d une inondation d un cas de force majeure d une installation inad quate d une installation non confo...

Page 30: ...30...

Page 31: ...31...

Page 32: ...991 0464 722_03 161019 D002872_02...

Reviews: