7
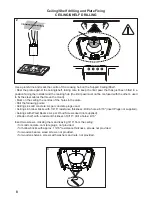
• Unfasten the 3 screw that join the parts of the Plate (of different shapes and/or sizes) using the wrench
provided.
• Take the Pawl
(14)
and fix it to the plate on the bracket in the position indicated in the figure, using the
screw provided
(12g)
.
INSTALLATION
This hood is designed to be mounted on the ceiling/on a shelf, above a free-standing Hob (min. 24
"), in:
• Recirculation version: Internal recirculation.
Sequence of operations - Installation
Preparing for installation:
• Drilling the Ceiling/Shelf and Fixing the support plate
• Connections
• Fitting the hood body
• Functional Check
• Disposal of Packaging
Fitting the Limiter pawl
1
14
12g
Summary of Contents for Zoom IS 16 SS
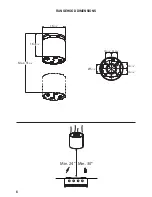
Page 6: ...6 RANGEHOOD DIMENSIONS 57 8 43 16 43 16 43 16 43 16 161 8 16 15 16 Max 515 8 Min 24 Min 30...
Page 18: ...18 Wiring Diagram...
Page 24: ...24 DIMENSIONS DE LA HOTTE 57 8 43 16 43 16 43 16 43 16 161 8 16 15 16 Max 515 8 Min 24 Min 30...
Page 36: ...36 Sch ma de c blage...
Page 54: ...54 Diagrama de cableado...
Page 58: ......
Page 59: ......

