background image

25. Reinstall the front driveline, using factory hardware.

26. Install the front tires and wheels. Torque the lug nuts to

wheel manufacturers specifications.

REAR SUSPENSION INSTRUCTIONS

:


27. Jack up the rear end of the vehicle and support the frame

rails just in front of the rear bumper with jack stands.

NEVER WORK UNDER AN UNSUPPORTED
VEHICLE!  

Remove the rear tires. Support the rear axle

with a floor jack just enough so that axle does not hang
freely.

28. Working on both sides of the truck and supporting the rear

differential with a jack remove and discard the rear shocks,
save shock hardware. Use care not to over extend the brake
hose.

29. Remove and discard the factory rear sway bar end links.

Save hardware.

30. Locate the lower track bar mount on the axle. Disconnect

the track bar from the axle and save hardware. Pull track
bar free from the factory mount.  Remove the factory
plastic trim guard from the trac bar axle mount and discard.

31. Remove the coil springs and discard.

32. Remove the factory rubber bump stop and discard.

33. Working from the driver side of the truck, locate the factory

lower link arm, remove and discard link, save the factory
hardware.

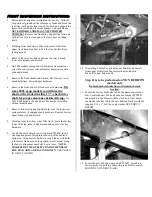
34. Locate the new Fabtech lower link arm FT50018. Install

one of the supplied grease fitting into each end of the new
Fabtech link arm. Using factory hardware install new
Fabtech link arm into the factory frame mount, than attach
to axel mount using factory hardware. Leave loose. 

NOTE:

MAKE SURE THE GUSSETS ON BOTH ENDS OF

THE LINK ARM ARE FACING DOWN.

  SEE PHOTO 

BELOW. 

35. If installing Fabtech’s optional upper link kit, install rear

upper at this time. See instructions included in Fabtech’s
upper link arm kit.

36. Locate the new Fabtech bump stop FT50027. Install into

factory pocket by pushing bump stop in until fully seated.

37. Repeat steps thirty through thirty-five on passenger side of

truck.

38. Working from both sides of the truck torque the lower link

arms to 130 ft. lbs.

39. Locate the new Fabtech lift coils FT50005.  Install new lift

coils into truck.

40. Locate the new Fabtech shocks FTS

6001

 (not included in


kit). Install on truck using factory hardware.

41. Locate the supplied FT50026 rear sway bar end links. Press

in one bushing and one sleeve into each end of the end link.
Install the end links onto truck using stock hardware.
Torque to 45 ft lbs.

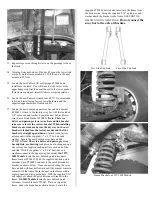
42. Locate the new Fabtech rear track bar bracket FT50053BK.

Place the bracket on factory axel mount.  With the supplied
½” x 3 ” bolt, nut, washers, and Fabtech sleeve FT46 attach
the lower hole of the bracket to the factory hole in the axle
bracket. (NOTE: THE SUPPLIED SLEEVE WILL BE
PLACED INSIDE THE FACTORY TRAC BAR POCKET
TO TAKE THE PLACE OF WERE THE TRAC BAR
WAS ORIGINALLY MOUNTED). Locate the hole in the
Fabtech bracket on the outer side. Drill a ½” hole through
the factory axle mount. Attach with the supplied ½” x 1¼”
bolt, nut, and washers.  Reattach the track bar to the new
bracket with the factory hardware. Torque all trac bar bolts
to 74 ft. lbs.  SEE PHOTO BELOW.

Summary of Contents for FTS24001

Page 1: ...Installation Instructions 4 Performance Suspension System 1997 2006 JEEP TJ 4WD ...

Page 2: ...acket 2 1 4 20 Nylok Nut 1 FT50336 Hdwr Sub Assembly 4 5 16 18 Nylok Nut 18 1 2 SAE Flat Washer FT50336 Hdwr Sub Assembly Kit 6 12mm Flat Washer Qty Part Description 4 1 4 SAE Flat Washer 2 FT50067 Sway Bar link Frame Bracket 6 5 16 SAE Flat Washer 2 FT42 Sway Bar Pin 1 1 8 x 2 Cotter Pin 2 FT90036 Lynch Pin 8 Zerk Fittings 2 FT45 Sway Bar Key Ring 1 1 2 2 FT50096 Bolt Tab Sway Bar 1 FT46 Rear Tra...

Page 3: ...PLACE AS NEEDED THIS KIT IS DESIGNED TO BE INSTALL ON A JEEP WITH STOCK AXLES STOCK TRANSFER CASE STOCK SUSPENSION READ ALL INSTRUCTIONS THOROUGHLY FROM START TO FINISH BEFORE BEGINNING INSTALLATION IF THESE INSTRUCTIONS ARE NOT PROPERLY FOLLOWED SEVERE FRAME DRIVELINE AND OR SUSPENSION DAMAGE MAY RESULT NOTE PRIOR TO THE INSTALLATION OF THIS SUSPENSION SYSTEM A FRONT END ALIGNMENT MUST BE PERFORM...

Page 4: ...ve front coil springs and discard save the lower coil spring retainer if equipped and hardware Remove factory upper bump stop and discard 8 Working from the driver side of the truck locate the factory lower link arm remove and discard link and save factory hardware 9 Locate the new Fabtech lower link arm FT50018 Install one supplied grease fitting into each end of the Fabtech Link arm Using factor...

Page 5: ...the factory axle mount with the supplied x 1 bolt nut and washer Locate the new Fabtech sway bar end link FT50070 Note There is a driver and passenger sway bar end link see drawing and press one bushing and one sleeve from the supplied bushing kit into each end of the end link With the supplied x 2 3 4 bolt nut and washers connect to the upper sway bar mount On 1997 2002 Models locate the new Fabt...

Page 6: ... the hole if bracket does not fit contact Fabtech tech line 887 432 2832 SEE DIAGRAM ON LAST PAGE 20 Reattach factory trac bar to the new drop bracket with the factory hardware torque to 55 ft lbs Insert the new supplied cotter pin through the factory trac bar 21 With a transmission jack support the transmission and transfer case remove the factory transmission crossmember discard factory hardware...

Page 7: ...smember spacers FT50024 and FT50205 Pan Bolt Taper Insert for 97 02 Models only Using the correct supplied bolts and washers for your year Jeep x 3 1 4 1997 2002 or 12mm 1 5 x 69 5mm 2003 reattach factory crossmember to the truck with the Fabtech spacer between the frame and the crossmember Torque bolts to 85 ft lbs On 97 02 models place the Pan Bolt Taper Inset into the crossmember before the bol...

Page 8: ...tach to axel mount using factory hardware Leave loose NOTE MAKE SURE THE GUSSETS ON BOTH ENDS OF THE LINK ARM ARE FACING DOWN SEE PHOTO BELOW 35 If installing Fabtech s optional upper link kit install rear upper at this time See instructions included in Fabtech s upper link arm kit 36 Locate the new Fabtech bump stop FT50027 Install into factory pocket by pushing bump stop in until fully seated 37...

Page 9: ...level ground connect front Sway Bar End Links to axle mounts SEE PHOTO BELOW 45 Using a grease gun grease all grease fittings in the new Fabtech Link Arms 46 Recheck all nuts and bolts for proper torque tightness before driving Drive the truck for 50 miles and have it aligned to factory specifications 47 Check front end alignment and set to factory specifications Re adjust headlights ...

Page 10: ...9 16 bolt install from the top of the factory trac bar bracket FT95010 Frame Sleeve Factory drag link Factory Trac Bar Bracket FT50134 Drop Trac Bar Bracket ...

Reviews: