background image

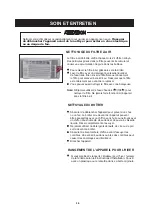
CARE AND CLEANING

Clean your air conditioner occasionally to keep it looking new. 

Be sure to unplug the unit 

before cleaning to prevent chock or fire hazards.

CAUTION

Air Filter Cleaning

The air filter should be checked at least once a
month to see if cleaning is necessary. Trapped 
particles in the filter can build up and cause an 
accumulation of frost on the cooling coils.
     Remove the filter by sliding out from the right-
     hand side.
     Wash the filter using liquid dishwashing deter-
     gent and warm water. Rinse filter thoroughly. 
     Gently shake excess water from the filter. Be
     sure the filter is thoroughly dry before replacing.
     Or, instead of washing you may vacuum the 
      filter clean.

Note:

Never use hot water over 40

clean the air filter. Never attempt to operate the 
unit without the air filter.

Cabinet Cleaning

     Be sure to unplug the air conditioner to prevent
     shock or fire hazard. The cabinet and front may
     be dusted with an oil-free cloth or washed with
     a cloth dampened in a solution of warm water
     and mild liquid dishwashing detergent. Rinse
     thoroughly and wipe dry.
     Never use harsh cleaners, wax or polish on the 
     cabinet front.
     Be sure to wring excess water from the cloth before
     wiping around the controls. Excess water in or around
     the controls may cause damage to the air conditioner.
     Plug in air conditioner.

      If you plan to store the air conditioner during the winter,
      remove it carefully from the window according to the 
      installation instructions. Cover it with plastic or return it
      to the original carton. 

Winter Storage

C (104

F) to

 11

Summary of Contents for MWK-05CMN1-BJ7

Page 1: ...WINDOW AIR CONDITIONER v DE FENETRE CLIMATISEUR 87795005 MWK 05CMN1 BJ7 OWNER S MANUAL MANUEL DE L UTILISATEUR READ AND SAVE THESE INSTRUCTIONS Lire et conserver ces instructions...

Page 2: ...nit Contact the installer for installation of this unit The air conditioner is not intended for use by young children or infirm persons without supervision Young children should be supervised to ensur...

Page 3: ...c shock or fire due to heat generation It may cause electric shock It may cause failure of machine or electric shock It may cause fire and electric shock It may cause fire and electric shock It may ca...

Page 4: ...t objects It may cause deterioration of quality etc It may cause failure of product or fire Do not use for special purposes Turn off the main power switch when not using the unit for a long time If wa...

Page 5: ...detection device designed to reduce the risk of fire Please refer to the section Operation of Current Device for details In the event that the power supply cord is damaged it cannot be repaired it mus...

Page 6: ...oldest or cooler setting 2 Set the selector control to the highest COOL setting 3 Adjust the louver for comfortable air flow see Air Directional Louvers 4 Once the room has cooled adjust the thermosta...

Page 7: ...room temperature when the unit is being operated in the COOL MODE To set the desired room temperature rotate the thermostat switch to the desired setting After the set temperature is achieved the ther...

Page 8: ...h Lock 1 Mounting Hardware TOOLS NEEDED Phillips Drill If pilot holes are needed CAUTION When handling unit be careful to avoid cuts from sharp metal edges and aluminum fins on front and rear coils To...

Page 9: ...ig 1 A Hold the Accordion Panel in one hand and gently pull back the center to free the open end See Fig 1 B Slide the free and I section of the panel into the cabinet as shown in Fig 2A 2B 3 Slide th...

Page 10: ...window behind the top rail of the unit 2 Extend the side panels out against the window frame Fig 6 3 4 Fig 7 Fig 8 Fig 5 Fig 6 Place the frame lock between the frame exten sions and the window sill a...

Page 11: ...r condensation must be allowed to drain out Storm window frame or other obstruction 11 2 MIN 38 mm Sash Board thickness as required for proper pitch to rear along entire sill Fasten with nails or scre...

Page 12: ...ter clean Note Never use hot water over 40 clean the air filter Never attempt to operate the unit without the air filter Cabinet Cleaning Be sure to unplug the air conditioner to prevent shock or fire...

Page 13: ...g on cooling coil behind decorative front Air conditioner cooling but room is too warm NO ice forming on cooling coil behind decorative front Thermostat set too warm Turn thermostat clockwise to a col...

Page 14: ...WARRANTY 13...

Page 15: ...imatiseur n est pas con u pour tre utilis par des jeunes enfants ou des personnes infirmes sans supervision Les enfants doivent tre supervis s pour s assurer qu ils ne jouent pas avec l appareil Si le...

Page 16: ...s de produits flammables tels que l essence le benzene les diluants peinture etc Pour viter les blessures et les dommages la propri t veuillez suivre les instructions suivantes Un mauvais fonctionnem...

Page 17: ...de la nourriture les animaux les plantes ou les objets d art Ceci peut causer une d t rioration de la qualit etc Ceci peut causer un arr t du fonctionnement et un feu Ne pas utiliser pour des circonst...

Page 18: ...imentation de cet appareil est quip d un dispositif qui d tecte le courant pour r duire le risque de feu Veuillez vous r f rer la section op ration du dispositif du courant pour plus de d tails Si vot...

Page 19: ...haut r glage 3 Ajuster les a rateurs pour une circulation d air confortable Voir la section concernant les a rateurs 4 Une fois la pi ce ajuster le thermostat selon un r glage que vous trouvez confort...

Page 20: ...a pour maintenir cette temp rature Tourner le bouton du thermostat vers la droite pour un r glage lev Ceci produit une temp rature ambiante plus basse Tourner le bouton du thermostat vers la gauche po...

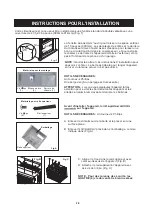
Page 21: ...Serrure de ch ssis 1 Mat riels pour le montage OUTILS N CESSAIRES Un tournevis Phillips Une per euse Si un per age est n cessaire ATTENTION Lorsque vous manipulez l appareil faites attention pour vit...

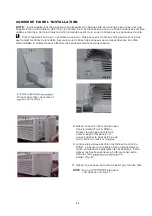
Page 22: ...pondent au bon c t Lorsqu install la collerette pour attacher les panneaux fera face dans la pi ce Fig 2B 1 Fig 1 A Tenir le panneau d une main et tirer doucement le centre Fig 1 B Glisser la section...

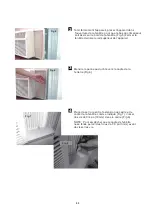
Page 23: ...e OH UDLO VXSpULHXU de l appareil 2 tendre le panneau du c t vers le cadre de la fen tre Fig 6 3 Placer la serrure entre l extension du cadre et le cadre de la fen tre comme indiqu Fig 7 Visser des vi...

Page 24: ...lmat s La pluie accumull e et ou la condensation doit pouvoir s couler Cadre d une contre fen tre 1 1 2 po MIN 38 mm ch ssis paisseur tel que requis pour une inclinaison s cure tout le long du seuil S...

Page 25: ...ne balayeuse Note NE jamais utiliser de l eau chaude 40 C 104 F pour nettoyer le filtre Ne jamais faire fonctionner l appareil sans le filtre air NETTOYAGE DU BO TIER S assurer de d brancher l apparei...

Page 26: ...la temp rature est trop lev Baisser celui ci Les a rateurs ne sont pas bien plac s Plac s les a rateurs de fa on avoir une meilleure distribution d air Le devant de l appareil est bloqu par un rideau...

Page 27: ...z appeler notre ligne de service gratuite pour parler un technicien au 1 866 206 0888 du lundi au vendredi de 8 h 18 h heure normale de l Est Ce produit est garanti durant 36 mois si utilis de fa on n...

Reviews: