background image

4-8

4-11

Assembly Manual

08

4-7

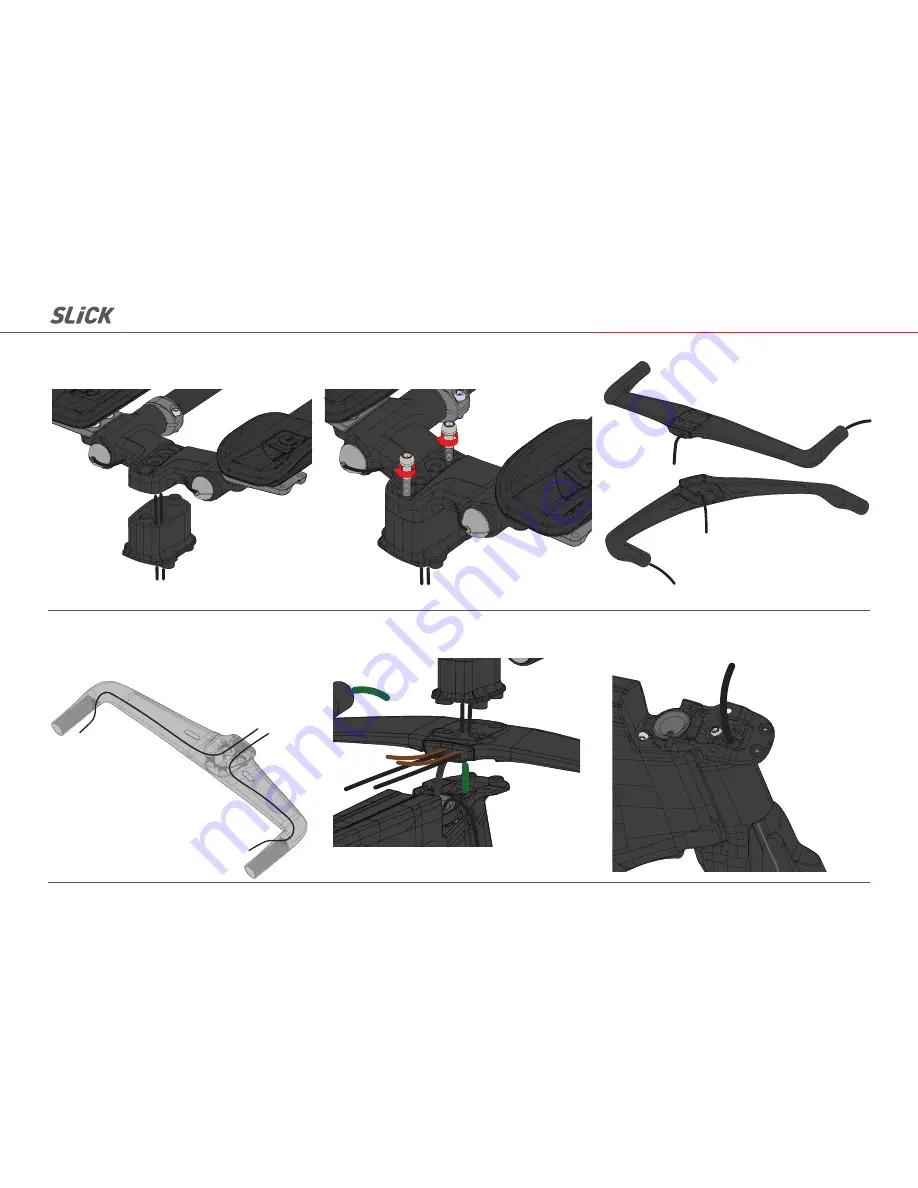
Route Di2 cables through base bar and install brake/shift 

levers

Route extension shifter Di2 cables through basebar

Route front brake cable into stem cable stop while 

carefully maneuvering the handlebar assembly 

onto the stem.

Route front and rear brake cable housings through base bar

4-9

4-10

Di2 shifter

wires

Summary of Contents for SLiCK

Page 1: ...Assembly Manual FACTORBIKES COM V1 09...

Page 2: ...ation of this limited warranty shall be one 1 year commencing from the date the customer takes possession of the bicycle Factor components considered subject to normal wear and tear will be listed in...

Page 3: ...articular purpose are hereby disclaimed Miscellaneous In the event that Factor prevails in any court action you agree to reimburse Factor for the expenses including attorney s fees and expenses of lit...

Page 4: ...instructions 1 2 Note Factor frame sets are shipped with 7X9 mm outer rail clamps for carbon rail saddles 7x7 mm outer rail clamps for traditional saddle rails are available through your Factor dealer...

Page 5: ...t match with the female battery groove Slide 4 mm hex wrench through the hole under the top tube and use to guide the seat post wedge into position Insert battery in the seatpost 1 5 Assembly Manual 0...

Page 6: ...Assembly Manual 03 1 8 Lightly grease the upper headset bearing and then install in upper headset cup Lightly grease the upper headset bearing and then install in upper headset cup 2 1 2 2 Note Your F...

Page 7: ...ring play but the headset still spins freely Install stem and tighten M6x20L bolts to 10 Nm Check headset adjustment as bearing preload may have changed during stem installation 2 6 2 5 Assembly Manua...

Page 8: ...erall view Park Tool offers an excellent internal cable routing kit Park Tool IR 1 to help you easily route your cables If you do not have access to this kit you can use a derailleur inner wire and a...

Page 9: ...ket shell exit window 3 5 3 4 2 3 Assembly Manual 06 3 3 Route Di2 cables through extensions and install shifters Install extensions through the extension tower and secure by tightening the M5x16L bol...

Page 10: ...anual 07 4 3 Install armrest pads Route extension shifter Di2 cables through extension tower Select desired base plate height and spacers Attach extension tower to top plate tightening M6 bolts to 8 N...

Page 11: ...stall brake shift levers Route extension shifter Di2 cables through basebar Route front brake cable into stem cable stop while carefully maneuvering the handlebar assembly onto the stem Route front an...

Page 12: ...ion A to stem cover using cable ties as pictured Route Di2 cables through stem cover cable port and install into Junction A Secure handlebar to stem by tightening M6x25L bolts to 8 Nm Route rear brake...

Page 13: ...en the rollers as pictured Placing the wedge too high could cause the brake arms to hit the brake cover resulting in a unexpected loss of braking power Install front brake using M6 bolts taking care t...

Page 14: ...pply Loctite 641 inside the bottom bracket shell and install the cups into the frame with BRT 002 bearing press from Enduro Bearings Cut the brake inner wire short enough to prevent it from contacting...

Page 15: ...12 6 4 Install down tube cage bridge and tighten M5 torx head bolts to 2 Nm Install cage and tighten M5 torx head bolts to 2 Nm For 24 or 22 mm cranks install the included Wheels MFG BBright reducers...

Page 16: ...In case of dropout replacement apply Loctite 243 on bolts threads and tighten to 1 Nm Install the rear Storage Pack rail to the seat tube by tightening the provided M5 torx head bolts to 2 Nm Slide t...

Page 17: ...ack cover making sure to carefully latch each tab into their corresponding holes Complete outlook Snap the stem cover onto the front Nutrition Pack Covers are available for both 0 and 40 mm stem optio...

Page 18: ...FACTORBIKES COM...

Reviews: