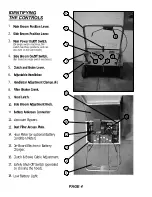
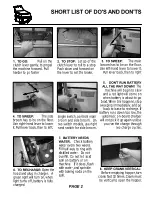
background image

PAGE 2

1.  TO GO:

          Pull on the

clutch lever gently, to propel
the machine forward.  Pull

harder to go faster

SHORT LIST OF DO'S AND DON'TS
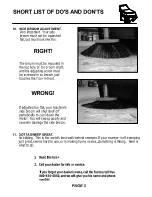
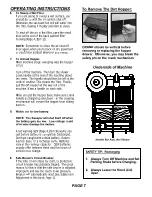
7.  BATTERY NEEDS
WATER

.

   Check battery

water every two weeks.
Fill half-way to ring with
distilled water.   Do not
overfill.  Do not let  acid
spill on battery or on

machine.   If it does, flush
with water, and sprinkle
with baking soda on the
spill.

2.  TO STOP:

  Let go of the

clutch lever to roll to a stop.
Push down and forward on
the lever to set the brake.

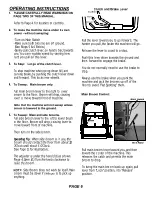
8.  KEEP CRANK VERTICAL:

Before emptying hopper, turn

crank fast 10 times. Crank must

be vertical to open the hopper.

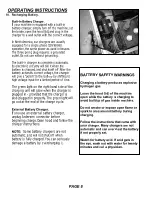
5.    DON'T RUN BATTERY

ALL THE WAY DOWN!!

 The

machine will begin to slow

and a red light will come on

when battery is about to go

dead. When this happens, stop

sweeping immediately, and go

back to base to recharge. If

battery runs down too low, the

automatic on-board charger

will not pick it up again unless

you run the charge through

two charge cycles.

3.  TO SWEEP:

      The main

broom has to be on the floor.

Use left-hand lever to lower it.

Pull lever back, then to right

4.  TO SWEEP:

        The side

broom has to be on the floor.
Use right-hand lever to lower
it. Pull lever back, then to left.

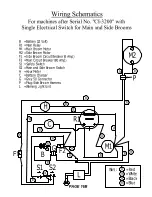
Single switch, controls main
broom and side broom.   On
two switch models, use right
hand switch for side broom.

6.  TO RECHARGE:

Open the

hood and plug in charger.   A
green light will turn on, when
light turns off, battery is fully
charged.

Summary of Contents for 34

Page 1: ...ator Parts Service Manual Model 34 Industrial Sweeper R P S Corporation Phone 1 800 634 4060 P O Box 368 Fax 1 866 632 6961 Racine Wisconsin 53401 C ACTORY A Copyright R P S Corporation 2002 Edition 7...

Page 2: ...his safety switch stops the motors whenever the hood lid is raised MAINTENANCE PROCEDURES AS OUTLINED IN THIS BOOK 9 IF YOU PLAN TO LEAVE YOUR MACHINE FOR EVEN A MINUTE TURN OFF Do not wear rings or m...

Page 3: ...N T RUN BATTERY ALL THE WAY DOWN The machine will begin to slow and a red light will come on when battery is about to go dead When this happens stop sweeping immediately and go back to base to recharg...

Page 4: ...ur sweeper isn t sweeping just great seems hard to use or is making funny noises Something is Wrong Here is what to do WRONG Very Important Your side broom must not be squashed flat but must look like...

Page 5: ...Cable Adjustment Safety Shut Off Switch operated by closing the hood 13 14 12 15 17 11 5 10 IDENTIFYING THE CONTROLS PAGE 4 Main Broom Position Lever Side Broom Position Lever Main Power On Off Switc...

Page 6: ...e where the main broom picks it up The main broom creates dust The automatic vaccuum system sucks up this dust then the filter catches it The filter empties into the hopper It is cleaned by turning th...

Page 7: ...move toward front of machine Then turn on the side broom Operating Tip When side broom is in use the broom should contact the floor from about 11 O Clock until about 5 O Clock See Page 11 for illustra...

Page 8: ...ing mechanism will prevent the hopper from sliding back in Watch out for low battery NOTE The Sweeper will shut itself off when the battery gets too low Low voltage could otherwise damage the motors A...

Page 9: ...r chargers are usually equipped for a single phase 110V 60Hz operation the same power as used in houses The three prong plug requires a grounded outlet Do not use without grounding The built in charge...

Page 10: ...steel surfaces of the machine eventually it will cause the machine to rust Treat acid spills with water to dilute the acid To clean up use solution of water and baking soda applied with a small brush...

Page 11: ...so the broom fits tightly on the machine s hubs Brooms made by will fit companies to fit our machines are often made with rough drain pipe cores They often bounce even when new Bouncing brooms do not...

Page 12: ...ght corner of engine compartment Turn clockwise to raise broom A Side broom will not sweep if it is flat on the ground Fiber should touch the ground in an 11 O Clock to 5 O Clock pattern as shown here...

Page 13: ...n right side of this page If kept adjusted the clutch donut should last several years To replace the donut 1 Turn off the machine and unplug the battery Remove the rear protective panel to have access...

Page 14: ...GUIDE Check for Cause of Problem in Order Shown PROBLEM MAIN BROOM WORKS BUT MAIN BROOM DOES NOT TURN hood on the left hand under side lip of the body Current machines use a circuit breaker situated...

Page 15: ...side causing broom to become oval This in turn is caused by leaving the broom on the ground for long periods of time without broom rotating which will bend the fiber A second cause is use of a mainbro...

Page 16: ...EMERGENCY ORDERS Within the Continental United States We can supply any part that weighs under 70lbs within 3 business days not counting weekends or National Holidays However if parts are ordered on...

Page 17: ...in Relay Main Broom Motor Side Broom Motor Side Broom Circuit Breaker 6 Amp Main Circuit Breaker 80 Amp Safety Switch Master Switch Side Broom Switch Hour Meter Battery Charger Grey 50 Connector Plug...

Page 18: ...t Main Relay Main Broom Motor Side Broom Motor Side Broom Circuit Breaker 6 Amp Main Circuit Breaker 80 Amp Safety Switch Main and Side Broom Switch Hour Meter Battery Charger Grey 50 Connector Plug S...

Page 19: ...12 6 6 32 37 35 4 23 38 34 37 32 29 34 22 32 25 21 27 28 31 33 PAGE 17 Upper Body Assy 12 13 16 CLUTCH LEVER ASSY P N 4 134 5 6 24 COMPLETE HANDLEBAR ASSY P N 4 121 17 HANDLEBAR MNTG BKT ASSY P N 4 1...

Page 20: ...7 TUBE PLUG 1 20 4 388 CLUTCH TENSION SPRING 1 21 H 1032HCN HCN 10 32 7 22 H 13003 HCS 1 4 20 X 3 4 2 23 H 13005 HCS 1 4 20 X 1 10 24 H 13015 HCS 1 4 20 X 3 8 25 H 19901 FB CASHD 1 4 20 X 1 2 4 26 H 2...

Page 21: ...26 27 23 39 36 1 13 19 21 14 9 10 42 15 40 35 18 42 29 17 32 11 12 20 37 41 8 3 16 28 38 33 37 7 30 6 2 33 5 PAGE 19 Air System 23 4 34 25 31 22 24 10 11 12 20 22 24 COMPLETE FILTER ELEMENT P N 4 500...

Page 22: ...1 22 H 002 1 2 DBL SIDED TAPE 1 23 H 00287 375 HEYCO COLLAR 1 24 H 048 3 16 PVC FOAM 1 25 H 1032HCN HCN 10 32 15 26 H 10436 00106 HXMS 10 32 X 1 1 27 H 10436 00107 FB 8 32 X 3 4 1 28 H 13053 HCS 5 16...

Page 23: ...25 50 53 24 38 47 10 50 12 17 41 16 50 53 27 22 47 40 36 48 19 32 48 39 20 PAGE 21 Lower Body Assy 38 28 23 47 55 21 47 26 38 36 15 36 47 3 53 49 34 42 6 36 47 11 45 53 8 37 54 44 36 52 46 COMPLETE F...

Page 24: ...525 HOPPER SEAL STRIP 1 27 4 526 RH SEAL STRIP 1 28 4 527 REAR SEAL STRIP 1 29 4 528 CORNER SEAL STRIP 1 30 4 529 CURTAIN CLAMP 1 31 5 130 SIDE DOOR LATCH 1 32 H 10436 0105 3 8 X 1 1 4 SPRING PIN 1 33...

Page 25: ...41 38 5 28 7 6 22 33 31 24 23 44 38 13 35 36 19 16 18 3 32 29 15 18 45 43 37 41 26 35 12 34 21 17 30 27 RIGHT LIFT ARM ASSY P N 4 455 16 17 3 15 18 DRIVE TUBE ASSY P N 4 445 20 4 6 5 38 4 8 39 28 7 2...

Page 26: ...1 23 4 515 RIGHT FLOOR SEAL 1 24 4 526 RH SEAL STRIP 1 25 H 10436 0010 1 4 X 1 1 4 SPRING PIN 1 26 H 10436 0105 3 8 X 1 1 4 SPRING PIN 1 27 H 19901 FB CASHD 1 4 20 X 1 2 7 28 H 2250 218 1 2 X 1 CLEVI...

Page 27: ...12 11 39 51 37 9 8 7 5 47 48 36 4 56 43 20 19 35 42 16 50 27 28 37 36 26 42 22 46 38 45 54 55 38 41 47 31 40 3 49 46 MAIN BROOM LIFT ARM ASSY P N 4 449 BROOM LAT ARM ASSY P N 4 415 LIFT SUPT ASSY P N...

Page 28: ...H 10436 0010 1 4 X 1 1 4 SPRING PIN 1 35 H 10436 0105 3 8 X 1 1 4 SPRING PIN 2 36 H 13103 HCS 3 8 16 X 3 4 2 37 H 13213 HB 1 2 X 2 1 2 1 38 H 19901 FB CASHD 1 4 20 X 1 2 12 39 H 2250 218 1 2 X 1 CLEV...

Page 29: ...5 2 3 21 12 13 42 8 42 27 23 15 28 4 7 40 26 22 17 28 35 44 38 43 39 36 34 31 10 26 22 30 11 24 17 22 36 34 22 29 28 28 6 26 37 26 34 31 25 34 33 32 9 43 TRANSMISSION ASSY P N 4 375 20 REAR TIRE WIDE...

Page 30: ...TIRE WIDE 2 21 4 362 TRANS HOUSING 1 22 4 364A FLANGE 1 75 ID 8 23 H 10436 00135 3 8 X 4 1 2 CLEVIS PIN 1 24 H 13003 HCS 1 4 20 X 3 4 4 25 H 13051 HCS 5 16 18 X 1 2 2 26 H 13053 HCS 5 16 18 X 3 4 16...

Page 31: ...PAGE 29 Power Supply 1 3 4 12 16 41 17 18 27 31 9 30 38 37 8 30 10 29 38 14 33 35 15 33 36 28 2 28 31 31 41 34 32 39 42 33 5 6 7 5 6 7 COMPLETE BATTERY BUCKLE P N 4 136 11 40 13...

Page 32: ...0 AMP BREAKER 1 22 4 253 SUB HARNESS 80 AMP BREAKER TO SOLENOID 1 23 4 254 SUB LEAD SOLENOID TO MAIN MOTOR 1 24 4 255 SUB HARNESS MAIN WIRING HARNESS 1 25 4 256 GREY 50 CONNECTOR WITH CONTACTS 2 26 4...

Page 33: ...with Pledge and Cloth Check Main Broom for Debris Weekly Check Battery Water Level Inspect Floor Seals Check Clutch Adjustment Inspect Main and Side Brooms Monthly Lubricate the Front Caster Remove Ma...

Page 34: ...er drive belts PARTS Replacement parts will be supplied free for 18 months or 750 hours from date of delivery to customer This parts warranty includes all parts on the machine except normal wear parts...

Page 35: ...lt Main Relay Main Broom Motor Side Broom Motor Side Broom Circuit Breaker 6 Amp Main Circuit Breaker 80 Amp Safety Switch Master Switch Side Broom Switch Hour Meter Battery Charger Grey 50 Connector...

Page 36: ...Volt Main Relay Main Broom Motor Side Broom Motor Side Broom Circuit Breaker 6 Amp Main Circuit Breaker 80 Amp Safety Switch Main and Side Broom Switch Hour Meter Battery Charger Grey 50 Connector Pl...

Reviews: