E
XAMPLE
MANUAL
3
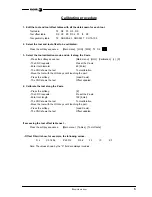
Calibrating procedure
1. Edit the tool and tool offset tables with all the data known for each tool.
Tool table:
T2 D2 F0 N0 R0
Tool offset table:
D2 X0 Z0 R0.4 F3 I0 K0
Tool geometry table
T2 NOSEA 60 NOSEW 7 CUTA 100
2. Select the tool and tool offset to be calibrated.
Press the softkey sequence:
[Main menu] [JOG] [MDI] T2 D2
3. Select the tool calibration mode and do it along the X axis.
- Press the softkey sequence:
[Main menu] [JOG] [Calibration] [+] [X]
- The CNC requests:
Preset the X axis:
- Enter tool diameter
60 [Enter]
- The CNC shows the text
Tool calibration.
- Move the tool with the JOG keys until touching the part.
- Press the softkey:
[Load X axis]
- The CNC shows the text
Offset updated.
4. Calibrate the tool along the Z axis.
- Press the softkey:
[Z]
- The CNC requests:
Preset the Z axis:
- Enter tool length
100 [Enter]
- The CNC shows the text
Tool calibration.
- Move the tool with the JOG keys until touching the part.
- Press the softkey:
[Load X axis]
- The CNC shows the text
Offset updated.
If accessing the tool offset table next ...
Press the softkey sequence:
[Main menu] [Tables] [Tool offsets]
... Offset D2 will show, for example, the following values:
D 2
X 57.456
Z 29.312
R 0.4
F 3
I 0
K 0
Note: The values shown by the “X” field are always in radius.


