137
Note: The parameters indicated between angular brackets are
optional.
Cycle
Meaning
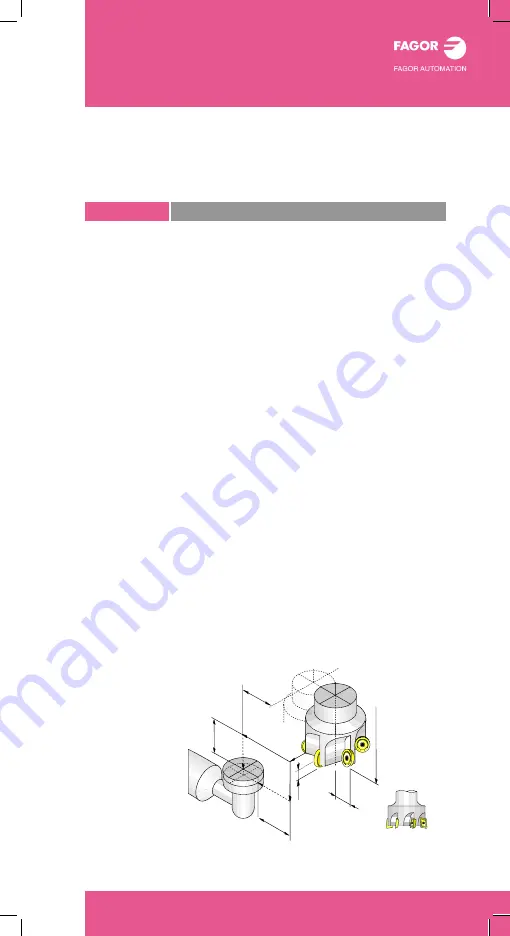
#PROBE 1
Tool calibration (dimensions and wear).
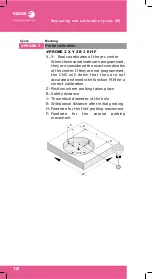
#PROBE 1 B [I] [J] F [K] [S] [N] [D] [E]
[L] [M] [C] [X U Y V Z W]
B: Safety distance
I: Dimension of the tool to be calibrated (if
I0, length on the axis; if I1, length at one
end; if I2, radius; if I3, radius and length)
J: Type of operation (if J0, calibration; if J1,
wear measurement)
F: Probing feedrate
K: Side of the probe being used (if K0, X+
side; if K1, X- side; if K2, Y+ side; if K3,
Y- side)
S: Speed and turning direction of the tool
N: Number of edges to be measured (if N=0
or when not programmed, one turning
m e a s u r e m e n t ; i f N =+ n , e x a c t
measurement of the first edge and the rest
a r e e q u i d i s t a n t , i f N = - n , e x a c t
measurement of the n edges)
D: Distance from the probing point to the tool
shaft
E: Distance from the probing point to the tool
base
L: Maximum length wear allowed
M:Maximum radius wear allowed
C: Behavior when exceeding the maximum
wear
X..W: Tabletop probe position
B
B
L
R
D
N
D
z
MEASURING AND
CALIBRATION CYCLES (M)
Summary of Contents for CNC 8060
Page 1: ...CNC 8060 65 User quick reference Ref 1906...
Page 44: ...Work modes 44...
Page 64: ...ISO language 64...
Page 102: ...ISO canned cycles T 102...
Page 128: ...Conversational cycles M 128...
Page 136: ...Conversational cycles T 136...
Page 150: ...Measuring and calibration cycles T 150...
Page 169: ......


