background image

10

Unplug the appliance when not in use,
before moving it, and before carrying out
any cleaning or maintenance.

Never pull on the cable to remove the plug.

Do not place any heavy or hot objects on
the appliance. 

Do not allow children to handle or play with
the appliance.

Do not push any objects through the air
inlet/outlet grilles as this could be dangerous
when the fan is running at high speed.

Do not cover the air inlet/outlet grilles.

Do not use the appliance in narrow, sealed
rooms.

Place the appliance on a flat, stable surface.

A space of at least 50 cm must be left free
around the appliance to guarantee correct
functioning.

Close the doors and windows of the room in
which the appliance is to be used.

The temperature in the room in which the
appliance is to be used must be between
5ºC and 35ºC. If the temperature exceeds
these limits the compressor will stop
working.

If the ambient temperature is lower than 5º
C, the absolute humidity will be very low and
it will therefore not be necessary to use the
dehumidifier.

When the appliance stops, wait around 5
minutes before starting it up again.

Do not place any objects or pour any liquids
into the water tank.

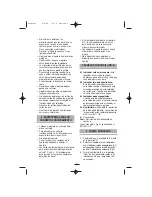
4. FOR CORRECT FUNCTIONING

The condensation water can be drained off
in two ways:

Tank (4):

The condensation water is collected directly
in the tank (4). 
When the tank is full, the red pilot light on
the control panel (6.2) will come on and the
appliance will automatically switch off.
The tank must then be emptied and fitted
correctly back onto the appliance (Fig. 4) so

7. DRAINING OFF THE

CONDENSATION WATER

6.1

Green on/off pilot light: This lights up
when the appliance is switched on,
and goes off when it stops.

6.2

Red tank full pilot light: This lights up
if the tank is not fitted to the appliance
or if it is not fitted correctly. When this
pilot light comes on the appliance will
switch off.

6.3

Defrost pilot light: When this pilot light
is on, it means the internal defrost
system is functioning and the
compressor has stopped.

6.4

Humidistat: this regulates the 

R

elative

H

umidity. The adjustment values are

between 40% and 80% RH.

0

= Off

Cont

= Continuous functioning position.

The middle position (fig. 3) corresponds to
55%-65% RH. 

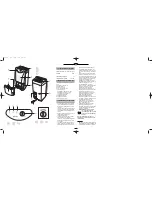
5. CONTROL PANEL (6) (FIG. 2)

1

Ensure the humidistat (6.4) is turned to
"0".

2

Plug the appliance in. Check the red tank
full pilot light (6.2) is off. Position the air
outlet grille (7) by pressing on it (Fig. 4).

3

Turn the humidistat (6.4) to "Cont" for
continuous functioning. The green on/off
pilot light (6.1) will come on. 
Keep the humidistat (6.4) in this position
until the relative humidity in the
atmosphere drops to the desired level.
Then slowly turn the humidistat (6.4) in
the opposite the direction until the
appliance stops and the green pilot light
(6.1) goes out. In this position the
appliance will start and stop automatically,
maintaining the set degree of humidity. 
The ideal ambient conditions for well-
being are between 50% and 60%
relative humidity.

4

To stop the appliance, turn the
humidistat (6.4) to "0" and unplug the
appliance.

Important:

If the degree of humidity set is

higher than the ambient humidity, the
dehumidifier will not function.

6. STARTING UP THE APPLIANCE 

interior    5/6/06  11:35  Página 9

Summary of Contents for DH-16

Page 1: ...anual Le fabricant se r serve le droit de modifier les mod les d crit dans le pr sente notice Der Hersteller beh lt sich das Recht vor die in dieser Gebrauchsanweisung beschrieben Modelle zu ver ndern...

Page 2: ...en ning n caso el aparato durante el funcionamiento porque se podr a producir un sobrecalentamiento peligroso El uso de cualquier aparato el ctrico requiere que se respeten algunas reglas fundamentale...

Page 3: ...No utilizar el aparato en habitaciones estrechas y herm ticas 4 ADVERTENCIAS PARA UN CORRECTO FUNCIONAMIENTO 1 Comprobar que el humidistato 6 4 est en la posici n 0 2 Enchufar el aparato a la red Comp...

Page 4: ...ado el orificio de paso del tubo de drenaje Fig 7 3 Introducir a trav s del orificio perforado el extremo del tubo de pl stico y ajustarlo al racord de salida del agua de condensaci n Fig 8 El otro ex...

Page 5: ...rato debidamente colocado 10 INFORMACI N PARA LA CORRECTA GESTI N DE LOS RESIDUOS DE APARATOS EL CTRICOS Y ELECTR NICOS Al final de la vida til del aparato ste no debe eliminarse mezclado con los resi...

Page 6: ...pe as sobresselentes originais Caso n o respeite o anteriormente indicado colocar em perigo a seguran a do aparelho O utilizador n o deve proceder substitui o do cabo No caso de estar danificado ou t...

Page 7: ...aparelho parar espere cerca de 5 minutos para voltar a coloc lo a funcionar N o introduza nenhum objecto no dep sito de gua nem verta sobre ele nenhum l quido 6 COLOCA O EM FUNCIONAMENTO 1 Verificar s...

Page 8: ...a um dreno 4 Colocar o dep sito no seu alojamento para que o indicador vermelho 6 2 se apague e o aparelho funcione Antes de realizar qualquer opera o de manuten o e limpeza desligar o aparelho da to...

Page 9: ...ELHOS EL CTRICOS E ELECTR NICOS No fim da sua vida til o produto n o deve ser eliminado juntamente com os res duos urbanos Pode ser depositado nos centros especializados de recolha diferenciada das au...

Page 10: ...ources of heat or in spaces where the air may contain gases oil or sulphur or in areas exposed to radiation Do not spill any water or flammable liquids on the appliance Do not handle the appliance wit...

Page 11: ...rectly back onto the appliance Fig 4 so 7 DRAINING OFF THE CONDENSATION WATER 6 1 Green on off pilot light This lights up when the appliance is switched on and goes off when it stops 6 2 Red tank full...

Page 12: ...ery dirty it may be washed in warm soapy water Rinse it and wait until it is completely dry before replacing it in its housing Do not expose the filter to sunlight to dry it 8 MAINTENANCE AND CLEANING...

Page 13: ...rately avoids possible negative consequences for the environment and health deriving from inappropriate disposal and enables the constituent materials to be recovered to obtain significant savings in...

Page 14: ...ayez pas de le r parer S il s av re n cessaire de le r parer adressez vous exclusivement un Service d Assistance Technique autoris par le fabriquant et demandez l installation de pi ces de rechange or...

Page 15: ...rature d passe ces limites le compresseur cessera de fonctionner Si la temp rature ambiante est inf rieure 5 C l humidit absolue sera faible et il ne 4 CONSEILS POUR UN FONCTIONNEMENT CORRECT 1 V rif...

Page 16: ...extr mit du tube en plastique et le raccorder la sortie d eau de condensation Fig 8 Diriger l autre extr mit vers le d versoir 7 VACUATION DE L EAU DE CONDENSATION Avant de proc der une quelconque op...

Page 17: ...il correctement positionn 10 INFORMATION POUR LA CORRECTE GESTION DES R SIDUS D APPAREILS LECTRIQUES ET LECTRONIQUES A la fin de la vie utile de l appareil ce dernier ne doit pas tre limin m lang aux...

Page 18: ...ef hrt wurden WICHTIG Decken Sie das Ger t bei Betrieb nie ab Dies kann zu einer gef hrlichen berhitzung f hren Wie beim Benutzen von allen elektrischen Ger ten m ssen auch bei diesem Ger t folgende G...

Page 19: ...ur unter 5 C ist die absolute Luftfeuchtigkeit sehr niedrig so dass die Nutzung eines Luftentfeuchters nicht notwendig ist 6 1 Gr ne Leuchtanzeige Ein Aus Diese Leuchtanzeige leuchtet bei Betrieb des...

Page 20: ...vor 1 Nehmen Sie den Wasserbeh lter aus dem Ger t Abb 5 2 Durchsto en Sie mit einem spitzen Gegenstand die ffnung f r den Ablaufschlauch Abb 7 3 F hren Sie durch die durchsto ene ffnung das Ende des...

Page 21: ...Das Ger t macht w hrend des Betriebs zu viel L rm Ist der Untergrund unregelm ig oder zu weich Ist das Ger t richtig aufgestellt 10 INFORMATION ZUR ORDNUNGSGEM SSEN ENTSORGUNG ELEKTRISCHER UND ELEKTR...

Page 22: ...sto in funzionamento nelle vicinanze della vasca da bagno docce o lavelli Non installare l apparecchio in prossimit di fonti di calore o in spazi in cui l aria pu contenere gas olio o zolfo n in aree...

Page 23: ...ttendere circa 5 minuti prima di avviarlo nuovamente Non introdurre alcun oggetto nel serbatoio d acqua n versare nessun liquido 6 1 Indicatore verde marcia arresto Questo indicatore si accende quando...

Page 24: ...al raccordo di uscita dell acqua di condensa Fig 8 L altra estremit indirizzarla ad uno scolo 4 Collocare il serbatoio nella sede affinch l indicatore rosso 6 2 si spenga e l apparecchio funzioni Prim...

Page 25: ...LETTRONICHE Alla fine della sua vita utile il prodotto non deve esser smaltito insieme ai rifiuti urbani Pu essere consegnato presso gli appositi centri di raccolta differenziata predisposti dalle amm...

Page 26: ...v v v v v v v v v v v v v v v v v v v v v v v v v v v v v v v v v v v 3 3 v v v v v v v v v v v v v v v v v v v v v v v v v v v v v v v v v v v v v v v v v v v v v v v v v v v v v v v v v v v v v v v...

Page 27: ...v v v v v v v v v v v v v v v v v v v v v v v v v v v v 50 v v v v v v v v v v v v v v v v v v 5 C 35 C v v v v v v v v v v v v v 5 C v v v v v v v v v v v v v 5 v v v v v v v v v v v 6 6 1 v j v v v...

Page 28: ...7 7 v v v v v v v v 4 v v v v v 4 v v v v v v v v 6 2 v v v v v v v v v v v v 4 v v v v 6 2 v v v v v v v v v v v v v v v v v v v v 9 v v v v v v v v v v v v v v v v v v v v v 1 v v v v 5 2 v v v v v...

Page 29: ...v v v v v v v v v v v v v v v v v v V v v V v v v v v v v v v v v v v v v v v v v v v v v v v v v v v v v V v v v v v v v v v v v v v v v v v v v v v v v v v v v v v v v v v v v v v v v v v v v v v v...

Page 30: ...a k sz l ket m k d s k zben mert vesz lyes t lmeleged st id zhet el Elektromos k sz l kek haszn latakor be kell tartani az alapvet biztons gi el r sokat K L N SEN AZ AL BBIAKAT Figyelem A k sz l ket...

Page 31: ...hogy a piros tele tart ly jelz s 6 2 nem vil g t Ir ny tsa a leveg kimeneti r csot 7 gy hogy k zben lenyomja 4 bra 3 Tekerje a nedvess gszab lyoz t 6 4 Cont helyzetbe a folyamatos m k d shez A z ld m...

Page 32: ...ser lni vagy megjav tani az elektromos alkatr szeket Amennyiben az al bb felsorolt esetekben szakszervizhez fordul viselnie kell a felmer l k lts geket a garancia id tartama alatt is A berendez s nem...

Page 33: ...t v gz keresked kn l adhat le Az elektromos h ztart si k sz l kek szelekt v gy jt se lehet v teszi a nem megfelel en v gzett hullad kkezel sb l ad d a k rnyezetet s az eg szs get vesz lyeztet negat v...

Page 34: ...aru ujeme jen pokud je p ipojen na instalaci s inn m uzemn n m Nedoporu ujeme pou v n adapt r z str ek a nebo prodlu ovac ry Pokud by jejich pou it bylo nezbytn pou ijte jen takov adapt ry a prodlu ov...

Page 35: ...ebn pou t odvlh ova Kdy spot ebi vypnete p ed jeho op tovn m zapnut m po kejte p ibli n 5 minut 1 Zkontrolujte jestli je ovlada nastaven vlhkosti 6 4 v poloze 0 2 Zapojte spot ebi do s t Zkontrolujte...

Page 36: ...ku na m sto aby erven kontrolka 6 2 zhasla a spot ebi bylo mo n zapnout 7 VYPOU T N KONDENZOVAN VODY Uv d me n kter probl my kter by jste m li zkontrolovat p ed t m ne zavol te servis Pokud spot ebi n...

Page 37: ...obek odklizen spole n s dom c m odpadem Je t eba zabezpe it jeho odevzd n na specializovan m sta sb ru t d n ho odpadu z izovan ch m stskou spr vou anebo prodejcem kter zabezpe uje tuto slu bu Odd len...

Page 38: ...i Ak ko vek in pou itie sa pova uje za nespr vne a nebezpe n V pr pade poruchy a alebo nespr vneho fungovania spotrebi vypnite a nepok ajte sa ho opravi V pr pade e je potrebn oprava obr te sa len na...

Page 39: ...nete pred jeho op tovn m zapnut m po kajte pribli ne 5 min t 5 KONTROLN PANEL 6 OBR 2 1 Skontrolujte i je ovl da nastavenia vlhkosti 6 4 v polohe 0 2 Zapojte spotrebi do siete Skontrolujte i je zhasnu...

Page 40: ...Postupujte nasledovne 1 Vyberte n dr ku na vodu Obr 5 z priestoru kde je umiestnen 2 Ostr m predmetom predierkujte otvor v st hadice pre vyp anie vody Obr 7 3 Tento koniec plastovej hadice s vytvoren...

Page 41: ...a s n m nesmie zaobch dzat ako s mestsk m odpadom Mus te ho odovzdat v autorizovan ch miestnych stredisk ch na zber peci lneho odpadu alebo u predajcu ktor zabezpe uje t to slu bu Oddelenou likvid cio...

Page 42: ...zy Je eli u ycie tych element w jest konieczne zastosuj przystawki pojedyncze lub z o one i przed u acze spe niaj ce obowi zuj ce normy bezpiecze stwa zwracaj c uwag aby nie przekroczy granicy mocy ws...

Page 43: ...dzenie przestanie osusza Je eli temperatura otoczenia jest mniejsza ni 5 C stopie wilgotno ci ca kowitej jest bardzo niski dlatego u ywanie odwil acza nie jest konieczne 6 1 Kontrolka zielona start s...

Page 44: ...lonej wody Rys 8 Drugi koniec w a skieruj do kanalizacji wodnej 4 W ponownie zbiornik na wod aby czerwona kontrolka 6 2 zgas a i urz dzenie zacz o dzia a Przed przyst pieniem do jakichkolwiek czynno c...

Page 45: ...10 INFORMACJA DOTYCZ CA PRAWID OWEGO ZARZ DZANIA ODPADAMI URZ DZE ELEKTRYCZNYCH I ELEKTRONICZNYCH Na koniec okresu u yteczno ci produktu nie nale y wyrzuca do odpad w miejskich Mo na go dostarczy do o...

Page 46: ...45 BG 3 1 220V 240V 50Hz 360W 5L 5 C 35 C 1 2 3 4 5 6 6 1 6 2 6 3 6 4 7 8 9 2 1 interior 5 6 06 11 35 P gina 44...

Page 47: ...46 50 5 C 35 C 5 C 5 4 6 1 6 2 6 3 6 4 40 80 HR 0 Cont 3 55 65 HR 5 6 2 1 6 4 0 6 interior 5 6 06 11 35 P gina 45...

Page 48: ...47 4 4 6 2 4 6 2 9 1 5 2 7 3 Fig 8 4 7 5 6 8 2 6 2 7 4 3 6 4 Cont 6 4 6 4 6 1 50 60 4 6 4 0 interior 5 6 06 11 35 P gina 46...

Page 49: ...48 9 10 interior 5 6 06 11 35 P gina 47...

Page 50: ...49 RU 1 220 240 50 360 5 5 C 35 C 1 2 3 4 5 6 6 1 6 2 6 3 6 4 7 8 9 2 1 3 interior 5 6 06 11 35 P gina 48...

Page 51: ...50 4 50 5 C 35 C 5 C 5 5 6 2 6 1 6 2 6 3 interior 5 6 06 11 35 P gina 49...

Page 52: ...51 1 6 4 0 2 6 2 7 4 3 6 4 Cont 6 1 6 4 6 4 6 1 50 60 4 6 4 0 6 8 4 4 6 2 4 9 1 5 2 7 3 8 4 6 2 7 6 4 40 80 0 Cont 3 55 65 interior 5 6 06 11 35 P gina 50...

Page 53: ...52 5 6 9 10 interior 5 6 06 11 35 P gina 51...

Page 54: ...53 interior 5 6 06 11 35 P gina 52...

Reviews: