background image


 12    


fagorindustrial.com


4.2.3


Draining the Unit 

Each  unit  has  a  drain  located  inside  the  unit  which  removes  the 
condensation  from  the  evaporator  coil  and  evaporates  it  at  an  external 
condensate  evaporator  pan.  Each  drain  can  become  loose  or  disconnected 
from moving or bumping the drain.  

IF  YOU  NOTICE  EXCESSIVE  WATER  ACCUMULATION  ON  THE  INSIDE  OF  THE 
UNIT  be  sure  the  drain  tube  is  connected  from  the  evaporator  housing  to 
the condensate evaporator drain pan. 

IF WATER IS COLLECTED UNDERNEATH THE UNIT you may want to check the 
condensate  evaporator  drain  tube  to  be  sure  it  is  still  located  inside  the 
drain pan. The leveling of the unit is important as the units are designed to 
drain properly when  on a level surface, if your floor is not level this can 

also  cause  drain  problems.  Be  sure  all  drain  lines  are  free  of 
obstructions;  typically  food  product  is  found  blocking  drain  lines  causing 
water to back up and overflow the drain pans. 

4.3


 Machine disposal 

The  product’s  life-cycle  is    around  7    to  10  year  from  first  use  and  operation 
date. 

FAGOR  equipment  is  manufactured    without  dangerous  or    toxic    materials.  Some 
parts of the equipments are biodegradable. 

The disposing  after the product’s life-cycle shall be determined by the customer 
according to the rules and laws established in the city or State of residence. 

REMEMBER TO TAKE CARE OF THE ENVIRONMENT. 


Summary of Contents for FMT-27-12-N

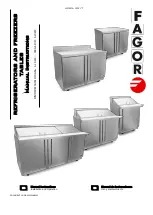
Page 1: ...17 REFRIGERATORS AND FREEZERS TABLES Manual Instructions PROFESSIONAL LINE SNACK LINE DOCUMENT CODE 602305M0065 Manual instructions Installation and Operation Manual de instrucciones Uso y mantenimien...

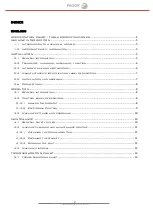
Page 2: ...er s identification label description 7 2 5 Installation and assembly 7 2 6 Connections 8 OPERATION 8 3 1 General information 8 3 2 Control panel description 8 3 2 1 Analog Thermostat 8 3 2 2 Electron...

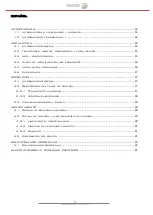
Page 3: ...16 2 6 Conexiones 17 OPERACION 17 3 1 Informaci n General 17 3 2 Descripci n del panel de control 17 3 2 1 Termostato anal gico 17 3 2 2 Control electronico 18 3 3 Configuraciones del Equipo 19 MANTE...

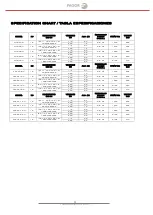
Page 4: ...704x766x929 115 2 7 8 8 Oz 1449 204 220 1 9 FST 36 10 N 1 6 36 1 3 x 30 x 36 1 2 923x766x929 115 2 7 8 8 Oz 1449 204 220 1 9 FST 48 12 N 1 4 48 1 3 x 30 x 36 1 2 1228x766x929 115 5 0 9 8 Oz 1666 289 2...

Page 5: ...n pan for efficient condensation 1 2 Important safety information DANGER Power must be turned off and disconnected from the power source whenever performing maintenance repair or cleaning the condensi...

Page 6: ...de Contact the dealer through which you purchased the unit Check the compressor compartment housing and visually inspect the refrigeration package Be sure lines are secure and base is still intact 2 3...

Page 7: ...loor strong enough to support the total weight of the unit and contents For the most efficient operation be sure to provide good air circulation inside and outside of the unit INSIDE CABINET The first...

Page 8: ...e 422 Appliances OPERATION 3 1 General information 3 2 Control panel description 3 3 Machine settings and programs 3 1 General information Good air flow inside the cabinet is critical Do not block air...

Page 9: ...or an error code call for technical service They will help you fix the problem FIGURE 1 Thermostat it s located inside the unit in the right side FIGURE 2 1 For best performance knob should be pointin...

Page 10: ...e the picture below Press this button to reach the desired value Release the button and then press the SET button to keep and save the new value Note The minimum value you can set in the controller is...

Page 11: ...are de greasing agents available for refrigeration use and specifically for the condenser coils The condenser coil may require a spray with the de greasing agent and then blown through with compresse...

Page 12: ...till located inside the drain pan The leveling of the unit is important as the units are designed to drain properly when on a level surface if your floor is not level this can also cause drain problem...

Page 13: ...must be 38 C 100 F f To insure proper air flow product must not be placed higher than the maximum level mark located on the internal wall of the unit g If FREEZER check that the temperature is not Cel...

Page 14: ...ci n eficiente 1 2 Informaci n de seguridad El equipo debe ser apagado y desconectado de la fuente de alimentaci n cuando realizar el mantenimiento reparaci n o limpieza de la unidad condensadora Si l...

Page 15: ...el equipo notif quelo de inmediato a la empresa transportadora mediante un llamado telef nico as como tambi n de manera escrita Solicite una inspecci n por parte de la compa a transportadora si el eq...

Page 16: ...Remoci n de la placa de datos anular la garant a 2 5 Instalaci n y Ensamble Las unidades presentadas en este manual est n dise adas para uso interior solamente Aseg rese de que la ubicaci n elegida ti...

Page 17: ...el aparato El equipo debe ser instalado en un circuito protegido por sobrecargas y o cortos circuitos as como por variaciones de voltaje IMPORTANTE El contacto o enchufe debe tener conductor de tierra...

Page 18: ...DE CONGELAC N Ejemplo FUF_ ACBR_MSP F Despu s de conectar su unidad active el interruptor situado en el controlador La pantalla se encender mostrando la temperatura dentro de la unidad Adem s los icon...

Page 19: ...l SET POINT para una nueva temperatura presione el bot n de flecha hacia abajo Pulse este bot n para alcanzar el valor deseado suelte el bot n y luego presione el bot n de SET para guardar el nuevo va...

Page 20: ...onecte la m quina Quite el panel delantero inferior y cuidadosamente Deslice hacia afuera la unidad condensadora La bobina del condensador requiere una limpieza regular recomendado cada 30 a 60 d as d...

Page 21: ...del evaporador Cada drenaje puede ser removido o desconectado Si percibe excesiva acumulaci n de agua en el interior de la unidad aseg rese de que est conectado el tubo de desag e del evaporador a la...

Page 22: ...ontrol no marque alguna alarma d Verifique que el SET POIT de temperatura es el correcto e Verifique que no existe obstrucci n al flujo del aire en el interior del equipo f Verifique que el ventilador...

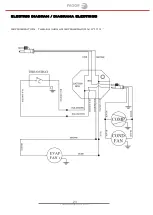
Page 23: ...23 fagorindustrial com ELECTRIC DIAGRAM DIAGRAMA ELECTRICO REFRIGERATION TABLES MESAS REFRIGERACION 27 72...

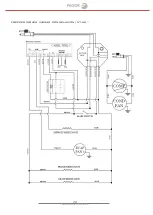
Page 24: ...24 fagorindustrial com FREZZER TABLES MESAS CONGELACION 27 60...

Page 25: ...25 fagorindustrial com ANEXOS...

Page 26: ...26 fagorindustrial com...

Page 27: ...Phone 866 463 2467 Circuito Exportaci n N 201 Parque Industrial Tres Naciones San Lu s Potos S L P M xico Tel fono Planta S L P 52 444 137 0500 Ext 538 Sin costo 01 800 00 FAGOR MULTI SOLUTION MANUFA...

Reviews: