background image

o


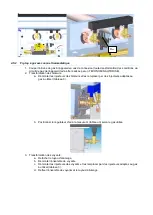
Das Bedienelement M entgegen  dem Uhrzeigersinn  in die Stellung für den  Pilotbrenner 

 drehen und das Bedienelement gedrückt halten. 

o


 Dann drücken Sie den Piezo Electric. 

o


Sollte  der  Pilotbrenner  nicht  automatisch  zünden,  kann  die  Zündung  mit  Hilfe  des 
Zündrohres von Hand erfolgen. 


Einschalten der Brenner: 

o


Zum Einschalten der Brenner muss das Bedienelement M gedrückt und entgegen dem 
Uhrzeigersinn in die gewünschte Stellung gedreht werden. 

5.2.1.3


Ausschalten der Brenner 


Das  Bedienelement  M  in  die  Stellung  für  den  Pilotbrenner 

  drehen,  so  dass  nur  der 

Pilotbrenner eingeschaltet ist. 

5.2.1.4


 Ausschalten des Pilotbrenners 


Das Bedienelement des Ventils M in die Stellung AUS   drehen. 

5.2.2


Gasbetriebene Griddle-Platte mit Thermostatventil 

5.2.2.1


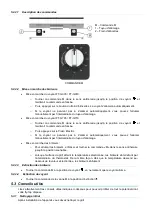
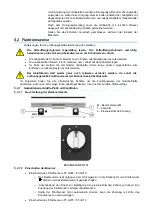
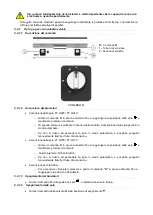
Beschreibung der Bedienelemente 


– Bedienelement M 

– Zündrohr 

– Piezoelektrische Zündung 


BEDIENELEMENT M 

5.2.2.2


Einschalten der Brenner 


Einschalten des Pilotbrenners FT-G905 / FT-G910 

o


Das Bedienelement M entgegen  dem Uhrzeigersinn  in die Stellung für den  Pilotbrenner 

 drehen und das Bedienelement gedrückt halten. 

o


 Anschließend  den  Knopf  zur  Betätigung  der  piezoelektrischen  Zündung  drücken.  Die 
Zündung des Pilotbrenners erfolgt vollautomatisch. 

o


Sollte  der  Pilotbrenner  nicht  automatisch  zünden,  kann  die  Zündung  mit  Hilfe  des 
Zündrohres von Hand erfolgen. 


Einschalten des Pilotbrenners FT-G705 / FT-G710 

o


Das Bedienelement M entgegen  dem Uhrzeigersinn  in die Stellung für den  Pilotbrenner 

 drehen und das Bedienelement gedrückt halten. 

o


 Dann drücken Sie den Piezo Electric. 

o


Sollte  der  Pilotbrenner  nicht  automatisch  zünden,  kann  die  Zündung  mit  Hilfe  des 
Zündrohres von Hand erfolgen. 


Summary of Contents for Kore 700 Series

Page 1: ...TION ET D ENTRETIEN EN INSTALLATION USAGE AND MAINTENANCE INSTRUCTIONS DE INSTALLATIONS GEBRAUCHS UND WARTUNGSANLEITUNG IT ISTRUZIONI PER L INSTALLAZIONE L USO E LA MANUTENZIONE TR MONTAJ KULLANIM VE BAKIM TALİMATLARI PL INSTRUKCJA MONTAŻU I UŻYTKOWANIA FT G905 FT G910 FT G705 FT G710 12159972 ...

Page 2: ... PLEASE READ INSTRUCTIONS PROTECTIVE EARTH EQUIPOTENTIAL BONDING VORSICHT GEFÄHRLICHE SPANNUNG ANLEITUNG GRÜNDLICH LESEN SCHUTZ ERDE POTENZIALAUSGLEICH PRECAUZIONE TENSIONE PERICOLOSA LEGGERE LE ISTRUZIONI TERRA DI PROTEZIONE EQUIPOTENZIALITÀ UWAGA WYSOKIE NAPIĘCIE PROSZĘ PRZECZYTAĆ INSTRUKCJĘ UZIEMIENIE PRZYŁĄCZE EKWIPOTENCJALNE Fagor Industrial S Coop Barrio Santxolopetegi 22 20560 Oñati Gipuzko...

Page 3: ...les y acometidas General dimensions and connections Allgemeine ABMessungen und Anschlüsse Dimensions générales et raccordements Dimensioni generali e le connessioni Wymiary i przyłącza FT G905 FT G910 FT G705 FT G710 G Entrada de Gas Gas Inlet E Conexión eléctrica Electrical conecction 1 Válvula de gas Gas valve 2 Pulsador tren de chispas Piezoelectric ignitor 3 Orificio de encendido manual Manual...

Page 4: ...renner Bruleur Bruciatore Palniki nº 1 2 1 2 ΣQn kW 9 25 2 x 9 25 7 5 2 x 7 5 Q kW Piloto Pilot burner Veilleuse Zundbrenner Pilota moc palnika pilota 0 25 0 25 0 25 0 25 Tensión alimentación Supply voltaje Versorgungs spannung Tension alimentation Tensione alimentazione Zasilanie elektryczne 230V 50 60 Hz 230V 50 60 Hz Sección manguera Cable section Querschnitt schlauch Section câble Sezion Cavo ...

Page 5: ...pen BE FR II2E 3 G 20 20 9 25 2x160 28 4 0 100 y abrir v 40 Open G 25 25 8 25 2x160 28 4 0 100 y abrir v 40 Open G 30 G 31 28 30 37 9 25 2x110 28 4 0 100 25 Open Grupo 2 II2H3 G 20 20 9 25 2x160 28 4 0 100 y abrir v 40 Open G 30 G 31 28 30 37 9 25 2x110 28 4 0 100 25 Open DE II2ELL3B P G 20 20 9 25 2x160 28 4 0 100 y abrir v 40 Open G 25 20 9 25 2x180 28 4 0 100 y abrir v 40 Open G 30 G 31 50 9 25...

Page 6: ... 28 2x4 0 100 25 Open Grupo 2 II2H3 G 20 20 2x9 25 2x 2x160 28 2x4 0 100 y abrir v 40 Open G 30 G 31 28 30 37 2x9 25 2x 2x110 28 2x4 0 100 25 Open DE II2ELL3B P G 20 20 2x9 25 2x 2x160 28 2x4 0 100 y abrir v 40 Open G 25 20 2x9 25 2x 2x180 28 2x4 0 100 y abrir v 40 Open G 30 G 31 50 2x9 25 2x 2x90 28 2x4 0 100 20 Open DK II2H3B P III1a2H3B P G 20 20 2x9 25 2x 2x160 28 2x4 0 100 y abrir v 40 Open G...

Page 7: ...0 25 BE FR II2E 3 G 20 20 7 5 210 26 3 75 1 y abrir v 40 G 25 25 7 0 210 26 3 75 1 y abrir v 40 G 30 G 31 28 30 37 7 5 140 20 3 75 0 90 25 Grupo 2 II2H3 G 20 20 7 5 210 26 3 75 1 y abrir v 40 G 30 G 31 28 30 37 7 5 140 20 3 75 0 90 25 DE II2ELL3B P G 20 20 7 5 210 26 3 75 1 y abrir v 40 G 25 20 7 5 225 26 3 75 1 y abrir v 40 G 30 G 31 50 7 5 120 20 3 75 0 90 20 DK G 110 8 6 75 425 26 3 75 1 y abri...

Page 8: ...1 y abrir v 40 G 25 25 2x7 0 2x210 26 2x3 75 1 y abrir v 40 G 30 G 31 28 30 37 2x7 5 2x140 20 2x3 75 0 90 25 Grupo 2 II2H3 G 20 20 2x7 5 2x210 26 2x3 75 1 y abrir v 40 G 30 G 31 28 30 37 2x7 5 2x140 20 2x3 75 0 90 25 DE II2ELL3B P G 20 20 2x7 5 2x210 26 2x3 75 1 y abrir v 40 G 25 20 2x7 5 2x225 26 2x3 75 1 y abrir v 40 G 30 G 31 50 2x7 5 2x120 20 2x3 75 0 90 20 DK G 110 8 2x6 75 2x425 26 2x3 75 1 ...

Page 9: ...dèle Modelo Model Consumo de aire necesario para la combustión Air consumption necessary for combustión Für die Verbrennung erforderlicher Luftverbraucht Consommation d air nécessaire á la combustión Consumo di aria necessario per la combustion Zużycie powietrza wymaganego do spalania Nm3 h FT G905 18 50 FT G910 37 00 FT G705 15 FT G710 30 ...

Page 10: ...50 CHIPRE CY 20 28 30 37 CHEQUIA CZ 20 28 30 37 ALEMANIA DE 20 50 DINAMARCA DK 8 20 30 ESTONIA EE 20 30 ESPAÑA ES 20 28 30 37 FINLANDIA FI 20 30 FRANCIA FR 20 25 28 30 37 REINO UNIDO GB 20 28 30 37 GRECIA GR 20 28 30 37 CROACIA HR 20 30 HUNGRÍA HU 25 30 IRLANDA IE 20 28 30 37 ISLANDIA IS 30 ITALIA IT 20 28 30 37 LITUANIA LT 20 30 LUXEMBURGO LU 20 LETONIA LV 20 30 REPUBLICA DE MACEDONIA MK 20 30 MA...

Page 11: ...0 50 DINAMARCA DK 20 30 ESTONIA EE 20 30 ESPAÑA ES 20 28 30 37 FINLANDIA FI 20 30 FRANCIA FR 20 25 28 30 37 REINO UNIDO GB 20 28 30 37 GRECIA GR 20 28 30 37 CROACIA HR 20 30 HUNGRÍA HU 25 30 IRLANDA IE 20 28 30 37 ISLANDIA IS 30 ITALIA IT 20 28 30 37 LITUANIA LT 20 30 LUXEMBURGO LU 20 LETONIA LV 20 30 REPUBLICA DE MACEDONIA MK 20 30 MALTA MT 30 PAÍSES BAJOS NL 20 25 30 NORUEGA NO 20 30 POLONIA PL ...

Page 12: ...I2H3B P 20 30 ESPAÑA ES II2H3 20 28 30 37 FINLANDIA FI II2H3B P 20 30 FRANCIA FR II2E 3 20 25 28 30 37 REINO UNIDO GB II2H3 20 28 30 37 GRECIA GR II2H3 20 28 30 37 CROACIA HR II2H3B P 20 30 HUNGRÍA HU II2HS3B P 25 30 IRLANDA IE II2H3 20 28 30 37 ISLANDIA IS I3B P 30 ITALIA IT II2H3 20 28 30 37 LITUANIA LT II2H3B P 20 30 LUXEMBURGO LU I2E 20 LETONIA LV II2H3B P 20 30 REPÚBLICA DE MACEDONIA MK II2H3...

Page 13: ...II2H3 20 28 30 37 FINLANDIA FI II2H3B P 20 30 FRANCIA FR II2E 3 20 25 28 30 37 REINO UNIDO GB II2H3 20 28 30 37 GRECIA GR II2H3 20 28 30 37 CROACIA HR II2H3B P 20 30 HUNGRÍA HU II2HS3B P 25 30 IRLANDA IE II2H3 20 28 30 37 ISLANDIA IS I3B P 30 ITALIA IT II2H3 20 28 30 37 LITUANIA LT II2H3B P 20 30 LUXEMBURGO LU I2E 20 LETONIA LV II2H3B P 20 30 REPUBLICA DE MACEDONIA MK II2H3B P 20 30 MALTA MT I3B P...

Page 14: ...zów Gas natural Natural gas Erdgas Gaz natural Gas naturale Gaz naturalny MJ m G L P L P G Verflüssigtes Petroleumgas MJ kg G 20 G 25 G 20 G 25 G 20 G 25 Poder calorífico inferior Lower calorific value Unterer Heizwert Puissance calorifique inférieur Potere calorifico inferiore Dolna wartość opałowa 34 02 37 38 34 02 37 38 34 02 37 38 ...

Page 15: ...ases 19 4 5 1 Fry top a gas con grifo válvula 19 4 5 2 Fry top a gas con válvula termostática 20 4 6 Reciclaje 21 5 INSTRUCCIONES DE USO Y MANTENIMIENTO 21 5 1 Riesgos de utilización 21 5 2 Funcionamiento 21 5 2 1 Fry top a gas con grifo válvula 22 5 2 2 Fry top a gas con válvula termostática 22 5 3 Consejos útiles 23 5 3 1 Limpieza inicial 23 5 3 2 Mantenimiento 24 5 3 3 No uso prolongado 24 6 AN...

Page 16: ...gos a la salud y seguridad de los usuarios y así como al equipo Si su máquina ha sufrido alguna avería llame al Servicio de Asistencia Técnica NO trate de repararlo usted mismo o personal no cualificado ni autorizado Utilice repuestos originales de lo contrario quedara sin efecto la garantía Para evitar la contaminación de los alimentos trabajados y mantener la higiene es recomendable limpiar los ...

Page 17: ...e asado 3 Orificio de encendido manual 4 Cajon recogegrasas 5 Pulsador tren de chispas 6 Válvula de gas 7 Pata regulable DISPOSITIVOS DE SEGURIDAD Los fry tops de cromo duro cuentan con un termostato de seguridad que corta el gas en caso de recalentamiento de la plancha El piloto de encendido cuenta con un termopar que corta el gas en caso de apagarse la llama DOTACIÓN DE ACCESORIOS En los fry top...

Page 18: ...ras de 150ºC se deberá instalar el equipo a una distancia igual o superior a 100mm de la misma Los aparatos solo pueden instalarse sobre y o contra una superficie incombustible Se recomienda analizar el lugar donde se va a instalar la máquina antes de su instalación para que no sufra daño alguno durante su uso Salvo indicaciones específicas en contra las piezas que han sido protegidas por el fabri...

Page 19: ...ZADO La instalación general deberá estar provista de una llave de paso y un regulador de presión siendo aconsejable además poner una llave de corte por cada aparato de consumo Para la conexión de gas debe emplearse un tubo que como mínimo sea de Ø12x10mm y acabado en una tuerca de para acoplar al fry top 4 5 Transformación a distintos gases Si el aparato está preparado a un gas distinto al que se ...

Page 20: ...ores a Desmontar los inyectores de los quemadores y sustituirlos por los adecuados según el gas a utilizar tabla 3 b Posicionar el regulador de aire a la medida H tabla 3 según el gas a utilizar 3 Transformación de los pilotos a Soltar el tubo de encendido b Soltar el conjunto piloto c Desmontar los inyectores de los pilotos y sustituirlos por los adecuado según el gas a utilizar tabla 3 d Volver ...

Page 21: ...eteriorarse las partes funcionales del mismo El funcionamiento en vacío del equipo durante mucho tiempo puede provocar un sobrecalentamiento de los componentes Límpie asiduamente la máquina Si se van a utilizar disolventes o productos de limpieza inflamables para quitar las posibles incrustaciones de la plancha hacerlo siempre con la plancha fría los mandos de los quemadores en posición apagado y ...

Page 22: ... piloto se realizará de forma automática o En caso de no conseguir encender el piloto de forma automática existe la posibilidad de encenderlo manualmente a través del tubo de encendido Encedido de piloto FT G705 FT G710 o Girar el mando M en sentido antihorario hasta la posición piloto y mantener el mando pulsado o A continuación pulsar el piezo eléctrico o En caso de no conseguir encender el pilo...

Page 23: ...o conseguir encender el piloto existe la posibilidad de encenderlo manualmente a través del tubo de encendido Encendido de quemadores o Para encender los quemadores pulsar y girar el mando M en sentido antihorario hasta la posición deseada o En el momento en que la superficie de la plancha alcanza la temperatura seleccionada los quemadores por medio del termostato se apagarán Así mismo tan pronto ...

Page 24: ... al agujero recogegrasas Prestad especial atención para que no se desborde el cajón recogegrasas Plancha de hierro o Frotar la superficie de la plancha con vinagre limón o cualquier desengrasante natural Una vez límpiada la plancha se debe secar toda su superficie Para asegurar el secado se puede encender el fry top Para evitar que las planchas de hierro se oxiden conviene frotar su superficie con...

Page 25: ...ica 7 RECICLAJE DEL PRODUCTO La norma Europea 2012 19 EU sobre la eliminación de aparatos eléctricos y electrónicos indica que los electrodomésticos no deben ser eliminados de la misma manera que los desechos sólidos urbanos Los aparatos en desuso se deben recoger separadamente para optimizar el porcentaje de recuperación y reciclaje de los materiales que los componen e impedir potenciales daños p...

Page 26: ... to other types of gas 30 4 5 1 Fry top a gas con grifo válvula 30 4 5 2 Gas Fry top with thermostatic valve 31 4 6 Recycling 32 5 INSTRUCTIONS FOR USE AND MAINTENANCE 32 5 1 Risks of use 32 5 2 Operation 32 5 2 1 Gas fry top with valve tap 33 5 2 2 Gas fry top with thermostatic valve 33 5 3 Useful tips 34 5 3 1 Initial cleaning 34 5 3 2 Maintenance 34 5 3 3 Prolonged periods of no use 35 6 FAULTS...

Page 27: ...afety of users and damage to the equipment If your machine breaks down please call the Technical Service Centre Do NOT try to repair it yourself or have it repaired by unqualified and unauthorized persons Use of spare parts other than original parts will cancel the guarantee To prevent the contamination of elaborated food and to maintain hygiene standards the elements in contact with food and surr...

Page 28: ...NT 1 Chimney 2 Grill plate 3 Manual ignition hole 4 Grease collection drawer 5 Spark generation button 6 Gas valveAdjustable leg SAFETY DEVICES The hard chrome fry tops have a safety thermostat which disconnects the gas if the hotplate overheats The ignition pilot light has a thermocouple which disconnects the gas supply if the flame goes out ACCESSORIES SUPPLIED The hard chrome fry tops are suppl...

Page 29: ...ring use Unless otherwise indicated the parts that have been protected by the manufacturer must not be manipulated by the installer 4 3 Electrical connection FT G905 FT G910 An AUTHORISED TECHNICIAN should always carry out the appliance s electrical connection The legal standards in force in each country regarding connection to the mains should be taken into account Check that the mains voltage co...

Page 30: ...gether with a nut to connect to the Fry Top 4 5 Conversion to other types of gas If the appliance is prepared for a different type of gas to the one available in the installation you should proceed as follows 4 5 1 Fry top a gas con grifo válvula 1 Disconnect the gas supply to the appliance if connected Any change to the conditions of the gas circuit must be carried out by an AUTHORISED TECHNICIAN...

Page 31: ...rsión a Remove the burner injectors and replace with the correct model according to the gas to be used table 3 b Set the air control to position H table 3 depending on the gas to be used 3 Pilot conversión a Release the ignition pipe b Undo the pilot unit c Remove the pilot injectors and replace with the correct model according to the gas to be used table 3 d Replace the pilot unit and the ignitio...

Page 32: ...ng other than what it is designed for as its operating components may be damaged Use of the equipment while empty may result in overheating of the components Clean the machines thoroughly If you are going to use solvents or inflammable cleaning products to remove any dirt on the hotplate always do so when the hotplate is cold the burner control buttons are switched to Off and the mains power is di...

Page 33: ...tion button The pilot will light automatically o If the pilot does not light automatically it is possible to light it manually through the ignition pipe Pilot ignition FT G705 FT G710 o Turn control M anticlockwise to the position Pilot and hold button down o Next press the piezo button o If the pilot does not light it is possible to light it manually through the ignition pipe Burner ignition o To...

Page 34: ...otate anticlockwise to the required position o When the surface of the hotplate reaches the selected temperature the burners will turn off by means of the thermostat Likewise as soon as the temperature drops below the selected value the burners turn on 5 2 2 3 Turing the burners off Turn the M control to the position Pilot only the pilot will be lit 5 2 2 4 Turning the pilot light off Turn the M v...

Page 35: ...e should be rubbed with a cloth moistened with olive oil This is not necessary but is recommendable for the Hard Chrome hotplates 5 3 3 Prolonged periods of no use If the machine is kept out of service for a long period of time holidays temporary closure please observe the following Close the gas supply Clean the machine and the adjacent areas thoroughly Sprinkle a thin layer of edible oil on the ...

Page 36: ...damage to health and to the environment The crossed out bin symbol is displayed on all the products to remind users of their obligation to dispose of the product separately For further information on the correct disposal of electrical kitchen appliances users may refer to the relevant public authority or other retailers NOTE If a fault occurs and is not listed in the above table please call the te...

Page 37: ...z différents 41 4 5 1 Fry top à gaz avec robinet à vanne 41 4 5 2 Fry top à gaz avec vanne thermostatique 42 4 6 Recyclage 43 5 INSTRUCTIONS D UTILISATION ET D ENTRETIEN 43 5 1 Risques d utilisation 43 5 2 Fonctionnement 43 5 2 1 Fry top à gaz avec robinet à vanne 44 5 2 2 Fry top à gaz avec vanne thermostatique 44 5 3 Conseils utiles 45 5 3 1 Nettoyage initial 45 5 3 2 Entretien 46 5 3 3 Non util...

Page 38: ...anté et la sécurité des utilisateurs ainsi que pour l équipement Si votre machine tombe en panne appelez le Service d assistance technique N essayez pas de la réparer vous même ou de la faire réparer pour un personnel non qualifié ni autorisé Utilisez des pièces de rechange d origine sinon la garantie sera annulée Pour éviter la contamination des aliments travaillés et maintenir l hygiène il est r...

Page 39: ...minée 2 Grill 3 Orifice d allumage manuel 4 Tiroir ramasse graisse 5 Bouton poussoir train d étincelles 6 Clapet de gaz 7 Pied réglable DISPOSITIFS DE SÉCURITÉ Les fry tops disposent d un thermostat de sécurité qui coupe le chauffage en cas de réchauffement du grill Le voyant de mise en marche dispose d un thermocouple qui coupe le gaz si la flamme s éteint ACCESSOIRES FOURNIS Les fry tops en chro...

Page 40: ...150 ºC l équipement devra être installé à une distance égale ou supérieure à 100 mm de celui ci Les appareils ne peuvent être installés sur et ou contre une surface incombustible Nous vous conseillons d analyser le lieu où sera installée la machine avant sa mise en place pour qu elle ne soit pas endommagée durant son utilisation Sauf indications contraires les pièces qui ont été protégées par le f...

Page 41: ... par un TECHNICIEN AUTORISÉ L installation générale doit être équipée d un robinet d arrêt et d un régulateur de pression Il est aussi conseillé d installer un robinet de coupure pour chaque appareil de consommation Pour raccorder le gaz utilisez un tuyau d au moins 12x10 mm de diamètre et terminé par un écrou de pouce pour le brancher au fry top 4 5 Adaptation à des gaz différents Si l appareil e...

Page 42: ...a Démonter les injecteurs des brûleurs et les remplacer par des injecteurs adaptés au gaz à utiliser tableau 3 b Positionner le régulateur d air à la mesure H tableau 3 selon le gaz utilisé 3 Transformation des voyants a Relâcher le tuyau d allumage b Démonter l ensemble de voyants c Démonter les injecteurs des voyants et les remplacer par des injecteurs adaptés au gaz à utiliser tableau 3 d Refix...

Page 43: ...et appareil à des fins différentes que celles prévues car cela peut détériorer les parties fonctionnelles de ce dernier Le fonctionnement à vide de l équipement pendant une longue période peut entraîner une surchauffe des composants Nettoyez assidûment la machine En cas d utilisation de dissolvants ou de produits de nettoyage inflammables pour enlever d éventuelles incrustations du grill toujours ...

Page 44: ...e o Puis appuyer sur le bouton du train d étincelles Le voyant s allumera automatiquement o Si le voyant ne parvient pas à s allumer automatiquement vous pouvez l allumer manuellement par l intermédiaire du tuyau d allumage Mise en marche du voyant FT G705 FT G710 o Tourner la commande M dans le sens antihoraire jusqu à la position de voyant et maintenir la commande enfoncée o Puis appuyez sur le ...

Page 45: ...t pas à s allumer automatiquement vous pouvez l allumer manuellement par l intermédiaire du tuyau d allumage Mise en marche des brûleurs o Pour allumer les brûleurs enfoncer et tourner la commande M dans le sens antihoraire jusqu à la position souhaitée o Lorsque l surface du grill atteint la température sélectionnée les brûleurs s éteindront par l intermédiaire du thermostat De la même façon dès ...

Page 46: ...une spatule spéciale éliminez les restes de saleté vers l orifice de récupération de graisse Faites particulièrement attention à ce que le tiroir ramasse graisse ne déborde pas Grill en fer o Frotter la surface du grill avec du vinaigre du citron ou tout autre dégraissant naturel Une fois nettoyé sécher toute la surface du grill Pour garantir un bon séchage le fry top peut être allumé Afin d évite...

Page 47: ...tance technique 7 RECYCLAGE DU PRODUIT La norme européenne 2012 19 EU concernant l élimination d appareils électriques et électroniques indique que les électroménagers ne doivent pas être éliminés de la même manière que les déchets solides urbains Les appareils usagés doivent être recueillis séparément afin d optimiser le pourcentage de récupération et de recyclage des matériaux qui les composent ...

Page 48: ...asbetriebene Griddle Platte mit Ventilhahn 52 4 5 2 Gasbetriebene Griddle Platte mit Thermostatventil 53 4 6 Recycling 54 5 GEBRAUCHS UND WARTUNGSANLEITUNG 54 5 1 Gefahren beim Gebrauch 54 5 2 Funktionsweise 55 5 2 1 Gasbetriebene Griddle Platte mit Ventilhahn 55 5 2 2 Gasbetriebene Griddle Platte mit Thermostatventil 56 5 3 Nützliche Ratschläge und Tipps 57 5 3 1 Erste Reinigung 57 5 3 2 Wartung ...

Page 49: ... Gerät auftreten so setzen Sie sich bitte mit dem zuständigen Kundendienst in Verbindung Versuchen Sie bitte AUF KEINEN FALL das Gerät selbst zu reparieren oder die Reparatur durch nicht qualifiziertes bzw autorisiertes Personal durchführen zu lassen Verwenden Sie ausschließlich Original Ersatzteile da anderenfalls die Garantie erlischt Der Hersteller empfiehlt alle in Kontakt mit den Lebensmittel...

Page 50: ...lade 5 Taste für die piezoelektrische Zündung 6 Gasventil 7 Höhenverstellbarer Gerätefuß SICHERHEITSVORRICHTUNGEN Die hartverchromten Griddle Platten sind mit einem Sicherheitstemperaturregler ausgerüstet der den Aufheizvorgang sofort unterbricht sobald die Glühplatte zu heiß wird Der Pilotbrenner zum Zünden ist mit einem Thermoelement ausgerüstet das die Gasversorgung unterbricht sobald die Flamm...

Page 51: ...der gültigen Gesetzgebung vorgenommen werden um die Bildung unzulässiger Anhäufungen von Schadstoffen am Aufstellungsort zu verhindern Sollte die benachbarte Wand nicht in der Lage sein Temperaturen von 150 ºC auszuhalten so muss das Gerät in einer Entfernung von mindestens 100 mm zur entsprechenden Wand aufgestellt werden Die Geräte dürfen nur auf oder neben nicht brennbaren Flächen aufgestellt w...

Page 52: ...ehörenden Deckels muss die Zuleitung ordnungsgemäß an der Stopfbuchse befestigt werden Der Hersteller übernimmt keine Verantwortung für Personen bzw Sachschäden an dem Gerät bei Nichteinhaltung der werkseits vorgegebenen Spezifikationen bzw einer nicht ordnungsgemäßen Installation 4 4 Gasanschluss Der Gasanschluss des Gerätes muss von einem AUTORISIERTEN FACHTECHNIKER vorgenommen werden Die Haupti...

Page 53: ...estigen 4 5 2 Gasbetriebene Griddle Platte mit Thermostatventil 1 Den Gasdurchlauf zum Gerät unterbrechen falls dieses eingeschaltet ist nur ein AUTORISIERTER FACHTECHNIKER darf Änderungen am Gaskreislauf des Gerätes durchführen 2 Umrüstung der Brenner a Die Injektoren der Brenner durch die für die verwendete Gasart passenden Injektoren ersetzen tabelle 3 b Den Luftregler je nach vorhandener Gasar...

Page 54: ...die örtliche Entsorgungsstelle für weitere Informationen Entsorgen Sie alle Verpackungselemente gemäß den jeweils gültigen Bestimmungen 5 GEBRAUCHS UND WARTUNGSANLEITUNG DIE IM VORLIEGENDEN HANDBUCH ENTHALTENEN ANWEISUNGEN VOR DER INBETRIEBNAHME DES GERÄTES GRÜNDLICH DURCHLESEN DIESES GERÄT IST AUSSCHLIESSLICH FÜR DEN PROFIGBERAUCH BESTIMMT UND DARF NUR VON QUALIFIZIERTEM FACHPERSONAL BEDIENT WERD...

Page 55: ...tte dürfen keine spitzen Gegenstände zum Entfernen von Essensresten benutzt werden Der Abluftkamin darf weder ganz noch teilweise verdeckt werden da sonst die ordnungsgemäße Funktionsweise der Brenner beeinträchtigt wird Im Folgenden finden Sie alle erforderlichen Schritte um die Funktionsweise der Griddle Platte optimieren zu können Wir zeigen Ihnen alle Möglichkeiten über die Ihre Griddle Platte...

Page 56: ...tte mit Thermostatventil 5 2 2 1 Beschreibung der Bedienelemente M Bedienelement M 1 Zündrohr 2 Piezoelektrische Zündung BEDIENELEMENT M 5 2 2 2 Einschalten der Brenner Einschalten des Pilotbrenners FT G905 FT G910 o Das Bedienelement M entgegen dem Uhrzeigersinn in die Stellung für den Pilotbrenner drehen und das Bedienelement gedrückt halten o Anschließend den Knopf zur Betätigung der piezoelekt...

Page 57: ...iten durchführen um eine lange Lebensdauer des Gerätes zu gewährleisten Das Gerät und die Fettauffangschublade zum Feierabend stets von allen Speiseresten reinigen Keine scheuernden ätzenden oder laugehaltigen Produkte Lösungsmittel und Spülmittel auf Chlorbasis oder Benzinderivate zur Reinigung verwenden Das Gerät nicht mit Wasserstrahlen reinigen Die Glühplatte sollte regelmäßig gereinigt werden...

Page 58: ...ut versuchen den Zündvorgang durchzuführen Die Flamme ist gelblich gefärbt Brenner verschmutzt Wenden Sie sich bitte an den zuständigen Kundendienst Die Griddle Platte heizt nicht auf Ventilhahn beschädigt Wenden Sie sich bitte an den zuständigen Kundendienst 7 RECYCLING DES GERÄTES Haushaltsgeräte dürfen laut der europäischen Norm 2012 19 EU über die Entsorgung von elektrischen und elektronischen...

Page 59: ...ti tipi di gas 63 4 5 1 Fry top a gas con rubinetto valvola 63 4 5 2 Fry top a gas con valvola termostatica 64 4 6 Riciclaggio 65 5 ISTRUZIONI DI USO E MANUTENZIONE 65 5 1 Rischi d uso 65 5 2 Funzionamento 65 5 2 1 Fry top a gas con rubinetto valvola 66 5 2 2 Fry top a gas con valvola termostatica 67 5 3 Consigli utili 67 5 3 1 Pulizia iniziale 67 5 3 2 Manutenzione 68 5 3 3 Non per uso prolungato...

Page 60: ...e dell apparecchio In caso di guasti si prega di contattare il Servizio di Assistenza Tecnica NON cercare di eseguire le riparazioni da soli o aiutato da personale non qualificato o autorizzato Utilizzare pezzi di ricambio originali altrimenti la garanzia decade Per evitare a contaminazione degli alimenti elaborati e per mantenere l igiene si raccomanda di pulire gli elementi che entrano a contatt...

Page 61: ...astra di cottura 3 Foro di accensione manuale 4 Cassetto per la raccolta dei grassi 5 Accendigas a scintilla 6 Valvola del gas 7 Piedino regolabile DISPOSITIVI DI SICUREZZA I fry tops al cromo duro sono dotati di un termostato di sicurezza che chiude il gas in caso di riscaldamento della piastra La spia di accensione è dotata anche di una termocoppia che blocca il cas nel caso di spegnimento della...

Page 62: ...ui viene installato Se la parete non resiste a temperature di 150ºC l attrezzatura dovrà essere installata a una distanza uguale o superiore a 100mm dal muro Le attrezzature possono essere installate sopra e o appoggiati a una superficie ignifuga Si raccomanda di analizzare il luogo in cui verrà installata la macchina prima dell installazione per evitare il verificarsi di danni durante l uso Salvo...

Page 63: ...essere realizzata sempre da un TECNICO AUTORIZZATO L installazione generale deve essere dotata di un rubinetto di distribuzione e di un regolatore di pressione in cui si consiglia installare un rubinetto d arresto per ciascun apparecchio di consumo Per la connessione del gas utilizzare un tubo che sia come minimo di Ø12x10mm e sull estremità essere dotato di un dado di per adattarlo al fry top 4 5...

Page 64: ...rmazione dei bruciatori a Smontare gli iniettori I dei bruciatori e sostituirli con quelli adeguati a seconda del gas che si utilizza tabella 3 b Posizionare il regolatore dell aria al grado H tabella 3 secondo il tipo di gas che si vuole utilizzare 3 Trasformazione delle spese a Sganciare il tubo di accensione b Smontare il gruppo della spia c Smontare gli iniettori delle spie e sostituirli con q...

Page 65: ...to poiché gli elementi funzionali potrebbero deteriorarsi Il funzionamento a vuoto dell apparecchio per molto tempo può provocare un surriscaldamento dei componenti Pulire gli apparecchi frequentemente Nel caso di utilizzare dei solventi o prodotti per la pulizia infiammabili per evitare delle eventuali incrostazioni dalla vasca pulire sempre con la piastra fredda i comandi in posizione di spegnim...

Page 66: ...le scintille L accensione della spia avverrà in modo automatico o Se non si riesce ad accendere la spia in modo automatico è possibile eseguirlo manualmente tramite il tubo di accensione Accensione della spia FT G705 FT G710 o Girare il comando M in senso antiorario fino a raggiungere la posizione della spia e mantenere premuto il comando o Quindi premere il Piezo Electric o Se non si riesce ad ac...

Page 67: ...uto il comando o Quindi premere il Piezo Electric o Se non si riesce ad accendere la spia in modo automatico è possibile eseguirlo manualmente tramite il tubo di accensione Accensione dei bruciatori o Per accendere i bruciatori premere e girare il comando M in senso antiorario fino a raggiungere la posizione desiderata o Quando la superficie della piastra raggiunge la temperatura selezionata i bru...

Page 68: ...le eliminare i resti di sporcizia da dirigere verso il foro raccogli grasso Fare particolare attenzione per evitare il trabocco del cassetto raccogli grasso Piastra di ferro o Strofinare la superficie della piastra con aceto limone o qualsiasi sgrassatore naturale Dopo aver pulito la piastra asciugare tutta la superficie Per una perfetta asciugatura si può accendere il fry top Per evitare l ossida...

Page 69: ...istenza tecnica 7 RICICLAGGIO DEL PRODOTTO La norma dell Unione Europea 2012 19 EU circa lo smaltimento degli apparecchi elettrici ed elettronici indica che gli elettrodomestici non devono essere smaltiti nello stesso modo dei rifiuti solidi urbani Smaltire gli apparecchi fuori uso separatamente per ottimizzare la percentuale di recupero e riciclaggio dei materiali per i componenti ed evitare even...

Page 70: ...önüştürme 74 4 5 1 Musluk vanalı gazlı fry top 74 4 5 2 Termostatik vanalı gazlı fry top 75 4 6 Geri dönüşüm 76 5 KULLANIM VE BAKIM TALİMATLARI 76 5 1 Kullanım riskleri 76 5 2 İşleyiş 77 5 2 1 Musluk vanalı gazlı fry top 77 5 2 2 Termostatik vanalı gazlı fry top 78 5 3 Kullanışlı tavsiyeler 79 5 3 1 İlk temizlik 79 5 3 2 Bakım 79 5 3 3 Uzun süre kullanmama 79 6 ANORMAL DURUMLAR ALARMLAR VE ARIZALA...

Page 71: ...n sağlık ve güvenliği ve cihaz açısından riskler doğurabilir Eğer makinanız arızalandıysa Teknik Yardım Servisini arayınız Cihazı kendinizin ya da yetkili veya kalifiye olmayan bir personelin onarmasınaİZİN VERMEYİN Orijinal yedek parçaları kullanın aksi takdirde cihaz garanti dışı kalır Kullanılan besinlerin kirlenmesini önlemek ve hijyeni korumak için her kullanımdan sonra besinlerle temas halin...

Page 72: ...rası 3 Manuel çalıştırma deliği 4 toplayıcı çekmece Yağ 5 Çakmak düğmesi 6 Gaz vanası 7 Yükseklik ayarlı ayaklar GÜVENLİK CİHAZLARI Sert kromdan fry toplar da ızgaranın tekrar ısınması halinde gazı kesen bir güvenlik termostatı bulunmaktadır Işıklı açma düğmesinde ateşin sönmesi halinde gazı kesen bir termokulp bulunmaktadır AKSESUARLARIN DONANIMI Sert kromdan fry top larda yağ toplama deliği için...

Page 73: ...kurmak gerekir Cihazlar sadece yanıcı olmayan bir yüzeyin üstüne ve veya üzerine kurulabilir Kullanımı sırasında herhangi bir hasar görmemesi adına makinayı kurmadan önce makinanın kullanılacağı yerin analiz edilmesi önerilmektedir Aksi belirtilmediği takdirde üretici tarafından korunan parçalar kurulumu yapan kişi tarafından manipüle edilmemelidir 4 3 Elektrik bağlantısı FT G905 FT G910 Cihazın e...

Page 74: ...tüketim aparatı için bir akım kesme anahtarının da konması önerilir Gaz bağlantısı için fry top a iliştirilmesi adına en az Ø12x10mm ve somun bitişten bir boru kullanılmalıdır 4 5 Farklı gazlara dönüştürme Eğer cihaz kurulumda mevcut olandan farklı bir gaz için hazırlanmışsa aşağıdaki şekilde işlem yapılmalıdır 4 5 1 Musluk vanalı gazlı fry top 1 Eğer bağlanmışsa cihaza gaz geçişini kesin Cihazın ...

Page 75: ...llarında yapılacak her türlü değişim YETKİLİ BİR TEKNİK eleman tarafından yapılmalıdır 2 Ocakların dönüştürülmesi a Ocakların enjektörlerini sökün ve kullanılacak gaza göre uygun enjektörler koyun tablo 3 b Kullanılacak gaza göre hava regülatörünü H seviyesine tablo 3 getirin 3 Pilot düğmelerin dönüştürülmesi Rair ...

Page 76: ...nanın paketlenmesi için kullanılan tüm ambalajlar geri dönüşüme verilebilir bu ürünlerin doğru şekilde atılması çevrenin korunmasına katkı sağlar Bu ürünlerin geri dönüşümü hakkında daha fazla bilgi edinmek için ilgili yerel birim ile görüşün Bu malzemeleri yürürlükte olan standartlara uygun şekilde atın 5 KULLANIM VE BAKIM TALİMATLARI CİHAZI ÇALIŞTIRMADAN ÖNCE BU KILAVUZDAKİ TALİMATLARI DİKKATLİ ...

Page 77: ...dikkatli bir şekilde çıkarın dökülme tehlikesi Izgarayı tencere veya tava ısıtmak için kullanmayın Besini et balık sebze doğrudan ızgaranın üstüne koyun Krom ızgaralı cihazlarda yemek kalıntılarını çıkarmak için ucu sivri nesneler kullanmayın Ocakların iyi şekilde işlemesi için bacanın kısmen de olsa tıkanmamış olmaması çok önemlidir Aşağıda tüm işleyiş olasılıklarını göstererek fry top un en iyi ...

Page 78: ...ların yakılması Pilot düğmenin yanması FT G905 FT G910 o M düğmesini pilot pozisyonuna kadar saatin aksi yönüne doğru çevirin ve basılı tutun o Sonrasında çakmak butonuna basın Pilot düğme otomatik olarak yanacaktır o Pilot düğme otomatik olarak yanmazsa yakma borusu aracılığıyla manuel şekilde yakma imkanı da bulunmaktadır Pilot düğmenin yanması FT G705 FT G710 o M düğmesini pilot pozisyonuna kad...

Page 79: ...r şekilde temizlemek uygun olacaktır Fry top u temizlemek için bazı öneriler Sert Krom Izgara o Izgara hala sıcakken yağ toplama çekmecesini tıkamalı ve buz dökmelidir Sonrasında özel bir spatula ile kirli kalıntıları yağ toplama deliğine doğru temizlemek gerekir Yağ toplama çekmecesinin devrilmemesine özellikle dikkat edin Demir ızgara o Izgaranın yüzeyini sirke limon veya herhangi başka bir doğa...

Page 80: ...le ilgili 2012 19 EU sayılı Avrupa standardı elektronik ev aletlerinin katı şehir atıkları ile aynı şekilde atılmaması gerektiğini belirtir Kullanılmayan aletler kendisini meydana getiren materyallerin geri kazanılma ve geri dönüşüm yüzdesini artırmak ve sağlığa ve çevreye olan olası zararlarını önlemek adına ayrı şekilde toplanmalıdır Üstü çizilmiş çöp kovası sembolü ürünün ayrı şekilde toplanma ...

Page 81: ...ików płyty bez zaworu termostatycznego 85 4 6 2 Konwersja palników płyty z zaworem termostatycznym 86 8 87 4 7 Recykling 87 5 INSTRUKCJA UŻYTKOWANIA I KONSERWACJI 87 5 1 Ryzyko zwiazane z użytkowaniem 87 5 2 Obsługa 88 5 2 1 Płyta do smażenia z zaworem gazowym bez termostatycznej kontroli 88 5 2 2 Płyta do smazenia z zaworem termostatycznym 89 5 3 Przydatne wskazówki 90 5 3 1 Pierwsze mycie 90 5 3...

Page 82: ...a sprzętu Jeśli urządzenie się zepsuje proszę zgłosić ten fakt za pomocą formularza zgłoszenia serwisowego dostępnego na stronie www fagorindustrial pl który należy przesłać na adres serwis fagorindustrial pl Nie należy próbować naprawiać go samodzielnie lub przez osoby niewykwalifikowane i nieuprawnione Użycie części innych niż oryginalne spowoduje anulowanie gwarancji Aby zapobiec zanieczyszczen...

Page 83: ... produkcji 4 Specyfikacja elektryczna 5 Charakterystyka gazowa 6 Numer certyfikatu Należy podać informacje z tabliczki w momencie wezwania serwisu OGÓLNY OPIS URZĄDZENIA 1 Komin 2 Płyta robocza 3 Rurka recznego zapalania 4 Szuflada na tłuszcz 5 Zapalacz piezoelektryczny 6 Zawór gazowy 7 Regulowane nogi ELEMENTY BEZPIECZEŃSTWA Płyta chromowana posiada termostat bezpieczeństwa który odetnie zasilani...

Page 84: ...enia poziomej prawidłowej pracy Podłoga na której ma być zainstalowana maszyna musi być w stanie wytrzymać pełen ciężar urządzenia Zaleca się zainstalowanie okapu wyciągowego dla optymalnej pracy urządzenia Urządzenie należy umieścić w pomieszczeniu wystarczająco wentylowanym zgodnie z obowiązującymi przepisami aby zapobiec tworzeniu niedopuszczalnych stężeń szkodliwych substancji w miejscu instal...

Page 85: ...y zabezpieczyć wyłącznikiem róznicowopradowym Producent nie ponosi odpowiedzialności za szkody wynikłe z nieprzestrzegania tego wymogu W przypadku zaobserwowania jakichkolwiek usterek podczas instalacji należy niezwłocznie powiadomić dostawcę Przed zmknięciem skrzynki przyłączeniowej urządzenia sprawdź czy przewód zasilajacy został prawidłowo zamocowany i dokręcony Producent nie ponosi odpowiedzia...

Page 86: ...óry ma być używany według Tabela 3 d Zamontuj ponownie palnik pilota i rurke zapalania ręcznego 4 6 2 Konwersja palników płyty z zaworem termostatycznym 1 Odłączyć dopływ gazu do urządzenia jeśli jest podłączony Każda zmiana warunków obwodu gazowego musi być przeprowadzona przez AUTORYZOWANA TECHNIKA 2 Konwersja palnika głównego a Zdemontuj dysze palnika i wymieniń na odpowiednie zgodnie z gazem k...

Page 87: ... tych produktów pomoże w ochronie środowiska Dalsze informacje dotyczące recyklingu tych produktów można znaleźć w odpowiednim urzędzie samorządu terytorialnego Należ usuwać te materiały zgodnie z obowiązującymi przepisami 5 INSTRUKCJA UŻYTKOWANIA I KONSERWACJI PRZED URUCHOMIENIEM URZĄDZENIA PROSIMY PRZECZYTAĆ INSTRUKCJĘ MASZYNA JEST PRZEZNACZONA WYŁĄCZNIE DO UZYTKU PROFESJONALNEGO I MOŻE BYĆ UZYW...

Page 88: ...dy umieszczonej pod płytą Nie używaj płyty jako gorącej płyty do podgrzewu garnków lub naczyń Płyta przeznaczona jest do smażenia miesa ryb warzyw Nie używaj elementów rysujących powierzchnię przy pracy na płycie chromowanej Nigdy nie przykrywaj komina nawet częsciowo Odkryty komin jest niezbędny do prawidłowego funkcjonowania urządzenia Kroki do optymalnego wykorzystania urządzenia zostały opisan...

Page 89: ...o M do pozycji Pilot i przytrzymaj pokrętło wciśnięte o Następnie naciśnij przycisk zapalacza piezoelektrycznego Płomień pilota zostanie automatycznie zapalony Przytrzymaj nadal wciśnięte pokrętło przez około 15 20 sek W przypadku linii 700 nacisnij kilkukrotnie zapalacz piezoelektryczny o Gdy pilot nie zostanie odpalony automatycznie zapal go przy uzyciu otwartego płomienia przez rurkę ręcznego z...

Page 90: ...łuszcz aby zapobiec gromadzeniu się tłuszczu i ewentualnemu zapłonowi NIGDY NIE DOPUSZCZAJ DO NAGROMADZENIA SIĘ TŁUSZCZU W URZĄDZENIU MOŻE TO SPOWODOWAĆ SAMOZAPŁON I POŻAR URZĄDZENIA Płyty wykonane ze stali po umyciu i osuszeniu przesmaruj cienką warstwą oleju jadalnego w przeciwnym razie mogą pokryć się nalotem rdzy co jest naturalnym efektem oddziaływnia wody ze stalą Płyty z powłoką chromową ch...

Page 91: ...mień jest żółty Brudny palnik źle wyregulowany dopływ powietrza Skontaktuj sie z serwisem Płyta nie nagrzewa się Uszkodzony zawór gazowy Skontaktuj sie z serwisem 7 RECYKLING PRODUKTU Norma europejska 2012 19 UE w sprawie utylizacji urządzeń elektrycznych i elektronicznych mówi że urzadzenie to nie może być usuwane w taki sam sposób jak stałe odpady miejskie Stare urządzenia muszą być utylizowane ...

Page 92: ...92 ...

Reviews: