background image


14 

Description of the hood 

Fig. 1 
1. 

Control panel 

2.

 Grease filter 

3.

 Grease filter release handle 

4.

 Lamps 

5.

 Vapour catcher 

6.

 Telescopic chimney 

7.

 Air outlet (used for filter version only) 


Operation 

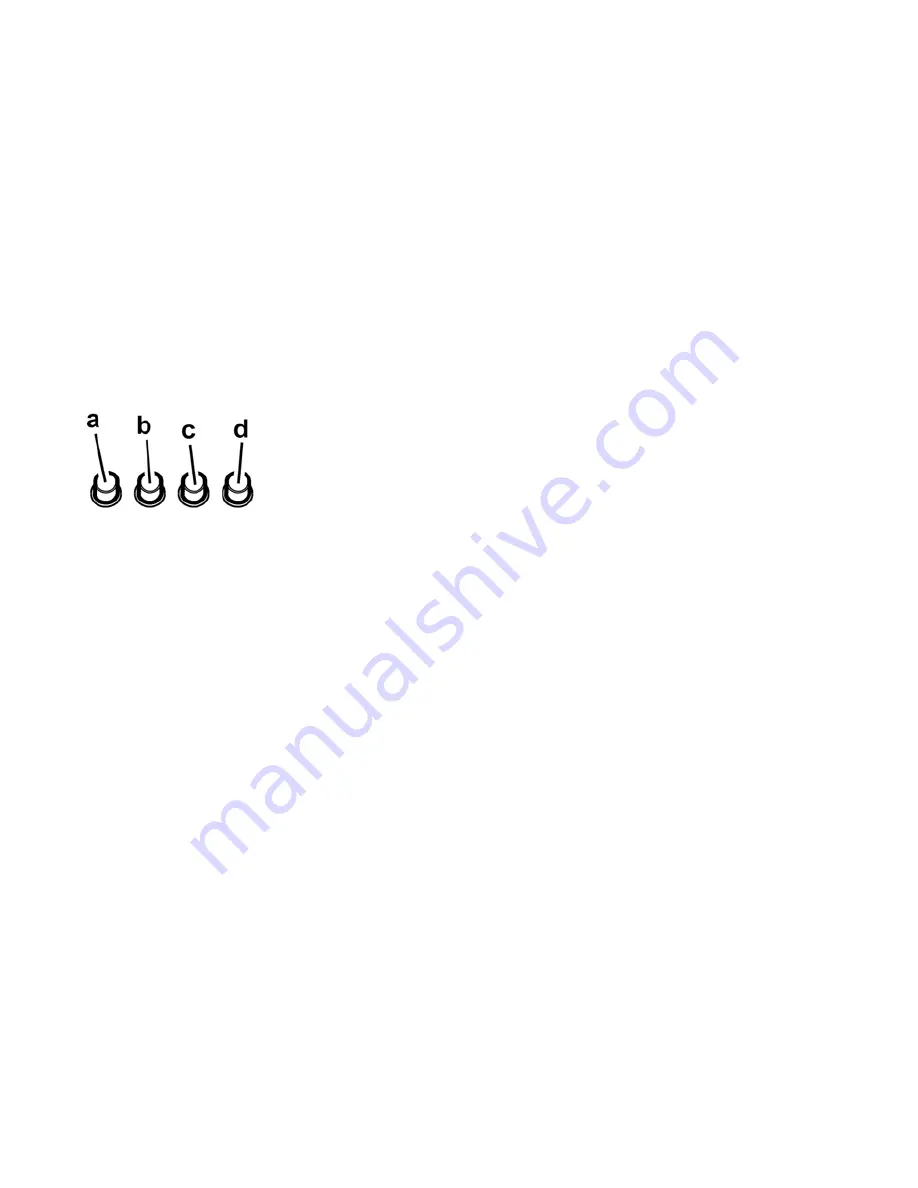
Use the high suction speed in cases of concentrated kitchen 
vapours.  It is recommended that the cooker hood suction is 
switched on for 5 minutes prior to cooking and to leave in 
operation during cooking and for another 15 minutes 
approximately after terminating cooking.  


a. 

ON/OFF light switch 

b. 

Speed 1/OFF switch  

c. 

 2-speed selection 

d. 

3-speed selection  


Maintenance 

ATTENTION! 

Before performing any maintenance operation, 

isolate the hood from the electrical supply by switching off at 
the connector and removing the connector fuse.  
Or if the appliance has been connected through a plug and 
socket, then the plug must be removed from the socket. 


Cleaning 

The cooker hood should be cleaned regularly (at least with the 
same frequency with which you carry out maintenance of the 
fat filters) internally and externally.  Clean using the cloth 
dampened with neutral liquid detergent. Do not use abrasive 
products. 

DO NOT USE ALCOHOL!


WARNING: 


Failure to carry out the basic cleaning recommendations 
of the cooker hood and replacement of the filters may 
cause fire risks.  
Therefore, we recommend oserving these instructions. 

The manufacturer declines all responsibility for any damage to 
the motor or any fire damage linked to inappropriate 
maintenance or failure to observe the above safety 
recommendations. 


Grease filter 

Traps cooking grease particles. 


This must be cleaned once a month (or when the filter 
saturation indication system – if envisaged on the model in 
possession – indicates this necessity)  using non aggressive 
detergents, either by hand or in the dishwasher, which must 
be set to a low temperature and a short cycle. 
When washed in a dishwasher, the grease filter may discolour 
slightly, but this does not affect its filtering capacity. 
To remove the grease filter, pull the spring release handle. 

Fig. 2 


Charcoal filter (filter version only) 

It absorbs unpleasant odours caused by cooking. 
The charcoal filter can be washed once every two months (or 
when the filter saturation indication system – if envisaged on 
the model in possession – indicates this necessity)   using hot 
water and a suitable detergent, or in a dishwasher at 65°C (if 
the dishwasher is used, select the full cycle function and leave 
dishes out). 
Eliminate excess water without damaging the filter, then 
remove the mattress located inside the plastic frame and put it 
in the oven for 10 minutes at 100° C to dry completely. 
Replace the mattress every 3 years and when the cloth is 
damaged. 
Remove the filter holder frame by turning the knobs (

g

) 90° 

that affix the chimney to the cooker hood. 
Insert the pad 

(i) 

of activated carbon into the frame 

(h)

 and fit 

the whole back into its housing 

(j)

Fig. 3 

It is possible to use a traditional carbon filter,  neither 
washable nor regenerable, to be  replaced every 3 - 4 months.  
The filter holder frame of the carbon filter is welded together; 
the eventual frame supplied with the hood is not, therefore, to 
be used.  
Insert it into its housing and fix it turning the 2 plastic knobs. 


Replacing lamps 

Disconnect the hood from the electricity. 

Warning! 

Prior to touching the light bulbs ensure they are 

cooled down. 

Fig. 4 


Remove the lamp cover. 


Always replace burn-out lamps, according to what is 

provided for your appliance, with max. 40 Watt bulbs. 

Re-close the lamp cover.If the lights do not work, make sure 
that the lamps are fitted properly into their housings before 
you call for technical assistance. 


Summary of Contents for LI3IQA

Page 1: ...brauchsanweisung EN Instruction on mounting and use FR Prescriptions de montage et mode d emploi NL Montagevoorschriften en gebruiksaanwijzingen ES Montaje y modo de empleo PT Instruções para montagem e utilização RU Инструкции по монтажу и эксплуатации ...

Page 2: ......

Page 3: ......

Page 4: ......

Page 5: ...za delle norme di pulizia della cappa e della sostituzione e pulizia dei filtri comporta rischi di incendi Non utilizzare o lasciare la cappa priva di lampade correttamente montate per possibile rischio di scossa elettrica Si declina ogni responsabilità per eventuali inconvenienti danni o incendi provocati all apparecchio derivati dall inosservanza delle istruzioni riportate in questo manuale Ques...

Page 6: ...essere sufficientemente robusto da sostenere il peso della cappa Installazione modello per parete Fig 5 La scatola di connessione elettrica va fissata come da Fig a b c 1 Con una matita eseguire una linea sulla parete sino al soffitto corrispondente alla linea di mezzeria faciliterà le operazioni di installazione 2 Applicare lo schema di foratura al muro la linea verticale di mezzeria stampata sul...

Page 7: ...erature ed a ciclo breve Con il lavaggio in lavastoviglie il filtro antigrasso metallico può scolorirsi ma le sue caratteristiche di filtraggio non cambiano assolutamente Per smontare il filtro grassi tirare la maniglia di sgancio a molla Fig 2 Filtro ai carboni attivi Solo per Versione Filtrante Trattiene gli odori sgradevoli derivanti dalla cottura Il filtro al carbone può essere lavato ogni due...

Page 8: ...schädigt die Filter und kann Brände verursachen daher ist dies in jedem Fall zu vermeiden Das Frittieren muss unter Aufsicht erfolgen um zu vermeiden dass das überhitzte Öl Feuer fängt In Bezug auf technische und Sicherheitsmaßnahmen für die Ableitung der Abluft sind die Vorschriften der zuständigen örtlichen Behörden strengstens einzuhalten Die Haube muss regelmäßig innen und außen gereinigt werd...

Page 9: ... wenn diese im Umluftbetrieb verwendet werden soll Vergewissern Sie sich dass sich im Inneren der Dunstabzugshaube aus Transportgründen kein im Lieferumfang enthaltenes Material zum Beispiel Tütchen mit Schrauben die Garantie usw befindet falls vorhanden entfernen Sie dieses und heben Sie sie auf Falls möglich entfernen Sie die Möbel unter und um die Dunstabzugshaube herum um besseren Zugriff auf ...

Page 10: ... Kaminhaltersteigbuegel G den Deflektor F befestigen und das andere Ende des Schlauchs and den auf den Deflektor F positionierten Verbindungsring befestigen 9 Die elektrische Verbindung erfuellen 10 Die Kaminen darauftun und sie mit zwei Schrauben 10a an den Kaminhaltersteigbuegel darauf G 10b befestigen 11 Den unteren Teil des Kamins ruetchen lassen damit die Abzuggruppe ganz bedeckt wird bis die...

Page 11: ...s dem Plastikrahmen entfernen und dieses bei 100 für 10 Minuten in den Ofen legen um es vollständig zu trocknen Das Vlies muss alle 3 Jahre ausgewechselt werden und weiterhin jedes Mal dann wenn es beschädigt ist Das Gestell das den Filter trägt abnehmen dafür die Knäufe g die es an der Haube befestigen um 90 drehen Das Kohlekissen i in den Rahmen h schieben und alles wieder an entsprechender Stel...

Page 12: ... as concerns hood and filter cleaning will lead to the risk of fires Do not use or leave the hood without the lamp correctly mounted because of the possible risk of electric shocks We decline any responsibility for any problems damage or fires caused to the appliance as the result of the non observance of the instructions included in this manual This appliance is marked according to the European d...

Page 13: ...Do not tile grout or silicone this appliance to the wall Surface mounting only Installation wall model Fig 5 The electric connection box must be assembled as shown in Fig a b c 1 Drawing a line on the wall with a pencil up to the ceiling corresponding to the centre line will make the installation operations easier 2 Apply the perforation diagram to the wall the vertical centre line printed on the ...

Page 14: ...using non aggressive detergents either by hand or in the dishwasher which must be set to a low temperature and a short cycle When washed in a dishwasher the grease filter may discolour slightly but this does not affect its filtering capacity To remove the grease filter pull the spring release handle Fig 2 Charcoal filter filter version only It absorbs unpleasant odours caused by cooking The charco...

Page 15: ...prévu dans les règlements des autorités locales compétentes La hotte doit être régulièrement nettoyée aussi bien à l intérieur qu à l extérieur AU MOINS UNE FOIS PAR MOIS respecter néanmoins les instructions relatives à l entretien fournies dans ce manuel La non observation de ces normes de nettoyage de la hotte et du changement et nettoyage des filtres comporte des risques d incendie Ne pas utili...

Page 16: ...ximité de la zone d installation de la hotte dans une zone également accessible avec la hotte déjà montée il y ait une prise électrique et qu il soit possible de se raccorder à un dispositif d évacuation de fumées vers l extérieur uniquement Version Evacuation Effectuer tous les travaux de maçonnerie nécessaires par exemple installation d une prise électrique et ou trou pour le passage des tubes d...

Page 17: ...graisse Pour le nettoyage utiliser un chiffon humidifié avec un détergent liquide neutre Ne pas utiliser de produit contenant des abrasifs NE PAS UTILISER D ALCOOL ATTENTION Il y a risque d incendie si vous ne respectez pas les instructions concernant le nettoyage de l appareil et le remplacement ou le nettoyage du filtre La responsabilité du constructeur ne peut en aucun cas être engagée dans le ...

Page 18: ... logement et fermer le on tournant les 2 boutons Remplacement des lampes Débrancher l appareil du réseau électrique Attention Avant de toucher les lampes assurez vous qu elles soient froides Fig 4 Enlever le hublot Remplacer la lampe grillée en utilisant selon le type prévu exclusivement des lampes de 40 W max Fermer le hublot Dans l éventualité où l éclairage ne devait pas fonctionner vérifier si...

Page 19: ...regelmatig schoongemaakt worden zowel binnen als buiten MINSTENS EENMAAL PER MAAND neem in ieder geval hetgeen in deze handleiding is aangegeven in acht Het niet in acht nemen van de reinigingsnormen van de wasemkap en van de vervanging en reiniging van de filters kan brandgevaar veroorzaken Zorg altijd dat de lampjes in de kap aanwezig en goed gemonteerd zijn om het gevaar voor elektrische schokk...

Page 20: ...rde onderdelen Koppel de wasemkap tijdens het maken van de elektrische aansluiting af van het elektriciteitsnet via de hoofdschakelaar in uw woning Controleer tevens of er in de buurt van de installatie ruimte op een ook met gemonteerde kap goed bereikbare plaats een stopcontact aanwezig is en of er de mogelijkheid bestaat voor de verbinding aan een rookafvoer naar buiten alleen voor het afzuigend...

Page 21: ...schoon gemaakt worden zowel binnen als buiten tenminste met dezelfde regelmaat waarmee de vetfilters gereinigd worden Gebruik voor het reinigen een doek die u vochtig maakt met een beetje neutraal vloeibaar reinigingsmiddel Gebruik geen producten die schuurmiddelen bevatten GEEN ALCOHOL GEBRUIKEN Attentie Als u deze aanwijzingen m b t reiniging van het apparaat en vervanging resp reiniging van de ...

Page 22: ...uur niet worden gebruikt Voer hem in zijn zitting en zet hem met de speciale sluitingen vast Vervanging lampjes Sluit de stroom af Attentie Alvorens de lampjes aan te raken controleer eerst of ze koud zijn afb 4 Verwijder het afdekplaatje Vervang het uitgebrandde lampje met uitsluitend een lampje van max 40 W Breng het afdekplaatje weer aan Als de verlichting niet werkt controleer dan of de lampje...

Page 23: ...o utilice o deje la campana sin las lámparas correctamente montadas debido a riesgos de cortocircuito Se declina todo tipo de responsabilidades daños o incendios provocados por no leer atentamente las instrucciones indicadas en este manual Este aparato lleva el marcado CE en conformidad con la Directiva 2002 96 EC del Parlamento Europeo y del Consejo sobre residuos de aparatos eléctricos y electró...

Page 24: ...n adecuados a su parede techo La El pared techo debe ser lo suficientemente fuerte para sostener el peso de la campana Instalación modelo para pared Fig 5 La caja de conexión eléctrica debe ser fijada como en la Fig a b c 1 Con un lápiz haga una línea sobre la pared hasta el techo correspondiente a la línea central facilitará las operaciones de instalación 2 Coloque el esquema de perforación sobre...

Page 25: ... al mes o cuando el sistema de indicación de saturación de los filtros si está previsto en el modelo que se posee indica esta necesidad con detergentes no agresivos manualmente o bien en lavavajillas a bajas temperaturas y con ciclo breve Con el lavado en el lavavajilla el filtro antigrasa metálico puede desteñirse pero sus características de filtrado no cambian absolutamente Para desmontar el fil...

Page 26: ...EZ POR MÊS todavia respeitar quanto expressamente indicado nas instruções de manutenção indicadas neste manual A inobservância das normas de limpeza da coifa e da substituição e limpeza dos filtros comporta riscos de incêndio Não utilizar ou deixar a coifa sem lâmpadas correctamente montadas devido ao possível risco de choque eléctrico Declina se qualquer responsabilidade por eventuais inconvenien...

Page 27: ...nexão eléctrica Além disso verificar que nas proximidades da zona de instalação da coifa em zona acessível também com a coifa montada uma tomada eléctrica se encontre a disposição e seja possível conectar se a um dispositivo de descarga fumos para o externo somente Versão aspirante Executar todos os trabalhos de alvenaria necessários por ex instalação de uma tomada eléctrica e ou tubo para a passa...

Page 28: ...umprimento das instruções fornecidas para a limpeza do aparelho e para a limpeza ou substituição do filtro pode provocar riscos de incêndio O fabricante declina toda e qualquer responsabilidade pelos danos ao motor ou decorrentes de incêndio provocados por uma manutenção inadequada ou pelo não cumprimento das indicações de segurança citadas anteriormente Filtro antigordura Capta as partículas de g...

Page 29: ...car se que estejam frias Fig 4 Remover a protecção das lâmpadas Substituir a lâmpada danificada utilizando exclusivamente lâmpadas de 40 W máx Fechar a protecção das lâmpadas Se a iluminação não funcionar verifique se as lâmpadas foram correctamente instaladas na sua sede antes de chamar a assistência técnica ...

Page 30: ...ческих мер и условий по технике безопасности при отводе дымов то придерживайтесь строго правил предусмотренных регламентом местных компетентных властей Производите периодическую очистку вытяжки как внутри так и снаружи ПО КРАЙНЕЙ МЕРЕ РАЗ В МЕСЯЦ во всяком случае с соблюдением условий которые специально предусмотрены в инструкциях по обслуживанию данного руководства Несоблюдение инструкций по очис...

Page 31: ... также соответствующий раздел Фильр ы устанавливаются обратно только если Вы хотите использовать вытяжку в режиме рециркуляции Проверьте чтобы внутри вытяжки не оставалось предметов помещенных туда на время ее транспортировки например пакетиков с шурупами листков гарантии и т д если они имеются выньте их и сохраните По возможности отсоедините и отодвиньте кухонные элементы расположенные под вытяжк...

Page 32: ...ки жира и проверьте исправное функционирование вытяжки Описание вытяжки Рис 1 1 Панель управления 2 Фильтр задержки жира 3 Ручка отцепления фильтра задержки жира 4 Подсветка 5 Откидной экран 6 Камин телескопический 7 Вывод воздуха только в режиме рециркуляции Функционирование Пользуйтесь интенсивным режимом работы вытяжки в случае особо высокой концентрации кухонных испарений Мы рекомендуем включи...

Page 33: ...д фильтр повернув на 90 рукоятки g которые крепят его к вытяжке Вставьте губчатый элемент угольного фильтра i в раму h и повторно установите подсобранный узел в гнездо j Рис 3 Возможно использовать угольный фильтр традиционного типа не подлежащий промывке и регенерации заменяемый каждые 3 4 месяца Рама и угольный фильтр приварены друг к другу поэтому рама если она поставлена вместе с вытяжкой не д...

Page 34: ......

Page 35: ......

Page 36: ...LI3IQA Ed 02 08 ...

Reviews: