Installation
INSTAL
LAT
ION
Ele
ctrica
l co
nne
ctio
ns
8.
Ref.2003
· 259 ·
QC-PDS
HARDWARE
For single-drives, size|3
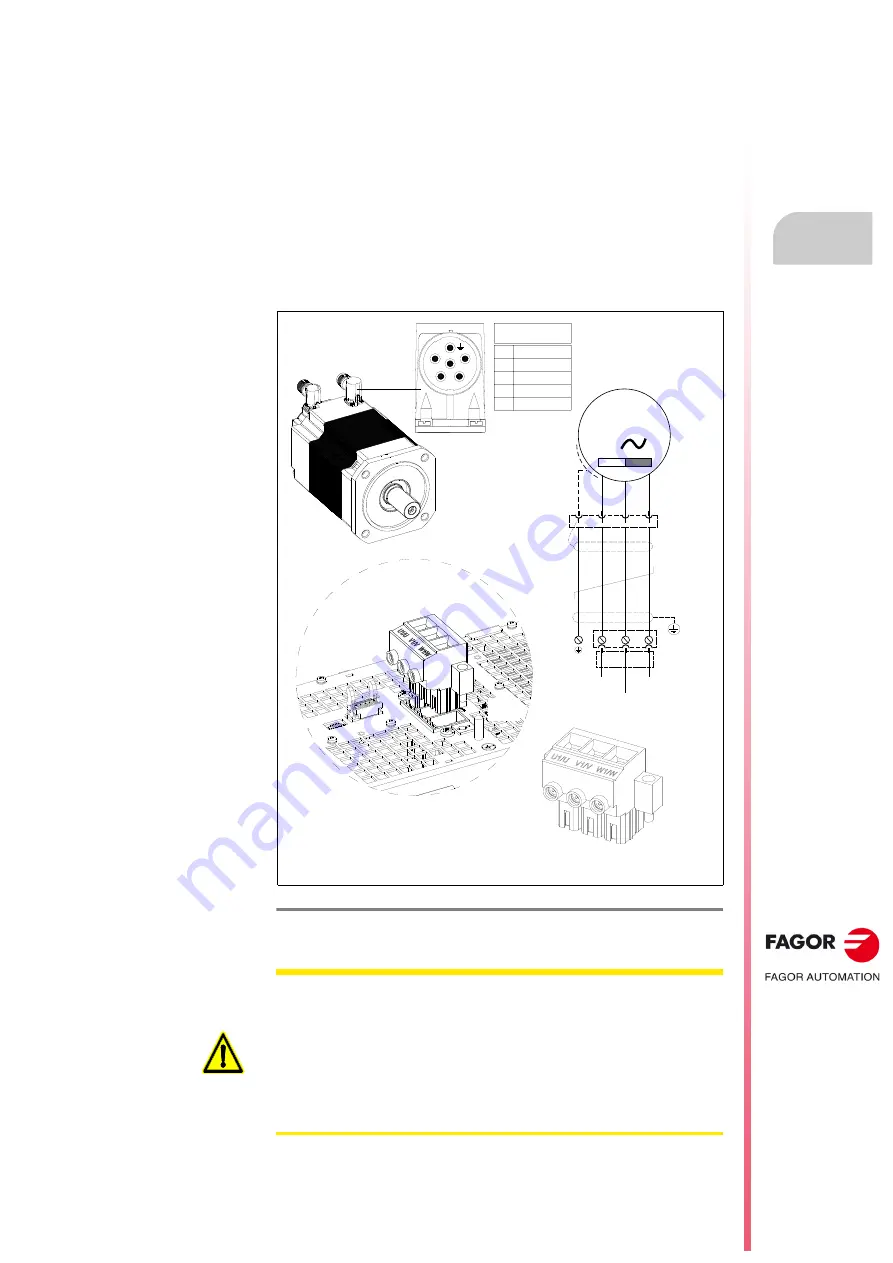
The power connection for a brakeless feed axis servomotor to a QC-DR-
-
F
, size|3 single-drive is made using a multi-pole MPC-4xS cable via
terminals U1/U, V1/V and W1/W of the A19/X11 connector. The connection
between the chassis and the protective earth (PE) is made via the M6
screw of the protective earth (PE) next to the connector found on the upper
part of the drive. The shield of the multi-pole MPC-4xS power cable is
connected to the protective earth at both cable ends. On the drive side via
the GP-1 protective earth bar.
Be sure to strip the power cable to expose the shield at both ends. Use a
metal clamp complete the connection to the GP-1 on the drive side. See
connection diagrams in
.
See figure.
F. H8/17
Power connection between a brakeless feed axis servomotor and a single-drive,
size|3.
U
V
W
P E
3
M
c h a s s i s
W 1 / W
V 1 / V
U 1 / U
A 1 9 / X 1 1
G P - 1
M 6
MC-20/6
PE
PE
QC-DR-
-F
SIZE|3
BRAKELESS FKM
SERVOMOTOR
MC-20/6
92.3 A
A19/X11
SIZE|3
A19/X11
QC-DR-080-F
QC-DR-120-F
mu
lti-pole MPC-
4xS cable
w
itho
ut con
necto
rs
1
2
4
5
6
MC-20/6
SEALING: IP 65
PIN SIGNAL
1
2
6
3
U PHASE
V PHASE
W PHASE
PE
WARNING.
When running the cables for the power connection between
the QC-DR-
-F
, size|3 single-drive and the servomotor, connect the
U1/U terminal of the A19/X11 connector to the terminal corresponding to
the U phase of the servomotor. Perform the same procedure with terminals
V1/V to V and W1/W to W. See A19/X11 connector in chapter 3. The multi-
polar MPC-4xS cable has metallic shielding (shield) that, in order to be
compliant with the EC marking, must be connected to the GP-1 protective
earth bar on the side of the drive. On the servomotor side, see the
assembly of connector MC-
/6 in the FKM motor manual.
Summary of Contents for QC-PDS
Page 1: ...DRIVE QC PDS Hardware manual Ref 2003...
Page 6: ...6 I 6 Ref 2003 6 QC PDS HARDWARE This page intentionally left blank...
Page 16: ...16 Ref 2003 16 Previous I QC PDS HARDWARE This page intentionally left blank...
Page 18: ...18 Ref 2003 18 Previous II QC PDS HARDWARE This page intentionally left blank...
Page 80: ...2 POWER SUPPLIES Power supplies 80 Ref 2003 QC PDS HARDWARE...
Page 138: ...3 DRIVES Drives 138 Ref 2003 QC PDS HARDWARE...
Page 174: ...4 AUXILIARY MODULES Auxiliary modules Ref 2003 174 QC PDS HARDWARE...
Page 302: ...8 INSTALLATION Installation Ref 2003 302 QC PDS HARDWARE...
Page 366: ...12 COMMERCIAL MODELS Commercial models Ref 2003 QC PDS HARDWARE 366...
Page 367: ...ANNEXES...
Page 368: ...ANNEX A1...
Page 383: ...ANNEX A2...
Page 398: ...ANNEX A3...
Page 418: ......
Page 419: ......


