background image

Making edge-to-edge joints

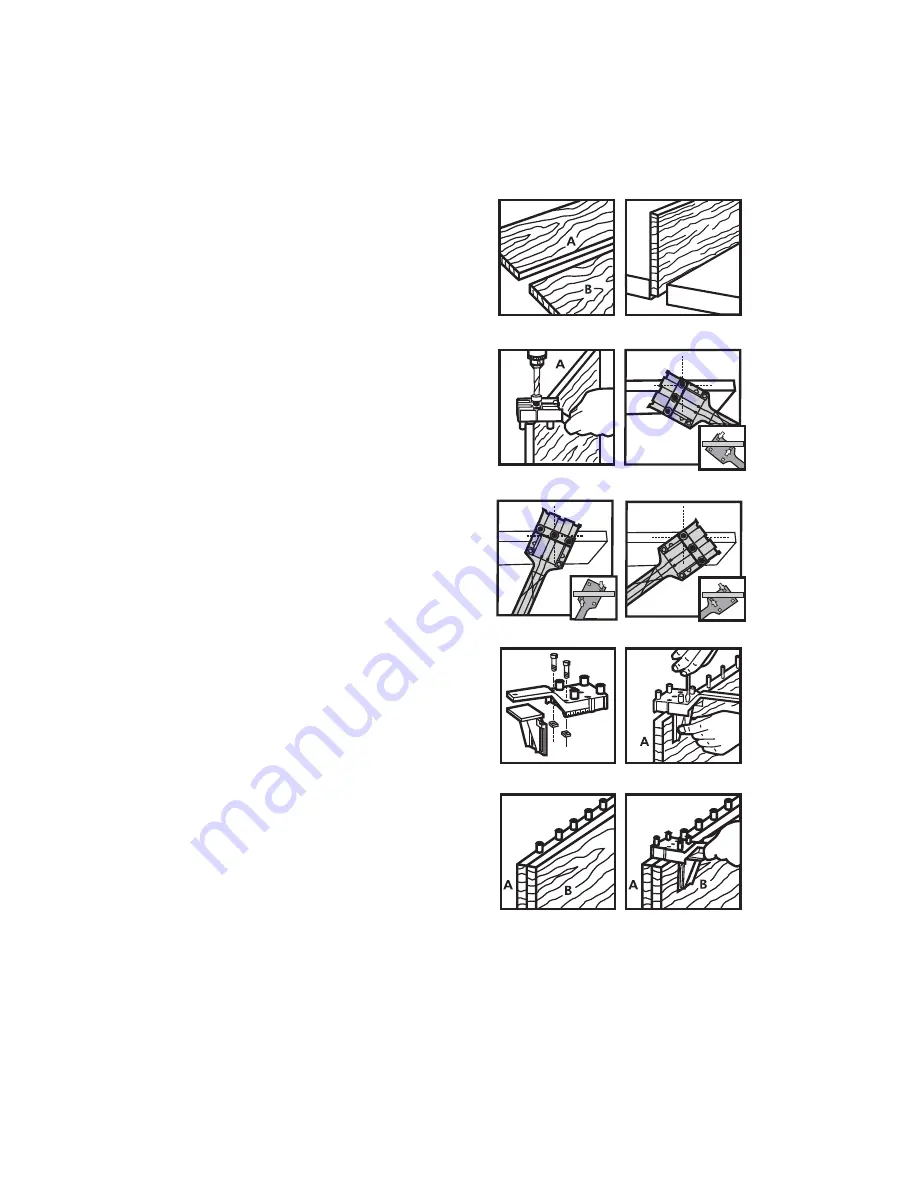
$OLJQWZRERDUGVLQWKHLU¿QLVKHGSRVLWLRQDQGPDUN

them “A” and “B”.  See Figure 31.

&ODPSERDUG$WRDZRUNEHQFKRUFODPSLQJWDEOH

See Figure 32.

3.  Using the Quick Dowel Jig as a guide, place a depth 

VWRSRQWKHGULOOELWDWWKHSURSHUGHSWKIRU\RXU¿UVW

hole.

4.  Place your Quick Dowel Jig, with the 4 centring 

SHJVSRLQWHGGRZQÀDWDJDLQVWWKHHGJHRIERDUG$

Choose the size hole you want to drill and twist the 

MLJWRFHQWUHLWRQWKHHQGRIWKHERDUGDQGFRQWDFWWKH

opposite side with the centring pegs. Depending on 
the desired hole size, different pairs of pegs are used 

WRFHQWUHWKHMLJRQWKHERDUG6HH)LJXUHV

5.  Drill through the Quick Dowel Jig and into the edge of 

WKHERDUG5HSHDWWKHWZLVWDQGGULOOVHTXHQFHLQVWHS
DV\RXPRYHGRZQWKHHGJHRIWKHERDUGXQWLODOO
KROHVKDYHEHHQGULOOHG

$IWHUDOOKROHVKDYHEHHQGULOOHGSODFHGRZHOSLQVLQ

HDFKKROH:,7+287*/8(7KHVHZLOOEHXVHGWR
SRVLWLRQWKHJXLGHIRUGULOOLQJKROHVLQERDUG%

7.  Attach the angle piece to the dowel jig using the 

screws and square nuts. Insert the screws through the 
two holes on the top of the jig and attach the square 

QXWVWRWKHERWWRP'RQRWWLJKWHQ6OLGHWKHDQJOH
SLHFHLQWRWKHVORWEHWZHHQWKHERWWRPRIWKHMLJDQG

the square nut. Keep the angle piece slightly loose. 
See Figure 37.

8.  With the 4 centring pegs pointed down, slide the Quick 

'RZHO-LJRYHURQHRIWKHGRZHOSLQVLQWKHHGJHRI
ERDUG$6OLGHWKHDQJOHSLHFHIRUZDUGXQWLOLWUHVWV
DJDLQVWWKHERDUGWKHQWLJKWHQWKHVFUHZVWRVHFXUH

the angle piece to the jig. See Figure 38.

3RVLWLRQERDUG%QH[WWRERDUG$VRWKDWERDUG%LV

FORVHUWR\RX7KH¿QLVKHGVLGHVRIWKHERDUGVVKRXOG
PLUURUHDFKRWKHUWKH¿QLVKHGVLGHVRIERWKERDUGV
VKRXOGHLWKHUEHIDFLQJHDFKRWKHURUIDFLQJ
RXWZDUG8VHDVTXDUHWRHQVXUHWKDWERWKERDUGVDUH
SURSHUO\DOLJQHG&ODPSERDUGVWRJHWKHU

See Figure 39.

10. Slide the proper slot in the front of the Quick Dowel

-LJRYHUDGRZHOSLQLQERDUG$6HH)LJXUH

11. Drill a hole for each dowel pin. See Figure 40.

12. Apply wood glue to the dowel pins and 

 DVVHPEOHWKHMRLQW

Figure 31

Figure 33

Figure 38

Figure 40

Figure 32

Figure 37

Figure 39

A

Figure 34

Figure 36

Figure 35

8mm Hole


6mm Hole

10mm Hole

Summary of Contents for FAI DOWJIG2

Page 1: ...Dowelling Jig Instruction Manual Before using this product read this manual entirely and follow all safety rules and operating instructions Keep this manual for future reference FAI DOWJIG2 ...

Page 2: ...VH DLWKIXOO VKDOO QRW EH OLDEOH IRU ORVV RU GDPDJH RI DQ NLQG LQFOXGLQJ incidental or consequential damages resulting either directly or indirectly from the use of this product I RX QG D GHIHFW LQ PDWHULDO RU ZRUNPDQVKLS FRQWDFW WKH DLWKIXOO XVWRPHU 6HUYLFH GHSDUWPHQW Faithfull Tools Phoenix House 3 White Lodge Business Estate Hall Road Norwich Norfolk NR4 6DG United Kingdom e mail enquiries faith...

Page 3: ...otection when using tools Do not force the tool Do not force a tool or apply undue pressure or attempt to carry out any operation that it was not designed to do OZD V XVH WKH ULJKW WRRO IRU WKH MRE DQG RQO for the purpose for which it was designed Do not attempt to adapt or modify a tool for DQ DOWHUQDWLYH SXUSRVH RU WR JDLQ D JUHDWHU working capacity than that for which it was intended Use clamps...

Page 4: ...RZHO LJ D YDOXDEOH DGGLWLRQ WR RXU ZRUNVKRS Selecting the correct sized dowel The following chart will help you select the proper size dowel to use for your application Board Thickness Dowel Size 12 14mm 6mm 15 17mm 8mm 17 23mm 10mm RU H WUD QDUURZ ERDUGV LW PD EH necessary to shorten the dowel or to drill out a deeper hole in the HGJH RI WKH PDWFKLQJ ERDUG H VXUH WR PDUN WKH ERDUGV DV GHVFULEHG L...

Page 5: ...ERDUG 7 Attach the angle piece to the dowel jig using the screws and square nuts Insert the screws through the two holes on the top of the jig and attach the square nuts WR WKH ERWWRP R QRW WLJKWHQ 6OLGH WKH DQJOH SLHFH LQWR WKH VORW EHWZHHQ WKH ERWWRP RI WKH MLJ DQG WKH VTXDUH nut Keep the angle piece slightly loose See Figure 7 3ODFH WKH MLJ DQG DQJOH SLHFH DVVHPEO RYHU DQ RQH RI WKH GRZHOV LQ W...

Page 6: ...rews and square nuts Insert the screws through the two holes on the top of the jig and attach the square nuts to the ERWWRP R QRW WLJKWHQ 6OLGH WKH DQJOH SLHFH LQWR WKH VORW EHWZHHQ WKH ERWWRP RI WKH MLJ DQG WKH VTXDUH QXW Keep the angle piece slightly loose See Figure 17 5HPRYH ERDUG IURP WKH FODPSV DQG OD LW ÀDW RQ WKH ZRUNEHQFK ZLWK WKH GRZHO SLQV IDFLQJ RXW 3ODFH ERDUG RQ WRS RI ERDUG ZLWK WKH...

Page 7: ...owel Jig and into the edge of WKH ERDUG 5HSHDW WKH WZLVW DQG GULOO VHTXHQFH LQ VWHS DV RX PRYH GRZQ WKH HGJH RI WKH ERDUG XQWLO DOO KROHV KDYH EHHQ GULOOHG IWHU DOO KROHV KDYH EHHQ GULOOHG SODFH GRZHO SLQV LQ HDFK KROH 7 287 8 7KHVH ZLOO EH XVHG WR SRVLWLRQ WKH JXLGH IRU GULOOLQJ KROHV LQ ERDUG 3ODFH ERDUG ÀDW RQ ZRUNEHQFK 3ODFH ERDUG RQ ERDUG ZLWK WKH HGJH RI ERDUG DSSUR LPDWHO PP DZD IURP WKH FH...

Page 8: ... the dowel jig using the screws and square nuts Insert the screws through the two holes on the top of the jig and attach the square QXWV WR WKH ERWWRP R QRW WLJKWHQ 6OLGH WKH DQJOH SLHFH LQWR WKH VORW EHWZHHQ WKH ERWWRP RI WKH MLJ DQG the square nut Keep the angle piece slightly loose See Figure 37 8 With the 4 centring pegs pointed down slide the Quick RZHO LJ RYHU RQH RI WKH GRZHO SLQV LQ WKH HG...

Reviews: