


Troubleshooting
Fault
Problem
Solution
Weak or no spray.
Non-pressuration.
Check and tighten
connections, if necessary.
Loss of pressure
Check gaskets are lubricated
and show no signs of wear -
replace if necessary.
Obstruction.
Check for possible blockage in
nozzle, trigger or outlet hose.
Distorted spray.
Obstruction.
Check for possible debris
partially obstructing nozzle.
Leakage.
Possible sediment
accumulation on sealing
surfaces.
Check sealing rings are free
from debris and sedimant -
clean or replace if necessary.
Looking After Your Sprayer
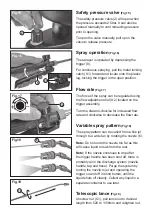
Blocked Nozzles
If a nozzle becomes blocked or fails to spray the correct pattern, unscrew the nozzle
tip and clean the components under running water or a water jet. Do not use a metallic
instrument to unblock a nozzle as this may alter the nozzle aperture making the nozzle
ineffective.
Cleaning
Add a little detergent and some warm water (not hot) to the sprayer and spray through the
system. Repeat the above operation with clean cold water. Finally check that the nozzle
is free from any residue. Your sprayer will now be perfectly clean and ready for its next
use. Always dispose of any unused garden chemicals safely and in accordance with the
manufactures instructions.
After Use
Always release the pressure from the tank before storage. Hold or lock the sprayers trigger
in the on position until the pressure in the tank has been released or pull up on the safety
valve to release the pressure.
Storage
Store the sprayer under cover and avoid freezing temperatures. For winter storage ensure
that all fluid is removed from the tank, hose and lance before storing. Do not store in direct
sunlight, in a greenhouse or any areas where extremes of heat may occur.


