background image

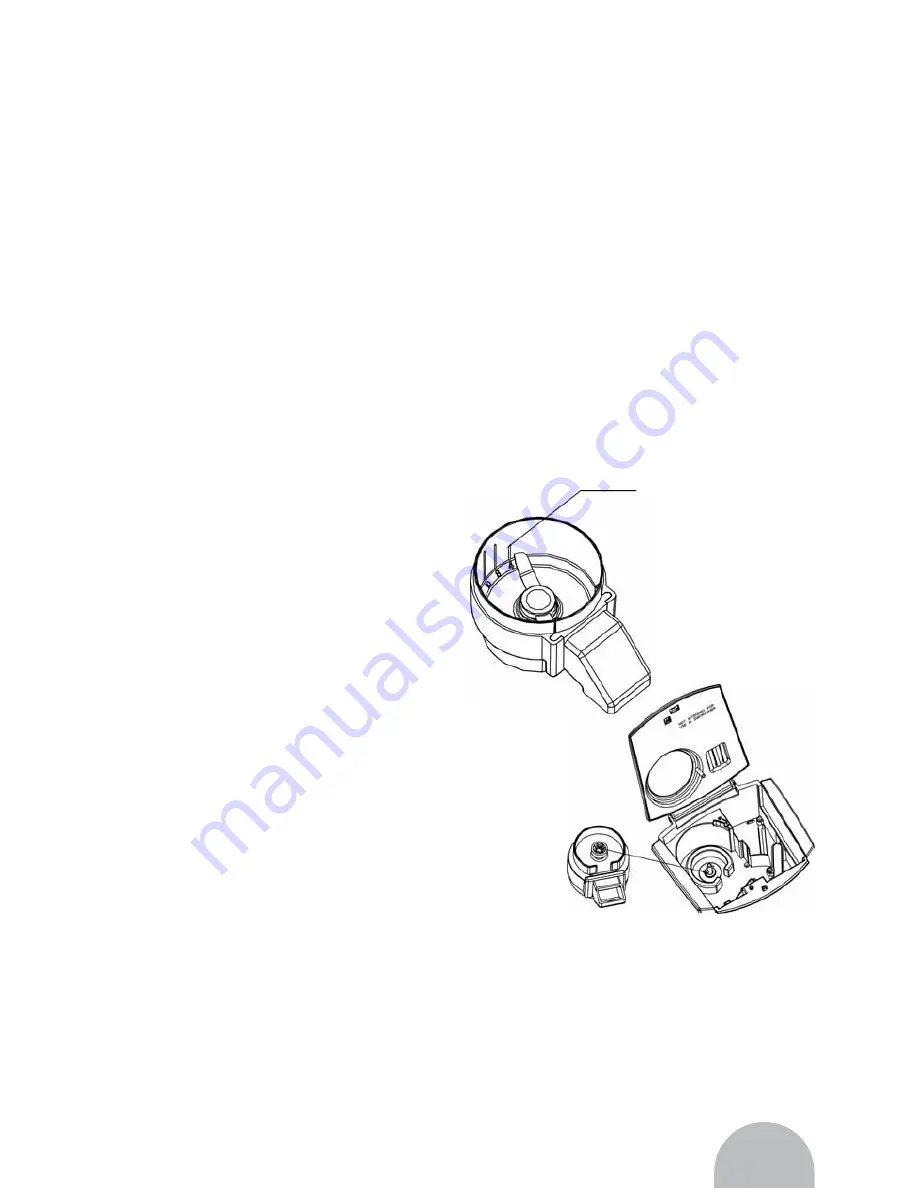
The three marks indicate
coffee bean quantity
wich making
corresponging coffee

32

Fig. 2

Fig. 1

Usage:

Before first use, it is recommended that you
fill to the maximum level mark with fresh
water, boil and empty the coffee maker at
least 2 times to clear coffee maker of any
tiny particles. Do not drink the water. Please
clean all the detachable parts, such as the
grinder box, filter, and filter compartment
and so on completely.

Set the clock:

Once the appliance is connected to power
supply, 18:88 will display and flash on the
LED display, after 5s, the LED will display
12:00.

Note:

 If you do not set the clock, you can

go directly to other settings.

Press the “program” button once (see LED
display). You are now in the “Time Set”
mode and can operate either “hr” or “min”
button to achieve the desired setting. The
buttons can be held down to scroll through
the digits, or pressed and released lightly
to advance one digit at a time.

Confirm the clock setting by waiting for 15
seconds.

Set the program time:

If you do not want the coffee maker start
operation immediately, you may set the
automatic start function as follows:

After set the clock (suppose the current
time is 13:30). Press the “program” button
twice. You will enter the state of “preset the
automatic start time” (see LED display).
The desired time can be set by pressing
the” hr” and “min” buttons to scroll forward
through the digits.

When the desired time setting approaches,
press the on/off button twice. The indicator
of program will be illuminated. When the
preset time achieves and the indicator of
program will be extinguished. The indicator
of on/off will be illuminated and the
coffeemaker will start to brew.

Note:

 You can see the automatic start time

by pressing the “program”. You can
determine the display time is programmed
time or current time by seeing the lower
indicator on the LED (the details refer to
the LED display)

If you want to cancel the preset program,
press the on/off button twice. The appliance
will start to brew immediately.

Reset the “automatic start” mode, only
following the steps 1-2 again.

Make Coffee with Coffee Beans:

Before you make the first pot of coffee in
your new appliance, we recommend
operating the coffee maker once, using
only water and paper filter. This will remove
any dust or residues which remain in the
system from the manufacturing process.

Adding coffee beans: Open the tank cover
by pushing the release button and lifting
up, and remove the grinder box , then open
the grinder box lid by screwing it, fill the
grinder box with the desired quantity of
beans according to the marks on the grinder
box. The marks indicate the coffee bean
which making corresponding coffee (see
fig.1). Generally load the Grind box till max.

Summary of Contents for Cafe Passion

Page 1: ...CAFE PASSION Kahve Makinesi Kullanma Kılavuzu Coffee Machine Instruction Manual Kaffeeautomat Bedienungsanleitung ...

Page 2: ...7 2 ...

Page 3: ...3 ...

Page 4: ...4 ...

Page 5: ...5 ...

Page 6: ...6 ...

Page 7: ...7 ...

Page 8: ...8 ...

Page 9: ...9 ...

Page 10: ...10 ...

Page 11: ...11 ...

Page 12: ...12 ...

Page 13: ...13 ...

Page 14: ...14 ...

Page 15: ...15 ...

Page 16: ...16 ...

Page 17: ...17 ...

Page 18: ...18 ...

Page 19: ...19 ...

Page 20: ...20 ...

Page 21: ...21 ...

Page 22: ...rhangi bir zarar n önlenmesi için yetkili bir Fakir servisi taraf ndan yerine yenisi ile de ifltirilmelidir Fakir taraf ndan tedarik edilmeyen aksesuarlar n kullan lmas yang n elektrik çarpmas ve ya kiflisel yaralanmalara sebep olabilir Cihaz kablosunun masa veya tezgâh köflelerinden sarkmas na veya s cak yüzeylere de mesine izin vermeyiniz Cihaz kesinlikle s cak gazl veya elektrikli s t c üstüne vey...

Page 23: ...rahi tutma sapı Cam sürahi Cam sürahi kapa ı Su seviye göstergesi ç kapak Ö ütücü kutusu Su tankı Tank kapa ı Gösterge ıflı ı yanıksa bu durum ekrandaki saatin programlanmıfl oldu unu gösterir Gösterge ıflı ı sönmüflse bu durum ekrandaki saatin mevcut saat oldu unu gösterir Çalıflma göstergesi Program göstergesi Program Açma kapama tuflu 1 4 kupa Ö ütücü kapama Saat Dakika Ö ütücü kapalı göstergesi 1 4 ...

Page 24: ...ve min dakika tufllar na bas larak ayarlanabilmektedir stenilen zaman ayar n seçtikten sonra açma kapama on off tufluna iki kez bas n z Program prog gösterge fl yanacakt r Saat önceden ayarlanm fl olan zamana ulaflt nda ve program gösterge fl söndü ünde açma kapama tuflu gösterge fl yanacak ve kahve makineniz kahve yapmaya bafllayacakt r Not Otomatik çal flma saat ayar n program prog tufluna basarak görebili...

Page 25: ...i iç kilit sistemi ile donat lm flt r Kahveyi demlemeden önce Cam sürahiyi s tma plakas üstüne yerlefltiriniz Cihaz fiflini prize tak n z LED ekran nda 18 88 belirecek ve yanacakt r 5 saniye sonra siz saati ayarlay ncaya kadar 12 00 belirecektir Cihaz saatini saat ayar bölümünden ayarlayabilirsiniz Cihaz n ö ütücü kapal gösterge fl n n yand ndan emin olunuz Not Cihaz n z n ö ütücü kapal gösterge fl yan...

Page 26: ... birer kafl k filtre kahve tozu koyman z tavsiye edilmektedir Not Maksimum filtre kahve kapasitesi 10 kafl k kadard r Bu miktar n afl lmas taflmaya sebep olabilir Filtre kapa nı yerine tak p filtre bölmesini yerine yerlefltiriniz Kahveyi demlemeden önce Cam sürahinin düzgün bir flekilde s tma plakas üstüne yerleflti inden filtrenin filtre bölmesi içine yerleflti inden ve filtre kapa n n da üstünde oldu un...

Page 27: ...alkalanabilmektedir Bu parçalar ayr ca bulafl k makinesinin üst bölmesinde de y kanabilmektedirler Her kullan mdan sonra parçalar durulay n z Ö ütücü kutusu cihazdan ç kart ld ktan sonra kesinlikle cihaz suya de dirmeye çal flmay n z Ö ütücü kutusunun alt k s mlar n nemli bir bez ile temizleyebilirsiniz Ö ütücü motoruna su kaçmas durumunda motor zarar görebilir ve ar zalanabilir Cihaz temizledikten ...

Page 28: ...leme s kl n z cihaz n z ne kadar kulland n za ve suyunuzun sertlik oran na göre de iflmektedir Kireci temizlemek için ilk olarak su tank n n 1 3 i sirke 2 3 si su olan kar fl mla doldurunuz Kahve makinenizi ON tufluna basarak çal flt r n z Sadece bir defa sirke ve su kar fl m ile cihaz içi kirecin temizlenmesi yeterli olacakt r Cihaz temizleme ifllemi bitirdikten ve bip sesi duyulduktan sonra cihaz n z ...

Page 29: ...29 ...

Page 30: ... an authorized Fakir Service facility for examination repair or adjustment The use of accessory attachments not recommended by Fakir may result in fire electric shock or injury to people Do not let cord hang over edge of table or counter or touch hot surface Do not place the appliance on or near a hot gas or electric burner or in a heated oven Always attach plug to appliance first then plug cord i...

Page 31: ...e Inner cover Grinder box Water tank Tank cover If the indicator is light it indicates the display time is programmed time If the indicator is extinct it indicates the display time is current time Run indicator Program indicator prog on off 1 4 cup grind off hr min run Grind off indicator 1 4 cup indicator Parts of description Control Panel LED Display ...

Page 32: ...rt time see LED display The desired time can be set by pressing the hr and min buttons to scroll forward through the digits When the desired time setting approaches press the on off button twice The indicator of program will be illuminated When the preset time achieves and the indicator of program will be extinguished The indicator of on off will be illuminated and the coffeemaker will start to br...

Page 33: ...se the tank cover Press down to lock The appliance is equipped with a safety interlock system The details refer to the section of Trouble shooting Before brewing coffee Make sure you have replaced the carafe in its position on the keeping warm plate Plug the cord into an electrical outlet 18 88 will display and flash on the LED after 5s 12 00 will appear until you set the time Set the current cloc...

Page 34: ...e Before brewing coffee Make sure you have replaced the carafe in its position on the keeping warm plate and have placed a filter in the filter compartment replace the filter cover Plug the cord into an electrical outlet 18 88 will display and flash on the LED after 5s 12 00 will appear until you set the time Set the current clock according to the Set the clock section on the above Press the grind...

Page 35: ...placed on the upper rack only Do not use scouring agential or harsh cleansers on any part of the coffeemaker Never immerse base unit in water or other liquid To clean base simply wipe with a clean damp cloth and dry before storing Wipe the keeping warm plate with a clean damp cloth Never use rough abrasive material or cleaners to clean the resting plate Do not dry the inside of the tank with a clo...

Page 36: ...36 ...

Reviews: