11
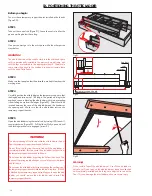
Before you begin:
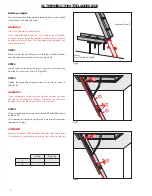
The attic ladder should be resting on the temporary support
boards. The lid should be openable but do not unfold legs of the
attic ladder.
Warning!
Do not unfold legs of the attic ladder yet. Use of the attic ladder
is not safe yet. Do not step on the attic ladder nor leave it
unattended until completely installed and both legs are adjusted to
rest on the floor. This can damage the attic ladder and cause
severe injury.
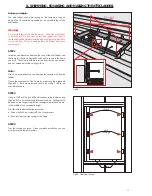
STEP 1
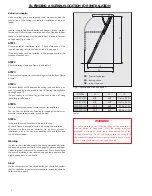
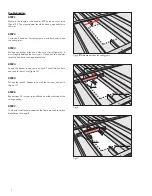
Insert the wooden shims between the case of the attic ladder and
the frame (as shown on Figure24) and until it is square in the frame
you built. The shims should be inserted from the top and bottom
and not extend below the ceiling surface.
Note:
Use of an oversized shims can damage the casement of the attic
ladder.
Check the squareness of the frame by measuring the diagonals
(Figure24). Both measurements should be within 1/8
Ē
to be
considered square.
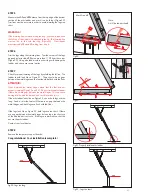
STEP 2
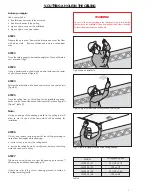
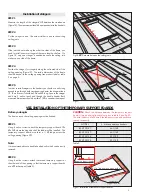
Using a 1/8
Ē
drill bit, pre drill nail locations in the ladder casing
(Figure25). Do not drill through joists and headers. Drilling should
be done on the longer sides of the casement where the shims are,
in the middle of the casementís height.
Nail the attic ladder following instructions:
a. Drive 6 nails 20d or screws 4
Ē
, check squareness
b. Be careful not to hit the spring or the hinge
STEP 3
Trim the sticking out shims. Upon complete installation you can
also remove the temporary shims.
X. SHIMMING, SQUARING AND NAILING THE ATTIC LADDER.
D1
shim
D1=D2
D2
shim
Fig.24.
nail
through
shims
shims
Fig.25. View from the top.


