background image

3


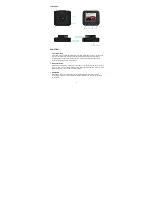
STRUCTURE


Lens


Speaker


Mode


Up  Down


Menu


USB Socket


Power / OK


MicroSD Card Slot


FUNCTION


1.


Cyclic Recording


Cyclic recording, sometimes called loop recording allows the camera to record until 

the card is full and then start to overwrite the oldest recordings (except locked 

recordings). We recommend setting this to 3 minutes which means the camera 
saves the recordings in 3 minute chunks. 


2.


Motion Detection


When motion detection is turned on the camera can detect movement in front of 

your  car  and  start  recording  automatically.  Note  that  this  function  will  only  work 
while the camera is connected to external power. 


3.


G-SENSOR


When the G-Sensor is enabled the camera will automatically lock the current 
recording (preventing it from being overwritten) if there is an external force like in 
an accident. 


Summary of Contents for 1080P HD Car Dash Cam

Page 1: ...User Manual www falcontechnology co uk ...

Page 2: ...1 Content Product Introduction 2 Notice Before Use 2 Structure 3 Function 3 4 Operation Guide 4 5 Recording Video 5 Taking pictures 6 Playback 6 7 Settings 8 13 FAQ 14 ...

Page 3: ...amera for the first time 3 Makes sure you insert the MicroSD card the right way round to avoid damage to the camera or the card 4 The camera is designed to be plugged in during use the built in battery is to allow it to save the last recording when the power is disconnected If the battery is very flat it may take a few minutes before the camera will turn on 5 Please only use the original 5V power ...

Page 4: ...setting this to 3 minutes which means the camera saves the recordings in 3 minute chunks 2 Motion Detection When motion detection is turned on the camera can detect movement in front of your car and start recording automatically Note that this function will only work while the camera is connected to external power 3 G SENSOR When the G Sensor is enabled the camera will automatically lock the curre...

Page 5: ...deo mode short press the OK button to manually stop or start recording 3 Photo In photo mode short press the OK button to take a still photo 4 Playback In playback mode short press the OK button to play the video 5 Power OK button In video mode photo mode or playback mode short press the menu button enter the menu short press up down to browse and short press the power button to confirm 6 Up butto...

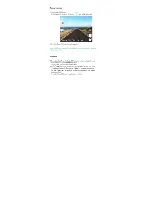
Page 6: ... press the Menu button to exit the menu 9 Mode button In standby mode camera not recording short press the mode button to switch between the different modes Video Photo Playback Recording video In Video mode in the upper left corner of the screen the icon will be displayed press the Power OK button to start recording REC icon will appear flashing in the upper left corner To stop recording press th...

Page 7: ...6 ...

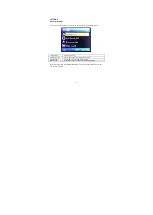
Page 8: ... mode press the Menu button and select lock this to protect the selected file from being overwritten or unlock this to unlock the selected files Select unlock all to unlock all the protected files on the memory card ...

Page 9: ...Time Setting Set date and time Auto Power Off Select the automatic power off delay time Screen savers Select the screen turning off delay time Beep sound Activate Deactivate sounds when pressing buttons Browse settings using the UP DOWN buttons and press the Power OK button to edit and confirm a setting ...

Page 10: ...anguage Select the menu display language Flicker 50 Hz or 60 Hz Format Select to format the memory card Reset System Select to revert to factory settings Version Select to check the system firmware version ...

Page 11: ...Menu button Resolution Select recording resolution Cyclic Record Select recording split duration or deactivate the cyclic recording function EV Adjust image exposure level Motion Detection Activate Deactivate motion detection trigger recording ...

Page 12: ...evel for the parking mode Audio Activate Deactivate recording with sound Date Tag Activate Deactivate date stamp on the recording G Sensor Adjust sensitivity level for the gravity sensor Photo settings In photo mode press the Menu button ...

Page 13: ...rst shooting mode Image quality Adjust image quality Sharpness Adjust sharpness level White Balance Adjust the white balance according to the environment ISO Select light sensitivity level EV Adjust image exposure level Anti Shaking Activate Deactivate image stabilizing ...

Page 14: ...13 Fast View Select preview duration after taking a shot Date Tag Activate Deactivate date and time stamp on the photo ...

Page 15: ... manually to delete all files on the card Why does the camera automatically turn on off continuously Check if the Parking Monitor is enabled If Parking Monitor is on the will turn on when it detects any shaking or movement and then turn off when it stops Also check if the Motion Detection function is enabled if it is on the camera will automatically start recording when it detects movement in fron...

Reviews: