


11
Conventional oven (top and
base heat)
This function combines the heat from the top and
base elements. It is particularly suitable for roasting
and baking pastry, cakes and biscuits. Food cooked
on the top shelf will brown and crisp faster than on
the lower shelf, because the heat is greater at the
top of the oven than at the base, as in ‘Fan assisted
oven’ function. Similar items being cooked will need
to be swapped around for even cooking. This means
that foods requiring different temperatures can be
cooked together, using the cooler zone in the lower
half of the oven and hotter area to the top.
Browning element
This function uses the element in the top of the
oven only. It is a useful function for the browning or
finishing of pasta dishes, vegetables in sauce and
lasagne, the item to be browned being already hot
before switching to the top element.
Base heat
This function uses the base element only. It
will crisp up your pizza or quiche base or finish off
cooking the base of a pastry case on a lower shelf.
It is also a gentle heat, good for slow cooking of
casseroles in the middle of the oven or for plate
warming.
The Browning and Base heat functions are useful
additions to your oven, giving you flexibility to finish
off items to perfection. With use, you will soon realise
how these functions can combine to extend your
cooking skills.
Both Ovens
The wire shelves should always be pushed firmly to
the back of the oven.
Baking trays meat tins etc should be placed level
centrally on the oven’s wire shelves. Keep all trays
and containers away from the sides of the oven as
over browning of the food may occur.
NOTE - Do not cover the base of your Multi-
function oven with cooking foil
.
For even browning, the maximum recommended size
of a baking tray is 340mm by 340mm.
When the oven is on, don’t leave the door open for
longer than necessary, otherwise the knobs may get
very hot.
Always leave a ‘fingers width’ between dishes on the
same shelf; this allows the heat to circulate freely
around them.
The Cook & Clean oven liners (see Cleaning your
cooker) work better when fat splashes are avoided.
Cover meat when cooking.
Sufficient heat rises out of the oven while cooking to
warm plates in the grill compartment.
Steam
When cooking foods with high water content (e.g.
oven chips) there may be some steam visible at
the grille at the rear of the hotplate. This is perfectly
normal.
Cooking high moisture content foods can create a
‘steam burst’, when the oven door is opened. When
opening the oven stand well back and allow any
steam to disperse.
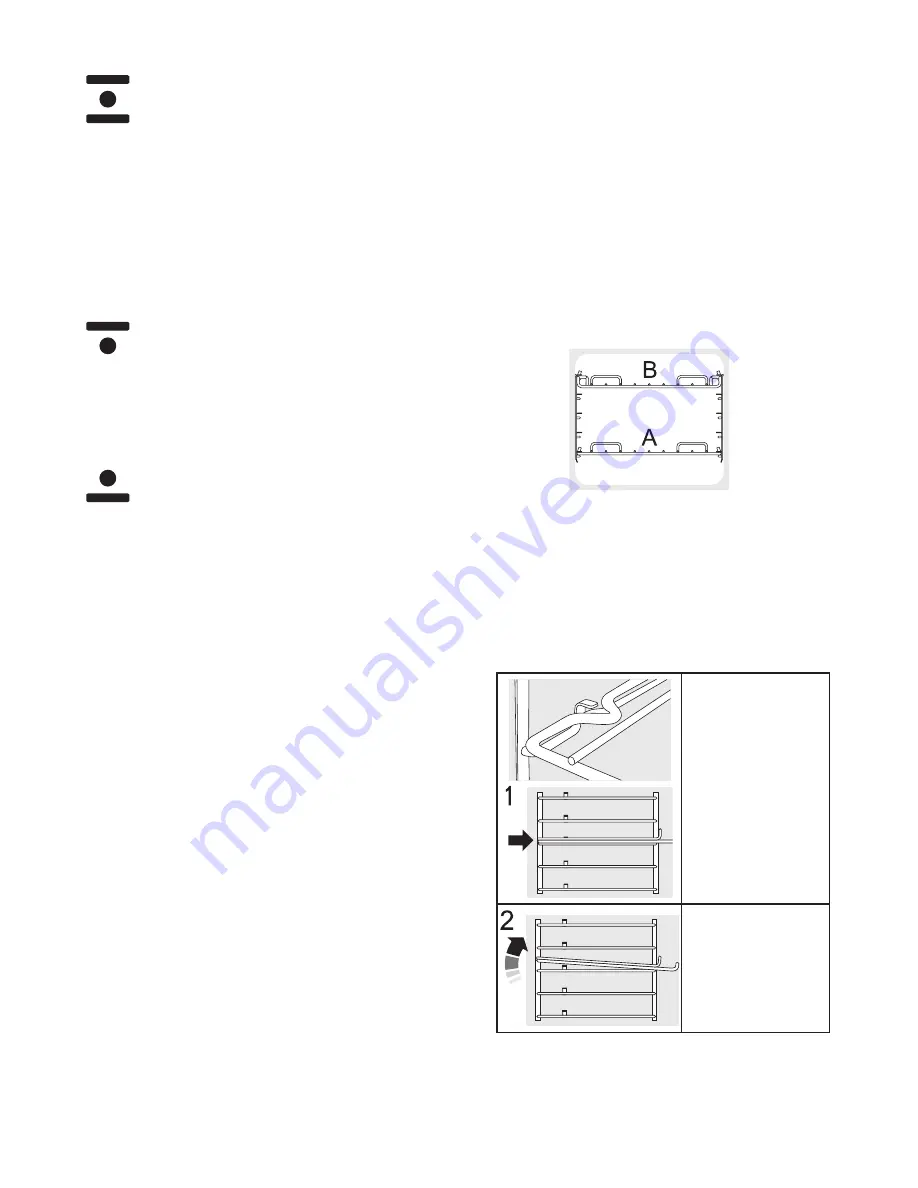
The Oven shelves
There are 4 standard oven selves and 1 drop shelf.
A standard shelf B Drop shelf
With the exception of the top position in the left hand
multifunction oven, which will only accept the drop
shelf, any shelf can be fitted in any of the positions.
The oven shelves are retained when pulled forward
but can be easily removed and refitted.
The shelves should not be fitted directly one above
the other. When cooking on more than one shelf
always leave at least one runner pace between them.
To remove a
shelf first make
sure it is pushed
fully back, so that
the shelf stop is
in line with the
kink in the side
of the shelf.
Lift up the front
of the shelf so
the shelf will
pass over the
shelf stop.


