background image


Falcon Foodservice Equipment


HEAD OFFICE 


Wallace View, Hillfoots Road, Stirling. FK9 5PY. Scotland.


WEEE Directive Registration No. WEEE/DC0059TT/PRO


At end of appliance life, dispose of appliance and any replacement parts in a 
safe manner, via a licensed waste handler. Appliances are designed to be 
dismantled easily and recycling of all material is encouraged whenever 
practicable.


Dear Customer 
 
Thank you for choosing Falcon Foodservice Equipment.  
 
This  manual  can  be  downloaded  from 

www.falconfoodservice.com


or  scan 

here: 


IMPORTANT: 

Please keep this manual for future reference. 

Summary of Contents for E600

Page 1: ...DATE PURCHASED MODEL NUMBER SERIAL NUMBER DEALER SERVICE PROVIDER F900 SERIES User installation and servicing instructions RISE and FALL GRILL E600 Read these instructions before use T100913 REV 3...

Page 2: ...ance and any replacement parts in a safe manner via a licensed waste handler Appliances are designed to be dismantled easily and recycling of all material is encouraged whenever practicable Dear Custo...

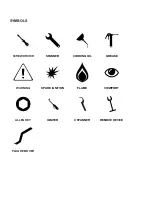
Page 3: ...SYMBOLS SCREWDRIVER SPANNER COOKING OIL GREASE WARNING SPARK IGNITION FLAME VIEWPORT ALLEN KEY IGNITER C SPANNER REMOVE DEVICE PLUG REMOVER...

Page 4: ...cock fitted in the supply pipe work The user must be familiar with the location and operation of this device in order to turn off the supply of gas in the event of an emergency This appliance has been...

Page 5: ...ealth and safety of your business you must control any risks identified in your commercial kitchen To do this you need to think about what might cause harm to people and decide whether you are taking...

Page 6: ...S AND INCOMPETENCE THE MANUFACTURER RESERVES THE RIGHT TO MODIFY WITHOUT NOTICE THE APPLIANCE CHARACTERISTICS DESCRIBED IN THIS HANDBOOK CONTENTS 1 INSTALLATION 1 1 IMPORTANT INFORMATION 1 2 POSITIONI...

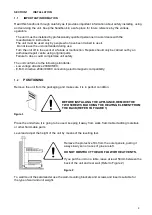
Page 7: ...andards Low voltage directive 2006 95 EC E M C directive 2004 108 EC concerning electromagnetic compatibility 1 2 POSITIONING Remove the unit from the packaging and make sure it is in perfect conditio...

Page 8: ...ht length through hole on the back of the appliance and connect to junction box on the right side Fit the require plug to the unit for the electrical supply and connect it to a suitable that is proper...

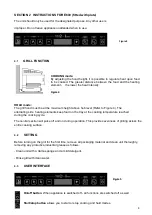
Page 9: ...Figure 4 The alternating side heating elements keep food on the tray at the cooking temperature reached during the cooking cycle The central section will pulse off and on during operation This provide...

Page 10: ...time and intensity and press START or place the plate upon the plate detection device to start the session cooking mode will terminate once the set time ends and a buzzer will sound pressing the START...

Page 11: ...ing Clean all stainless steel parts with warm soapy water rinse thoroughly and dry with care Do not use products that contain chlorine e g bleach DO NOT CLEAN UNIT WITH JETS OF WATER OR HIGH PRESSURE...

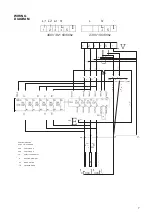
Page 12: ...m 11 31 21 l S J KOB 11 31 21 4 4 24 D 14 134 24 N m m z I z I KOA D A1 A2 zI 1 MO 0 2 o3 0 4 15 SCH1 MAIN BOARD SCH2 TRIAC BOARD KOA CONTACTOR A KOB CONTACTOR B FS1 SAFETY THERMOSTAT R HEATING ELEME...

Reviews: