2
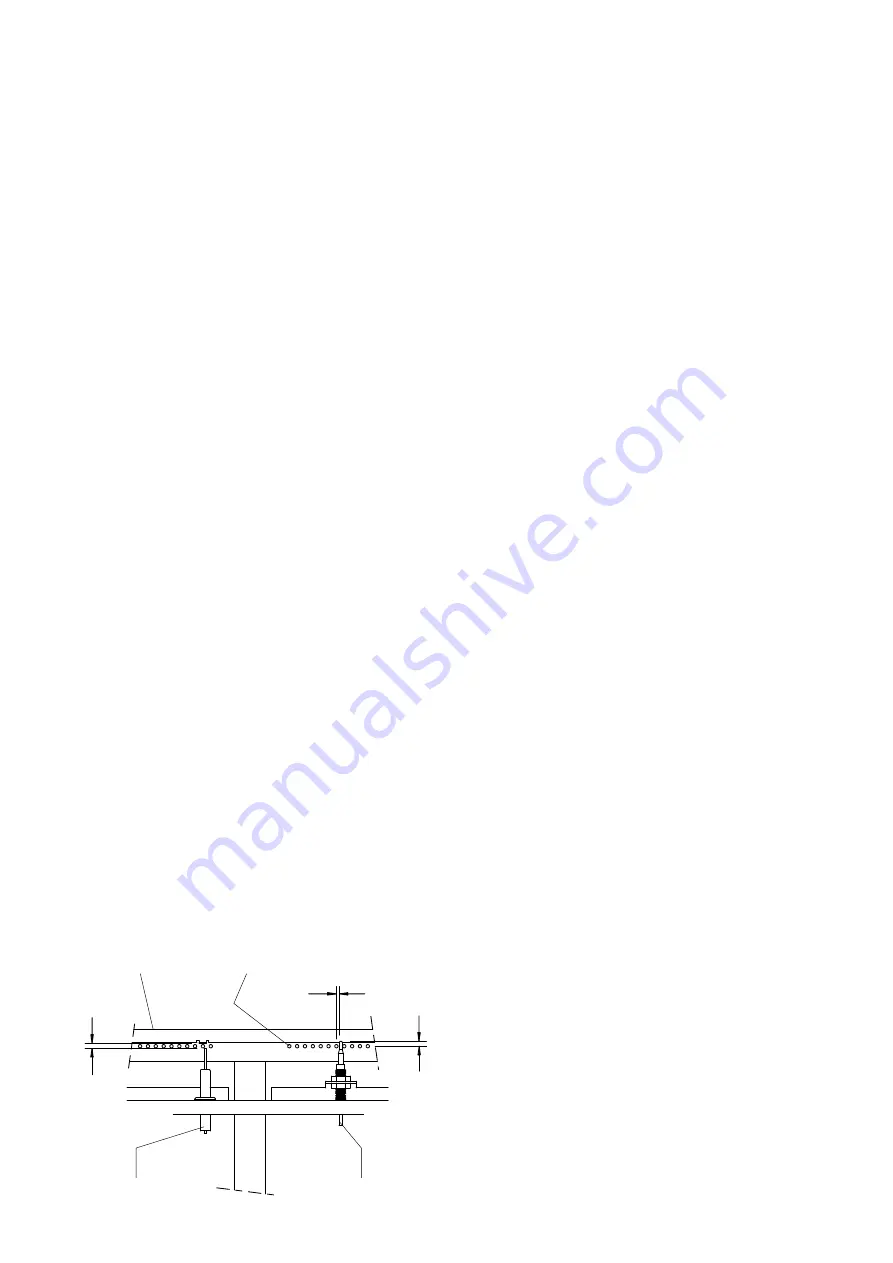
Ignition electrode
Thermocouple
Outline of burner
Burner ports
4.0
4.5
4.0
4.5
3.4 INJECTORS
3.4.1 Open Top
Remove pan support and burner head.
Undo and remove brass venturi. Place an extended
socket down main burner body centre.
Undo injector and carefully remove it.
Replace in reverse order.
3.4.2 Oven andSolidTop
Injectors are accessible for removal upon removal of
the burners.
3.5 FLAME FAILURE DEVICE
3.5.1 Oven
To remove, proceed as follows -
a) Remove oven burner as described in Section
3.3.3.
b) Undo union nut that secures gas supply pipe to
flame failure device at front of unit.
c) Undo fixings which secure injector bracket to base
panel and lift assembly clear.
Flame failure device embodies a thermocouple
heated directly by burner flame, i.e. no pilot is used.
The correct relationship between thermocouple probe
and burner is shown in Figure 4. When FFD button is
pressed to light burner, gas is admitted to burner at a
reduced rate. When thermocouple probe is
sufficiently heated to enable FFD to become
energised, full gas rate will flow upon release of
button.
3.5.2 Open Top
Remove hob pan supports and burner heads to allow
access to brass venturi. Undo venturi and remove
with aluminium bezel.
Thermocouple can now be observed protruding
through dripshed. Undo dripshed fixings and
remove.
Burner support bracket is located directly below drip
shed. Remove nut that secures thermocouple to
bracket and pull through from underside.
Undo thermocouple connection at FFD section of gas
tapand carefully remove thermocouple from hob.
Replace in reverse order.
3.5.3 SolidTop
Flame failure thermocouple is part of pilot assembly.
See Section 3.3.4.
3.6 SPARK IGNITER
To remove, proceed as follows:
a) Remove oven grid shelves and base plate.
b) Remove FFD and igniter cover.
c) Remove igniter lead and from inside, undo nut that
secures igniter.
Replace in reverse order. Check oven burner ignites
from spark. If spark-gap adjustment is necessary,
refer to dimensions in Figure 5.
3.7 OVEN THERMOSTAT
3.7.1 Thermostat Replacement
To remove, proceed as follows -
After removing control panel, undo compression nut
on gas supply pipe at thermostat rear.
Undo fixings that secure thermostat. Free thermostat
sensor from oven roof clips and feed capillary tube
and sensor back through roof hole into upper
compartment. Thermostat can now be removed from
unit.
N.B. Replace in reverse order, always ensuring that a
new gasket is used and joints are tested for gas
soundness
3.8 GAS TAPS
3.8.1 Open Top
Remove control panel as detailed in Section 3.2.
To Service
Undo tapbody fixings and withdraw spindle and niting
arrangement to allow plug to be eased out.
Replace in reverse order.
To Remove
Undo compression fitting brass nut on supply pipe at
rear of gas tap.
Remove thermocouple connection from FFD section
of tap.
Undo fixings and gently remove tap from supply
manifold.
To Clean andRe-grease a Tap
Dismantle tapby removing single front retaining
screw then push in and rotate spindle anti-clockwise
until niting pin is free. Withdraw spindle and centre
plug, taking care not to lose the small compression
spring. Clean all parts with a soft rag, and sparingly
re-grease plug with an approved high temperature
grease is recommended. Also apply grease to
operating spindle where it enters plug.
Note
Tap plugs and bodies are made in matched pairs -
DO NOT INTERCHANGE.
All manuals and user guides at all-guides.com


