background image

13

4.  Cooking Table

ArtNo.050-0007

Oven shelf positions 

Oven Shelf Positions 

Top (T)

Centre (C)

Base (B)

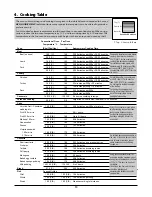
The oven control settings and cooking times given in the table below are intended to be used 

AS A GUIDE ONLY

. Individual tastes may require the temperature to be altered to provide a 

preferred result.

Food is cooked at lower temperature in a fan oven than in a conventional oven. When using 
recipes, reduce the fan oven temperature by 10 °C and the cooking time by 5-10 minutes. The 
temperature in the fan oven does not vary with height in the oven so you can use any shelf.

Food

Meat


Beef (no bone)

 Lamb

 Pork

Poultry

 Chicken

 Turkey

 Duck

Casserole

Yorkshire Pudding

Cake


Very rich fruit - Christmas,  


wedding, etc.


Fruit 180 mm tin


Fruit 230 mm tin


Madeira 180 mm


Queen cakes

 Scones


Victoria sandwich


180 mm tin


210 mm tin

Desserts


Shortcrust tarts


Fruit pies

 Tartlets


Puff pastry

 Meringues


Baked egg custard


Baked sponge pudding


Milk pudding

Bread

Fish

 Fillet

 Whole

 Steak

Approximate Cooking Time

30-35 minutes per 500g +30-35 minutes.

20-25 minutes per 500g +20-25 minutes.

30-35 minutes per 500g +30-35 minutes.

25-30 minutes per 500g +25-30 minutes.

35-40 minutes per 500g +35-40 minutes.

25-30 minutes per 500g +25-30 minutes.

20-25 minutes per 500g +20-25 minutes.

15-20 minutes per 500g +15-20 minutes.

20 minutes per 500g +20 minutes.

15 minutes per 500g +15 minutes.

25-30 minutes per 500g.

20 minutes per 500g.

2-4 hours according to recipe.

Large tins 30-35 minutes; individual 10-20 minutes.

45-50 minutes per 500g of mixture.

2-2½ hours.

Up to 3½ hours.

80-90 minutes.

15-25 minutes.

10-15 minutes.

20-30 minutes.

30-40 minutes.

20-30 minutes on a preheated tray.

35-45 minutes.

10-20 minutes according to size.

20-40 minutes according to size.

2-3 hours.

45-60 minutes.

40-45 minutes.

2 to 3 hours.

20-30 minutes.

15-20 minutes.

15-20 minutes per 500g.

Steaks according to thickness.

Conventional Oven

Temperature °C  

(Shelf Position)

160   (C)

200  (C)

160  (C)

200  (C)

160  (C)

200  (C)

160  (C)

200  (C)

160  (C)

200  (C)

160  (C)

200  (C)

140-150  (C)

220  (C)

140  (C/B)

150  (C/B)

150  (C/B)

160  (C/B)

190  (C/B)

220  (C/B)

180  (C/B)

180  (C/B)

200  (C/B)

200  (C/B)

200  (C/B)

210  (C/B)

100  (C/B)

160  (C/B)

180  (C/B)

140-150  (C/B)

210  (C)

Fanned Grilling

190  (C/B)

190  (C/B)

190  (C/B)

Fan Oven 

Temperature

 °C

150

190

150

190

150

190

150

190

150

190

150

190

130-140

210

130

140

140

150

180

210

170

170

190

190

190

200

90

150

170

130-140

200

190  (C/B)

190  (C/B)

190  (C/B)

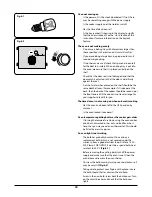
Thoroughly thaw frozen joints before 

cooking. Meat may be roasted at 

220°C (210°C for fan oven) and the 

cooking time adjusted accordingly. 

For stuffed and rolled meats, add 

approximately 10 minutes per 500g, 

or cook at 200°C (190°C) for 20 

minutes then 160°C (150°C) for the 

remainder.

For stuffed poultry, you could cook 

at 200°C (190°C) for 20 minutes 

then 160°C (150°C) for remainder. 

Do not forget to include the weight 

of the stuffing.

For fresh or frozen prepacked 

poultry, follow instructions on the 

pack. Thoroughly thaw frozen 

poultry before cooking.

Using the conventional oven: when 

two tier cooking leave at least one 

runner space between shelves.

Position the baking tray with the 

front edge along the front of the 

oven shelf. 

ArtNo.050-0001 Gas cooking table

Using the conventional oven: for 

even browning the maximum size of 

baking tray recommended is 340 mm 

x 340 mm. This ensures free heat 

circulation.

If cooking a two tier load, the trays 

should be interchanged 

approximately halfway though the 

cooking time.

Up to three tiers can be cooked in a 

fan oven at the same time but make 

sure to leave at least one runner 

space between each shelf being 

cooked on.

T - Top;  C - Centre;  B - Base

DocNo.031-0004 - Cooking table - electric & fan single cavity

Summary of Contents for Hi-LITE 110

Page 1: ...Hi LITE 110 Dual Fuel USER GUIDE INSTALLATION INSTRUCTIONS ...

Page 2: ...0 C for a fan oven orgas mark 7 2 Pull the small sprigs off the rosemary branches and set aside with the garlic 2 Using the tip of a paring knife make up to 20 well spaced cuts into the flesh of the lamb about 2 5cm inch deep Divide the rosemary sprigs garlic and anchovies and push down into the cuts Place the leg on a large roasting tin and pour over the oil massaging it all over the joint Season...

Page 3: ...5 Cleaning Your Cooker 14 Essential Information 14 Hotplate Burners 14 Ceramic Warming Zone 15 The Griddle 15 Glide out Grill 16 Control Panel and Doors 17 Ovens 17 Cleaning Table 18 6 Troubleshooting 19 7 Installation 22 Dear Installer 22 Safety Requirements and Regulations 22 Provision of Ventilation 22 Location of Cooker 22 Conversion 22 Positioning the Cooker 24 Moving the Cooker 24 Fitting th...

Page 4: ...ii ...

Page 5: ...iod If You Smell Gas DO NOT turn electric switches on or off DO NOT smoke DO NOT use naked flames DO turn off the gas at the meter or cylinder DO open doors and windows to get rid of the gas DO keep people away from the area affected Call your gas supplier Ventilation CAUTION The use of a gas cooking appliance results in the production of heat and moisture in the room in which it is installed Ther...

Page 6: ... pans should be only one third full of fat Filling the pan too full of fat can cause spill over when food is added If you use a combination of oils or fats in frying stir them together before heating or as the fats melt Foods for frying should be as dry as possible Frost on frozen foods or moisture on fresh foods can cause hot fat to bubble up and over the sides of the pan Carefully watch for spil...

Page 7: ...in temperature Cooker Care As steam can condense to water droplets on the cool outer trim of the oven it may be necessary during cooking to wipe away any moisture with a soft cloth This will also help to prevent soiling and discolouration of the oven exterior by cooking vapours Cleaning In the interests of hygiene and safety the cooker should be kept clean at all times as a build up in fats and ot...

Page 8: ...the flow of gas if the flame goes out When the igniter button is pressed in sparks will be made at every burner this is normal Do not attempt to disassemble or clean around any burner while another burner is on otherwise an electric shock could result To light a burner press the igniter button and push in and turn the associated control knob to the high position as indicated by the large flame sym...

Page 9: ...2 6 They will reduce burner performance and could damage the pan supports You should also avoid using unstable and misshapen pans that may tilt easily and pans with a very small base diameter e g milk pans single egg poachers Fig 2 7 The minimum recommended pan diameter is 120mm The maximum allowable pan base diameter is 260mm DO NOT use cooking vessels on the hotplate that overlap the edges Wok B...

Page 10: ...ace is non stick and metal cooking utensils e g spatulas will damage the surface Use heat resistant plastic or wooden utensils n n DO NOT put it crossways it will not fit properly and will be unstable Fig 2 12 n n DO NOT put it on any other burner it is not designed to fit in any of the other pan supports Position the griddle over the hotplate burners resting on the pan support Check that it is se...

Page 11: ...turn the control knob clockwise Fig 2 17 To heat the right hand half turn the control knob counter clockwise The neon indicator light by the grill control will come on For best results slide the grill pan back into the grill chamber and preheat the appropriate part s of the grill for two minutes The grill trivet can be removed and the food placed on it while you are waiting for the grill to prehea...

Page 12: ...faster more even cooking The recommended cooking temperatures for a fan oven are generally lower than a conventional oven Note Please remember that all cookers vary so temperatures in your new ovens may differ to those in your previous cooker Operating the Ovens Turn the oven knob to the desired temperature Fig 2 19 The oven indicator light will glow until the oven has reached the temperature sele...

Page 13: ...stop the beeper when it sounds turn the Adjusting knob counter clockwise The cook period which is the length of time you want the oven to cook for The stop time which is the time of day you want the oven to stop cooking To Stop the Right hand Oven at a Specific Time of Day Turn the Timer knob to the E position Fig 2 25 Use the Adjusting knob to set the stop time You can set the oven to turn on at ...

Page 14: ...d hold the Timer knob to the clock symbol A for about 8 seconds On appears on the display Fig 2 30 While still holding the Timer knob turned to the clock symbol A turn the Adjusting knob clockwise until the key symbol F and OF shows on the display Fig 2 31 Release the knobs The right hand oven is now locked as is confirmed by the display showing the time of day alongside the key symbol F Fig 2 32 ...

Page 15: ...ven shelves must be removed and the other positioned to suit When the Handyrack is used in its highest position other dishes can be cooked on the bottom shelf position or base of the oven When the Handyrack is used in its lowest position other dishes can be cooked on the second shelf position or base of the oven To fit the Handyrack locate one side of it on the door bracket Fig 2 40 Then spring th...

Page 16: ...d always be pushed firmly to the back of the oven Baking trays with food cooking on them should be placed level with the front edge of the oven s wire shelves Other containers should be placed centrally Keep all trays and containers away from the back of the oven as overbrowning of the food may occur For even browning the maximum recommended size of a baking tray is 340mm 13 by 340mm 13 When the o...

Page 17: ...40 minutes according to size 2 3 hours 45 60 minutes 40 45 minutes 2 to 3 hours 20 30 minutes 15 20 minutes 15 20 minutes per 500g Steaks according to thickness Conventional Oven Temperature C Shelf Position 160 C 200 C 160 C 200 C 160 C 200 C 160 C 200 C 160 C 200 C 160 C 200 C 140 150 C 220 C 140 C B 150 C B 150 C B 160 C B 190 C B 220 C B 180 C B 180 C B 200 C B 200 C B 200 C B 210 C B 100 C B ...

Page 18: ...ved for cleaning n n DO NOT put the burner heads in a dishwasher Make sure they are absolutely dry before replacing them The Single Ring Burners When refitting the burner head make sure that the notch lines up with the electrode or hole in the base Check that the burner head is level and that the cap is fitted centrally on the burner head Fig 5 1 The Wok Burner The wok burner can also be taken apa...

Page 19: ...t OFF and allow to cool before cleaning further After the surface cools down and the heat indicator lights go off follow the Daily Care procedure outlined above Cleaning Burned on Spills Make sure that the heat indicator lights are off and that the warming zone is cool Remove the excess burned on substance with a single edged razor scraper Hold the scraper at an angle of about 30 to the surface an...

Page 20: ...ll pan support frame by pulling the grill pan forward Fig 5 6 Lift the grill pan clear of the support frame The support frame is held to the side rails by two clips on each side Fig 5 7 For each side support the side rail with one hand and with the other hand lift the frame up and out of the side clips Fig 5 8 For safety push the side rails back into the grill chamber If you need to remove the sid...

Page 21: ... clean the oven door glass since they can scratch the surface which may result in shattering of the glass Ovens Cook Clean Panels The ovens have side Cook Clean panels which have been coated with a special enamel that partly cleans itself This does not stop all marks on the lining but helps to reduce the amount of manual cleaning needed These panels work better above 200 C If you do most of your c...

Page 22: ...s may cause cosmetic damage Do not use abrasive cleaners on lettering Control knobs handles trims Plastic chrome copper or lacquered brass Warm soapy water soft cloth Brass Brass polish Oven door glass glass lid some models only Toughened glass Hot soapy water cream cleaner scourer if necessary Oven and Grill Part Finish Recommended Cleaning Method Sides floor roof of oven NOT COOK CLEAN OVEN PANE...

Page 23: ...ide and make sure that the pan bottoms are smooth and clean Marks from mineral deposits from water or food can be removed with a cleaning cream However tiny scratches 6 Troubleshooting are not removable but will become less visible in time as a result of cleaning Metal markings on the ceramic warming zone surface Do not slide aluminium or copper pans across the ceramic surface Marks from aluminium...

Page 24: ...ker is not level arrange for your supplier to level it for you The timed oven is not coming on when automatic cooking Has the oven knob been left in the OFF position by mistake Is the oven locked see above Oven temperature getting hotter as the cooker gets older If turning the temperature down using the oven control knob has not worked or has only worked for a short time then you may need a new th...

Page 25: ...bottom hinge fixing screws and use the notch and a flat bladed screwdriver to move the position of the hinge to set the hinge position Fig 6 4 Retighten the hinge screws Fig 6 3 ArtNo 320 0007 Oven door hinge adjustment 2 Fig 6 4 Effect of hinge adjustment exaggerated for clarity Oven door omitted for clarity Centre line of hinge pin ...

Page 26: ...requirements regarding ventilation All rooms require a window that can be opened or equivalent while some rooms require a permanent vent in addition to the window Location of Cooker The cooker may be installed in a kitchen kitchen diner but NOT in a room containing a bath or shower This appliance is designed for domestic cooking only Use for any other purpose could invalidate any warranty or liabi...

Page 27: ...y required if fitting the cooker on a stone or concrete floor 4 Steel tape measure 5 Cross head screwdriver 6 Flat head screwdriver 7 Spirit level 8 Pencil 9 Adjustable spanner 10 Screws for fitting stability bracket 11 4mm 3mm Allen keys 12 13mm spanner or socket wrench 3 pan supports Plinth Griddle Grill pan trivet ArtNo 330 0001 Grill pan 4 flat shelves Handyrack ArtNo 324 0003 Handyrack Roasti...

Page 28: ...te kitchen furniture are particularly prone to heat damage and discolouration We cannot accept responsibility for damage caused by normal use of the cooker to any material that de laminates or discolours at temperatures less than 65 C above room temperature We recommend a gap of 1110mm between units to allow for moving the cooker Do not box the cooker in it must be possible to move the cooker in a...

Page 29: ...therwise stated a cooker using a flexible gas connector must be secured with a suitable stability device Suitable stability devices are shown in Fig 7 7 Fig 7 8 and Fig 7 9 If you are using a stability chain Fig 7 7 then the chain should be kept as short as is practicable and fixed firmly to the rear of the cooker If you are using a stability bracket Fig 7 8 and Fig 7 9 then adjust the bracket to ...

Page 30: ...ose supply connection should be within the shaded area A Fig 7 10 For Natural Gas the flexible hose must be in accordance with BS669 For LP Gas it should be capable of 50mbar pressure 70 C temperature rise and carry a red stripe band or label If in doubt contact your supplier Screw connect the threaded end of the hose into the gas inlet After completing the gas connection make sure that the cooker...

Page 31: ...ks are correctly fitted and that the terminal screws are tight Secure the mains cable using the cable clamp Final Checks Hotplate Check Check each burner in turn refer to the Hotplate Burners section at the front of the instructions Grill Check Turn on the grill control and check that the grill heats up Oven Check Set the clock as described earlier in the instructions and then turn on the ovens Ch...

Page 32: ...use reconditioned or unauthorised gas controls n n Disconnect from the electricity and gas supply before servicing n n Before electrical reconnection check that the appliance is electrically safe Hotplate Injectors Remove the burner caps and heads Remove the old jets Fig 8 1 Fit the new jets see the Technical Data section at the back of this book for the correct jets Reassemble in the reverse orde...

Page 33: ... one of the hotplate injectors not a wok burner Lift off a burner head Fit the pressure gauge to the jet Turn on and light one of the other burners Turn on and press in the control knob for the burner with the pressure gauge fitted The pressure should be 29mbar for Butane and 37mbar for Propane After checking the pressure turn off the taps and replace the burner head Reassemble burner top making s...

Page 34: ...on board left hand side A1 Grill front switch A2 Grill energy regulator A3 Left hand grill element A4 Right hand grill element B Illumination board right hand side B1 Left hand oven thermostat B2 Left hand front switch B3 Left hand oven top inner element B4 Left hand oven top outer element B5 Left hand oven bottom element F1 Left hand oven thermal preset C Clock D1 Right hand oven thermostat D2 Ri...

Page 35: ...tor Wok burner 57 3 5kW internal 78 3 5kW 246g h internal 53 external 126 external 82 Large burner 40 3 0kW 134 3 0kW 210g h 87 Medium burner 32 1 7kW 109 1 7kW 119g h 68 Small burner 28 1 0kW 75 1 0kW 70g h 51 The valves in this cooker are fitted with adjustable bypass screws The cooker is supplied with the bypass screws set for Natural gas For LPG conversion the bypass screws must be screwed all...

Page 36: ...32 Notes ...

Page 37: ...33 Notes ...

Page 38: ...34 Notes ...

Page 39: ...een repaired by persons or organisations other than those authorised to act on behalf of AGA Rangemaster Exceptions Items not included under the free 3 year guarantee include pan supports griddles wok rings baking trays grill pans trivets filters light bulbs and other consumable accessories Any damage caused other than through normal use Breakdowns associated with cooking spillage Cosmetic deterio...

Page 40: ...ification design and production of products and thus alterations take place periodically Whilst every effort is made to produce up to date literature this booklet should not be regarded as an infallible guide to current specification nor does it constitute an offer for the sale of any particular appliance For over 45 years Divertimenti Falcon s sister company has been the ultimate destination for ...

Reviews: