8
The Clocks
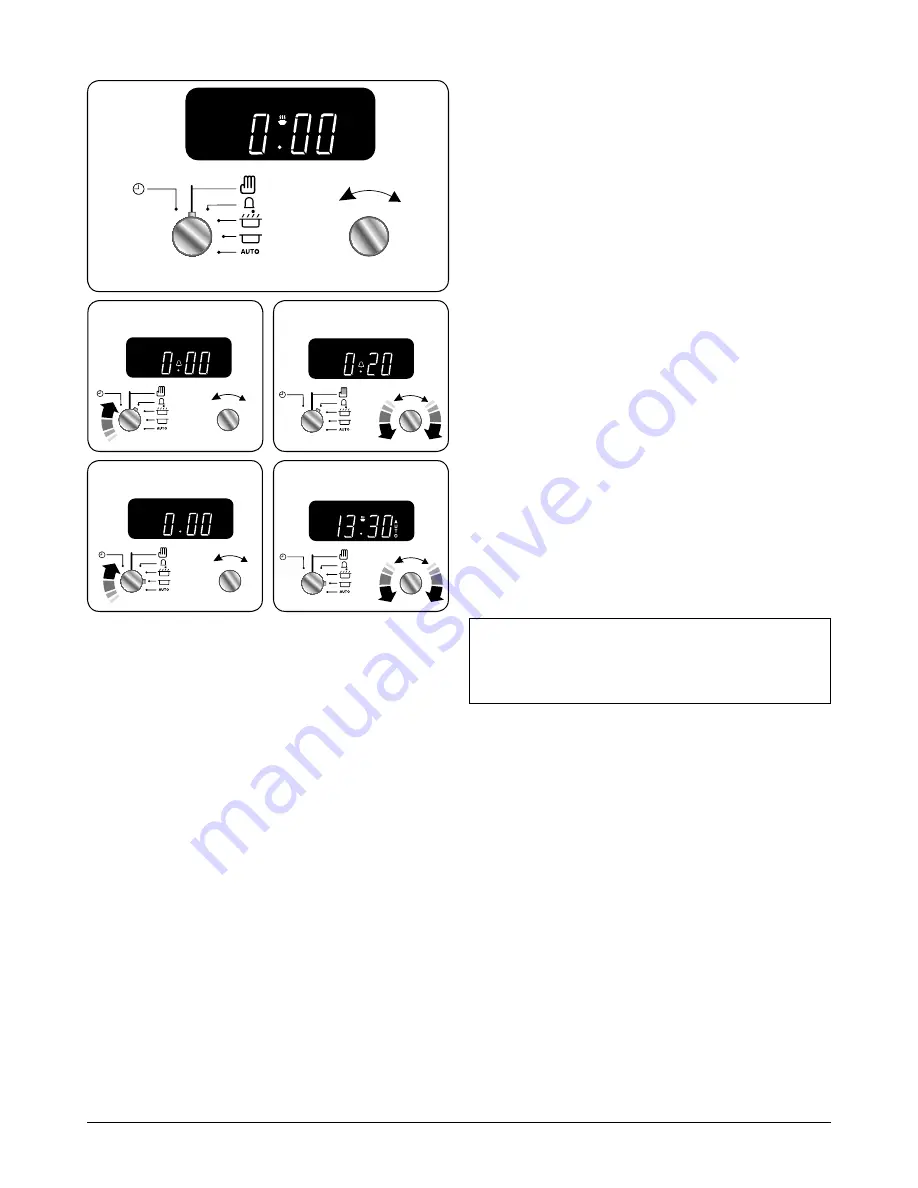
You can use the timer (Fig.2-21) to turn the left-hand oven
on and off. The clock must be set to the time of day before the
ovens will work.
The 2-Button Clock
(Profe)
Setting the Time of Day
When the clock is first connected, the display flashes (
0.00
)
and (
) alternately.
To set the time, turn and hold the Timer knob to the clock
symbol [
] and at the same time turn the Adjusting knob left
or right until the clock shows the time of day.
Remember this is a 24-hour clock.
Let go of the Timer knob and it will spring back to the vertical,
oven manual setting.
IMPORTANT:
The cooker will not operate unless the clock
has been set.
Minute Minder
Turn the Timer knob to the right to the [
] minute minder
setting – it should click into position (Fig.2-22).
Use the Adjusting knob to set the time you need (Fig.2-23).
You can either turn the knob back to the vertical manual
setting [
] to keep an eye on the time of day, or leave it in
the [
] minute minder position as the time ticks down.
To stop the beeper when it sounds, turn the Adjusting knob
counter-clockwise.
•
The
‘cook period’,
which is the length of time you want
the oven to cook for.
•
The
‘stop time’,
which is the time of day you want the
oven to stop cooking.
To Stop the Programmable Oven Automatically
Turn the Timer knob to the [
] position (Fig.2-24).
Use the Adjusting knob to set the time at which the oven is
to stop. You can set the oven to turn on at any time over the
following 24-hour period. AUTO shows in the display
(Fig.2-25).
Turn the Timer knob to the ‘AUTO’ setting to return to the
clock display.
Once the set time is reached, the beeper sounds. Turn the
Timer knob to the vertical [
] to return to manual cooking.
ArtNo.300-0004 2-button clock annotated
A
B
A – Timer knob, B – Adjusting knob
Fig.2-21
ArtNo.300-0005 2BC
minute minder setting
ArtNo.300-0006 2BC
minute minder setting 2
ArtNo.301-0007 2BC
Stopping the oven 1
ArtNo.301-0008 2BC
Stopping the oven 2
Fig.2-22
Fig.2-23
Fig.2-24
Fig.2-25


