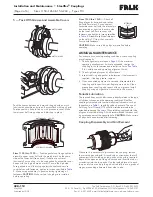
5 — Pack With Grease And Assemble Covers
Pack the spaces between and around the grid with as much
lubricant as possible and wipe off excess flush with top of grid.
Position seals on hubs to line up with grooves in cover. Move
lower cover half into position and block-up in place.
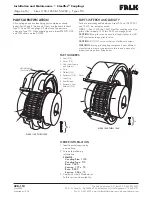
Sizes 1150 thru 1230 —
Position gaskets on flange split and
assemble upper cover half with the match mark on the same
side as the lower half (see above). If shafts are not level
(horizontal) or coupling is to be used vertically, assemble cover
halves with the lug and match mark UP or on the high side.
Push gaskets in until they stop against the seals and secure
cover halves with fasteners, tighten to torque specified in
Make sure gaskets stay in position during tightening of
fasteners.
CAUTION:
Make certain lube plugs are installed
before operating.
Sizes 1240 thru 1260 —
Check all
flange faces for burrs and coat either
half with Permatex #2 or equivalent.
Assemble cover half with the internal pin
(see drawing at right) on the same side
as the lower half. Secure cover with
fasteners and tighten to torque specified
so the split is 90° from the cover split.
Secure with fasteners.
CAUTION:
Make certain lube plugs are installed before
operating.
ANNUAL MAINTENANCE
For extreme or unusual operating conditions, check coupling
more frequently.
1. Check alignment per steps on
I
f the maximum
operating misalignment limits are exceeded, realign the
coupling to the recommended installation limits.
for installation and operating alignment limits.
2. Check tightening torques of all fasteners.
3. Inspect seal ring and gasket to determine if replacement is
required. If leaking grease, replace.
4. When connected equipment is serviced, disassemble the
coupling and inspect for wear. Replace worn parts. Clean
grease from coupling and repack with new grease. Install
coupling using new gasket as instructed in this manual.
Periodic Lubrication
The required frequency of lubrication is directly related to the type
of lubricant chosen, and the operating conditions. Steelflex
couplings lubricated with common industrial lubricants, such as
those shown in
should be relubed annually. The use of
Falk Long Term Grease (LTG) will allow relube intervals to be
extended to beyond five years. When relubing, remove both lube
plugs and insert lube fitting. Fill with recommended lubricant until
an excess appears at the opposite hole.
CAUTION:
Make certain
all plugs have been inserted after lubricating.
Coupling Disassembly And Grid Removal
Whenever it is necessary to disconnect the coupling, remove
the cover halves and grid. A round rod or screwdriver that will
conveniently fit into the open loop ends of the grid is required.
Begin at the open end of the grid section and insert the rod or
screwdriver into the loop ends. Use the teeth adjacent to each
loop as a fulcrum and pry the grid out radially in even, gradual
stages, proceeding alternately from side to side.
®
The Falk Corporation, P.O. Box 492, Zip 53201-0492
428-112
3001 W. Canal St., Zip 53208-4200, Milwaukee, WI USA Telephone: 414-342-3131
May 2000
Fax: 414-937-4359 e-mail: falkinfo@falkcorp.com web: www.falkcorp.com
Supersedes 12-98
Installation and Maintenance
•
Steelflex
®
Couplings
(Page 4 of 6)
Sizes 1150–1260 & 150–260
•
Types T10
MATCH MARK
MATCH MARK
VERTICAL COUPLINGS
MATCH MARK
LUG UP
INTERNAL
PIN


