background image

42 lbs/ft² (42 lbs per square foot) or .29 psi, and must not have a slope of greater than 
10° (ten degrees). 
        If you have any questions regarding the suitability of this product for your specific 
application, please consult with a qualitifed person or contact 

FallTech

 before using.  

Misuse of this product may result in serious injury or death. 

Warning:  Do not use this product if the roof or surface on which it is placed is 
contaminated with oil, grease, lubricants, algae or any other substance that would 
create slick conditions.  Do not use if there is a risk of frost or freezing conditions.  
Avoid sharp edges or highly abrasive surfaces.  The other components of your 
Personal Fall Arrest System (Body Wear, Connecting Device and Deceleration 
Device) must meet the requirements of ANSI Z359.  Failure to adhere to these 
warnings may result in serious injury or death! 
3.3:  Restricted Applications 

Harsh Chemical Environments:  Acids and other caustic chemicals can cause damage 
to this 

product

 and its component parts.  Damage from chemical exposure can happen 

quickly and will greatly degrade the ability of this product to function as intended.  Do not 
use this product where it may be exposed to harsh chemicals or substances.  
Extended Free Falls:  The EcoAnchor may be used in applications where freefall may 
exceed six feet, provided that the PFAS includes a deceleration device that  meets the 
extended freefall requirements in ANSI Z359.13.  Be sure to use a connecting device 
that is rated for free falls greater than six feet (i.e. 7247, 7248, 8247, 8248). 
Welding/Power Transmission:  Because of its neoprene construction, EcoAnchor is 
vulnerable to sparks, welding slag and sources of extreme heat.  Do not use this product 
if it may be exposed to very high temperatures, energized transmission equipment or 
other hazards of this sort.. 
Cold Weather Applications:  Because the EcoAnchor utilizes water as a ballast, it should 
not be used outdoors in cold weather environments where it will be exposed to freezing 
temperatures or snowy/icy surfaces. 

3.4:  Installation and Use – EcoAnchor for single users 

1.  Select the appropriate location to set up your 

FallTech EcoAnchor.  

The location 

must be capable of supporting 947 lbs, must be clean and dry and free of debris, 
protrusions, cracks, sharp edges or other conditions that could damage the neoprene 
bladder.  This location must also be set back a minimum of 10’ from the closest fall 
hazard and must have a pitch or grade of no more than 10°.  (Note:  Do not select an 
area where water accumulates). 

2.  Carefully inspect the EcoAnchor to ensure that it is undamaged and in serviceable 

condition (see Section 8 of this manual for complete inspection details. 

3. Spread the 

EcoAnchor

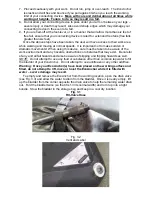
 bladder out flat, maximizing surface contact.  Ensure it is 

positioned as indicated on the label with the vent at the highest corner and with the 
drain at the lowest point (see Fig. 3.2).  The vent allows air to escape and prevents 
over-pressurizing.  

Incorrect positioning can result in trapped air and under-

filling, making the anchor unsafe

.   

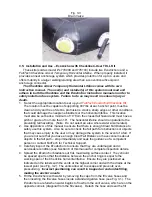
4. Fill the 

EcoAnchor

 with water by removing the cap from the fill valve hose and then 

inserting the fill-valve hose 

inside

 a standard garden hose (see Fig. 3.1).  The 

EcoAnchor

 is full when water begins to flow from the vent valve, which is on the 

opposite corner (diagonal from the fill valve).  Detach the hose and seal the fill valve.  
The 

EcoAnchor 

should now be filled to capacity.  Any air trapped in the bladder can 

be exhausted through the vent. 

5. Check the 

EcoAnchor

 for leaks and ensure that it is positioned correctly on the 

anchor surface.  Attach your connecting device (lanyard, vertical lifeline, self-
retracting lanyard, etc) to the anchorage ring on the top of the 

EcoAnchor

6.  Ensure your Full Body Harness is properly donned and adjusted and that your 

connecting device is securely attached to your back D-ring.  Ensure your connecting 
device is securely attached to the 

EcoAnchor

Summary of Contents for 7433

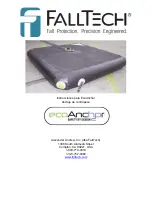
Page 1: ...Instructions for EcoAnchor Counterweight Anchor Alexander Andrew Inc dba FallTech 1306 South Alameda Street Compton CA 90221 USA 1 800 719 4619 1 323 752 0066 www falltech com...

Page 2: ...433 FallTech EcoAnchor n a 7433A FallTech EcoAnchor kit version n a G7433 FallTech EcoAnchor alt version n a 778000 75 EcoAnchor Checkline HLL Kit Also includes Checkline manual 778100 100 EcoAnchor C...

Page 3: ...ds on your jobsite and work deliberately to avoid these hazards in the course of your work Also be aware of hazards and obstructions in your fall path and work with your employer to eliminate these ha...

Page 4: ...een life and death Connectors snap hooks rebar hooks and carabiners must be of the locking type and require two distinct actions to open the gate Your connectors must be sized and shaped so that the r...

Page 5: ...restraint applications where the user is restricted from reaching a fall hazard a body belt may be used as an alternative Be sure to read and follow the manufacturer s instructions included with your...

Page 6: ...y harness and tied off to the structure on which they are positioning as a back up device 2 8 Free Fall Free Fall is the distance that a worker will fall before the connecting device or deceleration d...

Page 7: ...ous injury or death Rig your PFAS with extreme caution and be aware of all of the factors that may come into play in the event of a fall If using EcoAnchor with one of the authorized FallTech Temporar...

Page 8: ...general use and limitations of the EcoAnchor Counterweight Anchor Please read this section and all sections of this manual thoroughly If your application is not addressed or if you have questions rega...

Page 9: ...manual This product meets the requirements of OSHA 1926 502 as well as ANSI Z359 1 2007 and or ANSI A10 32 2004 It also meets the requirements of the European standard for Dead Weight Anchors Class E...

Page 10: ...oAnchor utilizes water as a ballast it should not be used outdoors in cold weather environments where it will be exposed to freezing temperatures or snowy icy surfaces 3 4 Installation and Use EcoAnch...

Page 11: ...matic movements When using this device care must be taken to be aware of the work environment and any hazards obstructions or obstacles that may exist Be careful of any and all fall hazards and also b...

Page 12: ...where water accumulates 2 Use Appendix A of this manual to ensure that there is enough Clear Fall Distance to safely use this system Also be sure to check the fall path for obstructions or objects tha...

Page 13: ...uctions or obstacles that may exist Be careful of any and all fall hazards and also be aware of slipping and tripping hazards as well NOTE Do not attempt to use any fluid or substance other than commo...

Page 14: ...sitioned correctly on the anchor surface Install the PSR 4 User THLL temporary horizontal lifeline Kit by attaching the thimbled end of the horizontal lifeline to the anchor ring on top of one of the...

Page 15: ...movement and the fall hazards along these paths Care must be taken to ensure that there are proper anchorages at appropriate intervals along these paths to protect the users from these hazards without...

Page 16: ...properly rated for your specific application check for specific restrictions in sections 3 5 3 9 Be sure to calculate your clear fall as discussed in section 2 9 and to avoid swing fall hazards Ensure...

Page 17: ...here fall hazards exist The best way to address a fall hazard is to eliminate it entirely or to employ a passive system to restrict access to the hazard i e guardrails netting covers etc Fall arrest p...

Page 18: ...fety and Health Information Bulletin SHIB 03 24 2004 at www osha gov Section 8 Product Inspection Inspection is a critical element in the employment of any fall protection equipment In order to protec...

Page 19: ...he drain valve and attempt to drain the bladder If there is ice in the bladder do not attempt to move it allow it to thaw and drain completely 9 If you know or suspect that this EcoAnchor has been use...

Page 20: ...replaced 4 Do not attempt to use any lubricants or solvents on any part of the EcoAnchor Store in a cool dry location away from direct sunlight and where it will not be exposed to chemical vapors 5 Th...

Page 21: ...e 10 Dimensions full SAE 57 x 57 x 8 75 Dimensions full Metric 144 8 cm x 144 8 cm x 22 2 cm Maximum User Capacity 310 lbs per user 10 3 Labels and Markings The label shown below must be present on th...

Page 22: ...igid anchorages When using the Checkline THLL with EcoAnchors refer to the Chekcline Instructions for the installation procedure but use the values below to evaluate Clear Fall Requirements In order t...

Page 23: ...all Distance HLL Span 11 20 21 30 31 40 41 50 51 60 Free Fall Distance 6 6 6 6 6 Height of tallest worker 6 6 6 6 6 Deceleration Distance 3 5 3 5 3 5 3 5 3 5 Dynamic Sag 6 6 9 10 10 Safety Factor 2 2...

Page 24: ...rson or firm is authorized to assume or assign for FallTech any other warranty in connection with the sale or use of this product Furthermore this warranty is void if any product is changed or altered...

Page 25: ...Instrucciones para EcoAnchor Anclaje de contrapeso Alexander Andrew Inc dba FallTech 1306 South Alameda Street Compton CA 90221 USA 1 800 719 4619 1 323 752 0066 www falltech com...

Page 26: ...Instalaci n y uso EcoAnchor con Equipo de HLL temporal para 4 usuarios 4 Selecci n del producto 5 Consideraciones del anclaje 6 Empleadores y capacitaci n para usuarios 6 1 Notas especiales para el e...

Page 27: ...e trabajo Estos t rminos tambi n se utilizan en estas instrucciones A continuaci n se presenta una breve descripci n del papel de estos individuos en el empleo de equipos de protecci n contra ca das P...

Page 28: ...pos No utilice este equipo si est da ado o si hay signos de desgaste excesivo deterioro deformaci n rasgaduras abrasi n o corrosi n No utilice este equipo si trabaja cerca de l neas el ctricas de alto...

Page 29: ...durante su uso o en el caso de una ca da Ciertas conexiones est n prohibidas y nunca se deben intentar con este producto o cualquier otro a menos que exista un permiso espec fico en las instrucciones...

Page 30: ...tenci n de ca das Si se va a utilizar para aplicaciones de restricci n en las que el usuario estar restringido de llegar a un peligro de ca da se puede utilizar una correa para el cuerpo como alternat...

Page 31: ...e cuerpo completo del usuario con el gancho de refuerzo conectado a la estructura en la cual el usuario est trabajando Nunca debe utilizarse una SAL o SRL para el posicionamiento del trabajo ni se deb...

Page 32: ...y el m todo para calcularla Tambi n es necesario considerar el trayecto de ca da al determinar las limitaciones de ca da despejada en su aplicaci n Aseg rese de que el trayecto de ca da est libre de...

Page 33: ...el usuario no s lo cae verticalmente sino que tambi n se balancea horizontalmente Esto puede ocasionar peligros adicionales por ejemplo puede balancearse hacia una obstrucci n o elemento estructural c...

Page 34: ...ma 4 8 horas sobre la Capacitaci n para personas autorizadas seg n se indica en ANSI Z359 2 2007 El usuario tambi n debe leer y estar familiarizado con todos los materiales contenidos en este manual d...

Page 35: ...oportar el peso del EcoAnchor lleno de 947 libras 429 6 kg con una carga distribuida de 42 libras pies cuadrados 19 05kg 0 092 metros cuadrados o 29 psi Construcciones comerciales y residenciales El F...

Page 36: ...indica en la etiqueta con el respiradero en la esquina m s alta y con el drenaje en el punto m s bajo ver Fig 3 2 El respiradero permite que el aire se escape y evita la presi n en exceso El posicion...

Page 37: ...NOTA No intente utilizar cualquier l quido o sustancia distinta al agua del grifo para llenar la bolsa de su EcoAnchor No intente utilizar anticongelantes o cualquier otro aditivo Advertencia Una vez...

Page 38: ...es 3 05 m del peligro de ca da m s cercano y debe tener una pendiente o grado de no m s de 10 La cuerda de salvamento horizontal debe ir en paralelo al peligro de ca da prevaleciente Nota No seleccion...

Page 39: ...blar n y rebotar n si empuja contra stos cuando llegue al l mite de operaci n de su dispositivo de conexi n Mu vase con prudencia y cuidado en todo momento mientras trabaja en alturas No hacerlo puede...

Page 40: ...os de ca da para detectar obstrucciones u objetos que puedan causar lesiones al usuario o puedan da ar el sistema en el caso de una ca da Si no est seguro de que tiene suficiente distancia de ca da de...

Page 41: ...a este sistema debe tenerse cuidado para estar consciente del ambiente de trabajo y de cualquier peligro obstrucciones u obst culos que puedan existir Debe tener cuidado con todos los peligros de ca d...

Page 42: ...dos deber n tener un tama o y forma adecuados de modo que sean compatibles con los dispositivos a los cuales se conectar n La persona competente deber seleccionar el m todo para proteger a los equipos...

Page 43: ...or puede ser obligado a suministrar equipos de protecci n personal que incluyen los equipos personales de detenci n de ca das y de protecci n contra ca das junto con una cantidad adecuada de capacitac...

Page 44: ...tos equipos puede ser tan peligroso como no utilizarlos en absoluto No leer comprender y seguir estas instrucciones puede ocasionar lesiones graves o la muerte Secci n 7 Plan de protecci n contra ca d...

Page 45: ...rauma por suspensi n tambi n conocido como intolerancia ortost tica es una afecci n que puede surgir de ser suspendido de un arn s de cuerpo completo durante un per odo prolongado mientras espera por...

Page 46: ...a en la bolsa del EcoAnchor Con un golpe suave a un lado debe expulsar una peque a cantidad de agua de la v lvula de respiradero Si no funciona o si la bolsa no parece estar llena la superficie de neo...

Page 47: ...ntes incrementar la vida til y garantizar que el EcoAnchor tenga una buena condici n de funcionamiento en caso de que usted lo necesite para detener una ca da Los siguientes pasos se deben tomar peri...

Page 48: ...las normas pertinentes con las cuales debe estar familiarizado 10 2 Especificaciones del rendimiento El EcoAnchor ha sido dise ado para funcionar como un anclaje de contrapeso para la detenci n de ca...

Page 49: ...NSI est n disponibles para su compra a trav s de la tienda de normas electr nicas en www ansi org ANSI Z359 1 2007 Requisitos de seguridad para los sistemas personales de detenci n de ca das subsistem...

Page 50: ...la ca da despejada Tramo de HLL 0 pies 0 m 15 pies 4 6 m 16 pies 4 9 m 30 pies 9 14 m 31 pies 9 4 m 50 pies 15 2 m 51 pies 15 5 m 75 pies 22 8 m 76 pies 23 16 m 100 pies 30 5 m Distancia de ca da libr...

Page 51: ...ca da Con el fin de determinar la distancia real de ca da despejada para la cual necesitar planificar utilice el cuadro en la siguiente p gina En la columna que muestra la longitud a la cual se ajust...

Page 52: ...Ninguna otra persona o empresa est autorizada para asumir o ceder a FallTech cualquier otra garant a en relaci n con la venta o uso de este producto Asimismo esta garant a ser nula si alg n producto...

Reviews: