background image

27

ENGLISH

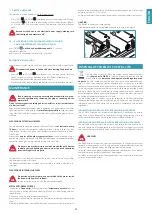
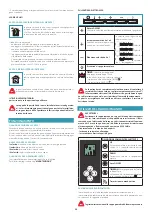
1) - CREATE A NEW CODE

The procedure is to be carried out on the radio control.

•  Press LIGHT 

 and TIMER 

 simultaneously until the display starts flashing.

•  Press DOWN 

 on the radio control: saving is confirmed by three brief flash-

es of the display. The new code cancels and replaces the previous default 
code. 

Reconnect the hood to the electrical power supply, making sure 

that the lights and motor are off. 

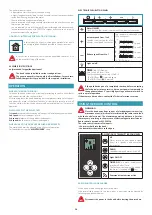
2A) -  ASSOCIATING THE RADIO CONTROL WITH THE HOOD


USING THE ELECTRONIC PUSHBUTTON PANEL


press TIMER (

on the hood pushbutton panel 

for 2 seconds:

the red LED lights up. 
press any key on the radio control within 10 seconds. 

RESTORING DEFAULT CODE

the procedure is to be carried out if the hood is disposed of, sold or transferred.

Disconnect the power to the hood before starting the procedure.

•  Press UP 

 and DOWN 

 simultaneously on the radio control for more 

than 5 seconds: reset is confirmed by three brief flashes of the display. 

•  Reconnect the hood to the electrical power supply.
•  Proceed with associating the hood and the radio control, as described in point 2. 

MAINTENANCE

Before cleaning or carrying out maintenance operations, discon-

nect the equipment by removing the plug or switching off the 

main switch.

Do not use detergents containing abrasive, acidic or corrosive substances 

or abrasive cloths.

Regular maintenance guarantees proper operation and performance over time.
Special attention is to be paid to the 

metal anti-grease filters

 : frequent clean-

ing of the filters and their supports ensures that no flammable grease is accu-
mulated.

CLEANING OF EXTERNAL SURFACES

You are advised to clean the external surfaces of the hood


at least once every 

15 days


to prevent oily substances and grease from sticking to them. To clean 

the brushed stainless steel hood, the Manufacturer recommends using "Magic 
Steel" wipes.
Alternatively 

and for all the other types of surfaces

, it can be cleaned using a 

damp cloth, slightly moistened with mild, liquid detergent or denatured alcohol.
Complete cleaning by rinsing well and drying with soft cloths. 

Do not use too much moisture or water around the push button 

control panel and lighting devices in order to prevent humidity 

from reaching electronic parts.

The glass panels can only be cleaned with specific, non-corrosive or non-abra-
sive detergents using a soft cloth.
The Manufacturer declines all responsibility for failure to comply with these in-
structions.

CLEANING OF INTERNAL SURFACES

Do not clean electrical parts, or parts related to the motor inside 

the hood, with liquids or solvents.

For the internal metal parts, see the previous paragraph.

METAL ANTI-GREASE FILTERS

It is advised to 

frequently

 wash the metal filters (

at least once a month

) leaving 

them to soak in boiling water and cleaning solution for 1 hour, taking care not 
to bend them.
Do not use corrosive, acid or alkaline detergents.
Rinse them well and wait for them to be completely dry before reassembling 
them.
Washing in a dishwasher is permitted, however, it may cause the filter material to 

darken: to reduce the possibility of this problem from happening, use low-tem-
perature washes 131°F / 55°C max.
To extract and insert the metal anti-grease filters see the assembly instructions.

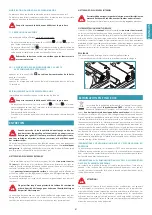
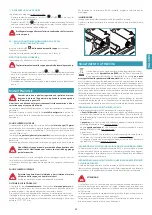
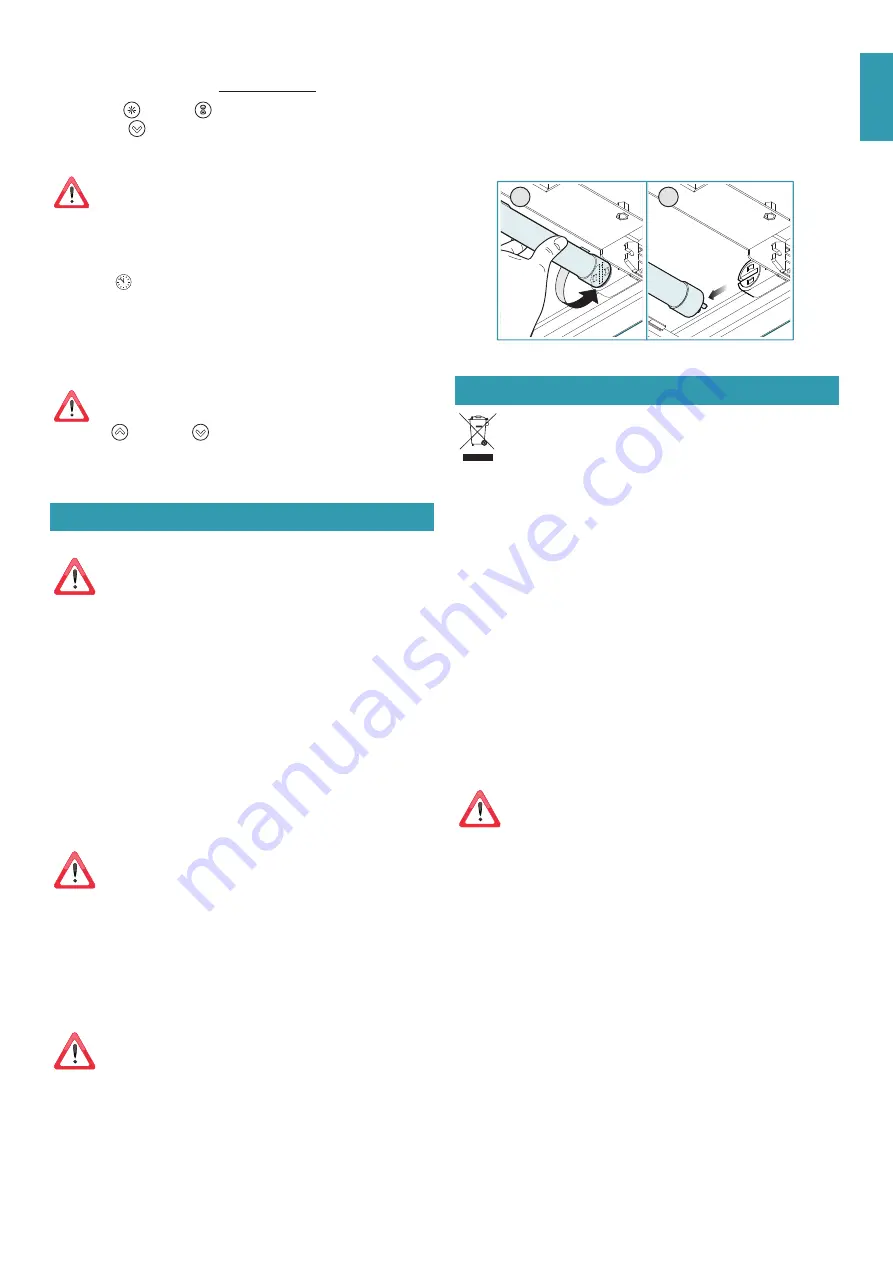
LIGHTING

The hood has fluorescent lamp lighting.
If the lamp ever needs to be replaced, proceed as shown in the figure.

1

2

 DISPOSAL AFTER END OF USEFUL LIFE

The crossed-out trash or refuse bin symbol on the appliance means 
that 

the product is WEEE

, i.e. “Waste electrical and electronic equip-

ment'', accordingly 

it must not be disposed of with regular unsort-

ed waste 

(i.e. with ''mixed household waste''), but it must be disposed of sepa-

rately so that it can undergo specific processing for its re-use, or a specific 
treatment, to remove and safely dispose of any substances that may be harmful 
to the environment and remove the raw materials that can be recycled. Proper 
disposal of these products contributes to saving valuable resources and avoid 
potential negative effects on personal health and the environment, which may 
be caused by inappropriate disposal of waste.
You are kindly asked to contact your local authorities for further information 
regarding the designated waste collection points nearest to you. Penalties for 
improper disposal of such waste can be applied in compliance with national 
regulations.

INFORMATION ON DISPOSAL IN EUROPEAN UNION COUNTRIES

The EU WEEE Directive was implemented differently in each country, accord-
ingly, if you wish to dispose of this appliance we suggest contacting your local 
authorities or dealer to find out what the correct method of disposal is.

INFORMATION ON DISPOSAL IN NON-EUROPEAN UNION COUNTRIES

The crossed-out trash or refuse bin symbol is only valid in the European Union: if 
you wish to dispose of this appliance in other countries, we suggest contacting 
your local authorities or dealer to find out what the correct method of disposal is.

WARNING!

The Manufacturer reserves the right to make changes to the equipment at any 
time and without prior notice. Printing, translation and reproduction, even par-
tial, of this manual are bound by the Manufacturer's authorisation. 
Technical information, graphic representations and specifications in this manual 
are for information purposes and cannot be divulged.
This manual is written in Italian. The Manufacturer is not responsible for any tran-
scription or translation errors.

Summary of Contents for FDNUV36C6SS

Page 1: ...nuvola FDNUV36C6SS FDNUV55C6SS EN INSTRUCTIONS BOOKLET FR MODE D EMPLOI ES MANUAL DE INSTRUCCIONES IT LIBRETTO ISTRUZIONI installation video ...

Page 2: ...8 239 mm 10 7 8 275 mm 3 3 4 95 mm 5 7 8 150 mm 10 7 8 275 mm EN Installation with motor on the hood FR Installation avec moteur sur la hotte ES Instalación con el motor en la campana IT Installazione con motore sulla cappa NUVOLA 36 70lb 32 Kg pag 12 120VAC 60Hz 280W FDNUV36C6SS EN cable length 5 0ft 1 5m FR longueur de câble 5 0ft 1 5m ES longueur de câble 5 0ft 1 5m IT lunghezza cavo 5 0ft 1 5m...

Page 3: ...3 8 341 mm 9 3 8 239 mm 10 7 8 275 mm 5 7 8 150 mm 10 7 8 275 mm EN Installation with motor on the hood FR Installation avec moteur sur la hotte ES Instalación con el motor en la campana IT Installazione con motore sulla cappa NUVOLA 55 99lb 45 kg pag 12 120VAC 60Hz 280W FDNUV55C6SS EN cable length 5 0ft 1 5m FR longueur de câble 5 0ft 1 5m ES longueur de câble 5 0ft 1 5m IT lunghezza cavo 5 0ft 1...

Page 4: ... 10 max 25 mm 3 3 4 95 mm 21 1 4 540 mm 38 1 4 973 mm 36 3 8 925 mm 19 3 8 492 mm 15 3 8 390 mm 21 7 8 556 mm EN Installation with conveyor kit and remote motor FR Installation avec kit convoyeur et moteur à distance ES Instalación con kit transportador y motor remoto IT Installazione con kit convogliatore e motore remoto NUVOLA 36 52lb 24 kg pag 17 FDNUV36C6SS ...

Page 5: ...10 max 25 mm 25 5 8 651 mm 15 3 8 390 mm 10 7 8 275 mm 10 7 8 275 mm 3 7 8 98 mm 8 1 2 216 mm 7 5 8 193 mm EN Installation with conveyor kit and remote motor FR Installation avec kit convoyeur et moteur à distance ES Instalación con kit transportador y motor remoto IT Installazione con kit convogliatore e motore remoto NUVOLA 55 81lb 37 kg pag 17 FDNUV55C6SS ...

Page 6: ...925 mm 19 3 8 492 mm 15 3 8 390 mm 21 7 8 556 mm 5 128 mm min 3 8 max 1 min 10 max 25 mm 3 3 4 95 mm 5 7 8 150 mm NUVOLA 36 48 lb 22 Kg EN Installation with remote motor FR Installation avec moteur à distance ES Instalación con motor remoto IT Installazione con motore remoto pag 19 FDNUV36C6SS ...

Page 7: ...3 4 95 mm 51 5 8 1310 mm 22 3 4 577 mm 5 1 8 130 mm min 3 8 max 1 min 10 max 25 mm 5 7 8 150 mm 25 5 8 651 mm 5 7 8 150 mm NUVOLA 55 77 lb 35 kg EN Installation with remote motor FR Installation avec moteur à distance ES Instalación con motor remoto IT Installazione con motore remoto pag 19 FDNUV55C6SS ...

Page 8: ...m EN Measurements for installation FR Mesures pour l installation ES Medidas para la instalacion IT Misure per l installazione ø3 8 9 mm EN tool required FR outil requis ES herramienta requerida IT Attrezzi necessari ...

Page 9: ...e de plâtre 1 insertion d un cadre de support 2 ES Operaciones preliminares Corte de placas de yeso 1 inserción del bastidor de soporte 2 IT Operazioni preliminari Taglio cartongesso 1 inserimento cornice di supporto 2 F A L S E C E I L I N G 2 min 2 3 8 60 mm min 2 3 8 60 mm 1 F A L S E C E I L I N G G 3 4 double adhesive 2 1 H H x 1 2 ...

Page 10: ...afond des chaînes de sécurité obligatoires ES Operaciones preliminares fijación en el techo de las cadenas de seguridad obligatorias IT Operazioni preliminari fissaggio a soffitto delle catenelle di sicurezza obbligatorie X Y X 1 2 Y 4 3 Ø9 mm ø3 8 9 mm NUVOLA 36 55 X 24 3 8 620 mm 44 2 8 1123 mm Y 5 7 8 150 mm 8 5 8 220 mm ...

Page 11: ...filters 4 and gas piston 5 FR Ouvrir le panneau retirer les filtres 4 et le piston à gaz 5 ES Abrir el panel quitar los filtros 4 y un pistón de gas 5 IT Aprire pannello togliere filtri 4 e pistone a gas 5 1 2 4 2 3 1 1 2 4 2 3 1 4 5 ...

Page 12: ...e la hotte 1 et du moteur 2 Si la sortie d air est vers le haut voir 3 Pour d autres directions voir 4 et 5 ES Retirar la brida de la campana 1 y del motor 2 Si la salida de aire es ascen dente véase 3 Para otras direcciones ver 4 y 5 IT Togliere la flangia dalla cappa 1 e dal motore 2 Se l uscita aria è verso l alto vedi 3 Per altre direzioni Vedere 4 e 5 ...

Page 13: ... A I R 180 3 4 90 5 x 8 6 x 8 2 1 OUTLET EN Side movement of the air exhaust FR Deplacement lateral de la sortie d air ES Desplazamiento lateral de la salida del aire IT Spostamento laterale dell uscita aria ...

Page 14: ...motor support brackets 6 FR Fixation des étriers de support du moteur 6 ES Fijación de las abrazaderas de soporte del motor 6 IT Fissaggio staffe di supporto motore 6 4 3 8 112 mm 15 3 8 390 mm x8 2 2 3 1 1 4 5 5 4 x4 6 ...

Page 15: ... frame 8 FR Montage du clapet de non retour 7 Positionnement du moteur sur le cadre de support 8 ES Montaje de válvula antirretorno 7 Colocación del motor en el bastidor de soporte 8 IT Montaggio valvola di non ritorno 7 Posizionamento motore sulla cornice di supporto 8 1 2 8 ...

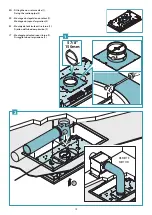
Page 16: ...2 3 9 EN Fitting the suction pipe and electrical connection 9 FR Montage du tuyau d aspiration et branchement électrique 9 ES Montaje del tubo de aspiración y la conexión eléctrica 9 IT Montaggio tubo d aspirazione e collegamento elettrico 9 ...

Page 17: ...he brackets onto the rectangular connection 2 FR Retirer la bride de la hotte 1 Fixation des étriers sur raccord rectangulaire 2 ES Retirar la brida de la campana 1 Fijación de las bridas en el accesorio rectangular 2 IT Togliere la flangia dalla cappa 1 Fissaggio staffe su raccordo rettangolare 2 ...

Page 18: ...Fitting the suction pipe 4 FR Positionnement du raccord rectangulaire sur le cadre de support 3 Montage du tuyau d aspiration 4 ES Colocación del racor rectangular en el bastidor de soporte 3 Montaje del tubo de aspiración 4 IT Posizionamento raccordo rettangolare su cornice di supporto 3 Montaggio tubo d aspirazione 4 ...

Page 19: ...ixing the suction pipe 2 FR Montage du clapet de non retour 1 Montage du tuyau d aspiration 2 ES Montaje de la válvula antirretorno 1 Fijación del tubo de aspiración 2 IT Montaggio valvola di non ritorno 1 Fissaggio tubo di aspirazione 2 F 1 2 REMOTE MOTOR 2 ...

Page 20: ...ugh passing the control cable through FR Opérations finales Passage des chaînes passage du câble des commandes ES Últimos pasos Paso de las cadenas paso del cable de mandos IT Operazioni finali Passaggio catenelle passaggio cavo comandi x2 2 1 CM 1 ...

Page 21: ...21 EN Closing the holding brackets FR Fermeture des étriers d étanchéité ES Cierre de los soportes de sellado IT Chiusura staffe di tenuta V3 OK Disassembly 2 1 2 ...

Page 22: ...tion du moteur ou raccord rectangulaire 3 raccordement électrique et tension des chaînes de sécurité 4 ES Fijación del motor o accesorio rectangular 3 conexión eléctrica y tensado de las cadenas de seguridad 4 IT Fissaggio motore o raccordo rettangolare 3 collegamento elettrico e tensionamento catenelle di sicurezza 4 V4 2 CM CE 1 ...

Page 23: ...ing filters and piston and closing the hood FR Repositionnement des filtres piston et fermeture de la hotte ES Reposicionamiento de filtros pistón y cierre de la campana IT Riposizionamento filtri pistone e chiusura cappa 5 ...

Page 24: ...radio antistatic properties Before installing the hood check that the electrical mains power supply corresponds with what is report ed on the identification plate located inside the hood The socket used to connect the installed equipment to the electrical power supply must be within reach otherwise install a mains switch to disconnect the hood when required Any changes to the electrical system mus...

Page 25: ...ated in compliance with the local regulations INSTALLATION only intended for qualified personnel Before installing the hood carefully read the chapter SAFETY INSTRUCTIONS AND WARNINGS TECHNICAL FEATURES The technical specifications are exhibited on the labels located inside the hood POSITIONING The minimum distance between the highest part of the cooking equip ment and the lowest part of the hood ...

Page 26: ...OR REPLACED The metal filters must be cleaned every 30 hours of operation For further details see the MAINTENANCE chap ELECTRONIC PUSHBUTTON PANEL Motor ON OFF Upon start up the speed is that stored at the previous operation Increase speed from 1 to 4 Speed 4 is only active for a few minutes then speed 3 activates The speeds are indicated by the LEDs on the keys Speed 1 Speed 2 Speed 3 Speed 4 LED...

Page 27: ... paragraph METAL ANTI GREASE FILTERS It is advised to frequently wash the metal filters at least once a month leaving them to soak in boiling water and cleaning solution for 1 hour taking care not to bend them Do not use corrosive acid or alkaline detergents Rinse them well and wait for them to be completely dry before reassembling them Washing in a dishwasher is permitted however it may cause the...

Page 28: ...ent à la terre conformément aux normes de sécurité du pays d utilisation il doit en outre être conforme aux normes européennes sur l antiparasite radio Avant d installer la hotte s assurer que la tension du secteur correspond à celle reportée sur la plaque qui se trouve à l intérieur de la hotte La prise utilisée pour le branchement électrique doit être facilement accessible avec l appareil instal...

Page 29: ...talliques anti graisse dans ce cas la graisse et la saleté se déposeraient dans l appareil et compromettrait son fonctionnement Des parties accessibles de la hotte peuvent être chaudes si elles sont utilisées avec des appareils de cuisson Ne pas effectuer d opérations de nettoyage si des parties de la hotte sont encore chaudes Si le nettoyage n est pas mené conformément aux modalités et avec les p...

Page 30: ...te au moins une minute avant de commencer à cuisiner pour canaliser les fumées et les vapeurs vers la surface d aspiration Au terme de la cuisson laisser la hotte en fonction jusqu à l aspiration complète de toutes les vapeurs et odeurs grâce à la fonction Timer il est possible de programmer l arrêt automatique de la hotte au bout de 15 minutes de fonc tionnement QUELLE VITESSE CHOISIR I vitesse m...

Page 31: ...sélectriquesoucellesrelativesau moteur à l intérieur de la hotte avec des liquides ou des solvants Pour les parties métalliques internes consulter le paragraphe précédent FILTRES MÉTALLIQUES ANTI GRAISSE Il est conseillé de laver souvent les filtres métalliques au moins tous les mois en les laissant tremper pendant une heure environ dans de l eau bouillante avec du produit vaisselle en évitant de ...

Page 32: ...so además debe respetar las normativas europeas sobre la protección contra interferen cias radio Antes de instalar la campana controle que la tensión de red coincida con la indicada en la placa colocada en el interior de la campana La toma usada para la conexión eléctrica debe ser fá cilmente accesible con el aparato instalado en caso contrario prevea un interruptor general para desco nectar la ca...

Page 33: ...Desconecte el interruptor general si no va a usar el equipo durante un periodo de tiempo prolongado En caso de utilizar simultáneamente otros equipos calderas estufas hogares etc alimentados con gas o con otros combustibles prevea una adecuada ventilación del ambiente donde se realiza la aspiración de humos según las normas vigentes INSTALACIÓN parte reservada al personal cualificado Antes de inst...

Page 34: ...OCIDAD SELECCIONAR I velocidad mantiene el aire limpio con bajos consumos de energía eléctrica II velocidad condiciones normales de uso III velocidad presencia de olores fuertes y de vapores IV velocidad eliminación rápida de olores y vapores CUÁNDO LAVAR O CAMBIAR LOS FILTROS Los filtros metálicos deben lavarse cada 30 horas de uso Para más detalles consulte el cap MANTENIMIENTO PANEL DE MANDOS E...

Page 35: ...caciones presentes en este manual son indicativas y no se pueden divulgar El idioma original del manual es el italiano y el fabricante se exime de toda res ponsabilidad por posibles daños de transcripción o traducción CAMBIO DEL CÓDIGO DEL RADIOMANDO Si solo hay un radiocontrol pase directamente al punto 2 Si hay varios radiomandos en la misma habitación se puede generar un nuevo código con el sig...

Page 36: ...cappa verificare che la tensione di rete corrisponda a quella riportata dalla targhetta posta all interno della cappa La presa usata per il collegamento elettrico deve es sere facilmente raggiungibile con l apparecchiatura installata in caso contrario prevedere un interruttore generale per disconnettere la cappa al bisogno Ogni eventuale modifica all impianto elettrico dovrà essere eseguita solo d...

Page 37: ...c chio non viene utilizzato per periodi prolungati di tempo In caso di utilizzo contemporaneo di altre utenze caldaie stufe caminetti ecc ali mentate a gas o con altri combustibili provvede re ad una adeguata ventilazione del locale in cui avviene l aspirazione dei fumi secondo le norme vigenti INSTALLAZIONE parte riservata solo a personale qualificato Prima di effettuare l installazione della cap...

Page 38: ...responsabilità nel caso le norme di sicurezza non ven gano rispettate SCARICO FUMI CAPPA AD EVACUAZIONE ESTERNA ASPIRANTE In questa versione fumi e vapori vengono convogliati verso l esterno attraverso il tubo di scarico A tal fine il raccordo d uscita della cappa deve essere collega to tramite un tubo ad un uscita esterna Il tubo d uscita deve avere un diametro non inferiore a quello di raccordo ...

Page 39: ...vaggi a basse tem perature 131 F 55 C max Per l estrazione e l inserimento dei filtri metallici antigrasso vedi istruzioni di montaggio ILLUMINAZIONE La cappa e dotata di illuminazione tramite lampada fluorescente Qualora si rendesse necessaria la sostituzione di quest ultima procedere come in figura 1 2 SMALTIMENTO A FINE VITA Il simbolo del cestino barrato riportato sull apparecchiatura in suo p...

Page 40: ...FALMEC S p A 31029 VITTORIO VENETO Treviso ITALY Zona Industriale Via dell Artigianato 42 www falmec com Code 110033065 Ed 02 2020 Codice Code Matricola Serial Number ...

Reviews: