


42
•
the electrical junctions and connection couplings are not accessible after installation;
•
the power supply system is efectively and properly connected to earth in compliance
with regulations in force.
•
the socket outlet to connect the installed equipment is within reach.
Some types of equipment can be equipped with a cable without a plug; in this case, the
type of plug to use is a "standardised" one, keeping in mind that the yellow-green wire must
be used for earthing, the blue wire must be used for neutral, and the brown wire must be
used for the phase.
The power supply cable must be assembled with a plug suitable for the load and connected
to an adequate safety plug.
If the ixed equipment is not provided with a power supply cable and plug, or any other
device that ensures disconnection from the electrical mains, with an opening gap of the
contacts that enables total disconnection in overvoltage category III conditions, said discon-
nection devices must be provided in the mains power supply in compliance with installation
regulations.
The yellow/green earth cable must not be cut of by the switch.
The Manufacturer declines all responsibility for failure to comply with the safety regulations.
FUMES DISCHARGE
(only intended for personnel qualiied to
assemble the hood)
EXTERNAL EXHAUST HOOD VERSION (SUCTION)
In this version, the kitchen fumes and vapours are conveyed outside through an exhaust
pipe.
The air outlet itting that extends from the upper part of the hood must be connected with
the pipe that conducts the fumes and vapours to an external output.
Do not connect the equipment to discharge pipes of fumes produced from combus-
tion (for example boilers, ireplaces, etc) and you are to comply with the regulations
in force regarding external air discharge.
The fumes outlet pipe must have:
- a diameter, or diameters, not less than that of the hood itting;
- the minimum required number of bends;
- minimum required length (long pipes with various bends can reduce suction performance
of the hood).
If the fumes outlet pipe passes through cold environments such as attics, etc., it is possible
that water condensation forms due to sudden changes in temperature. In this case, you are
required to insulate the pipes.
When the kitchen hood is used simultaneously with other appliances that use gas or
other fuels, the room must have suicient ventilation, in accordance with regulations
in force.
Deviation for Germany: when the kitchen hood is used at the same time as appliances that are
powered by energy other than electricity, the negative pressure in the room must not exceed 4 Pa
(4 x 10⁻⁵ bar).
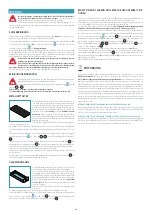
HOOD VERSION WITH INTERNAL RECIRCULATION (FILTERING)
In this model, air passes through the carbon-zeo combined ilters to be puriied and is then
recycled into the kitchen environment.
The iltering version hood can only be used if the Piano under furniture carbon-zeo ilter unit
kit (sold separately) has been installed downstream the motor
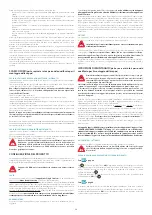
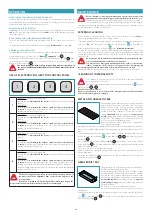
If you want to install the iltering version hood one or more suitably sized
holes must be drilled in the kitchen plinth to allow puriied air to exit the
under furniture compartment. For this reason two air grilles are supplied
together with the Piano under furniture carbon-zeo ilter unit kit.
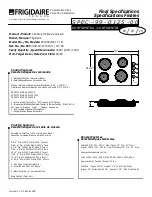
PRODUCT CONFIGURATION
The hood can be installed in various conigurations: for this reason its main components
(hood, conveyor and motor) are sold separately, so as to ofer maximum lexibility in terms
of installation.
The equipment must NOT be used in combination with gas cooker tops.
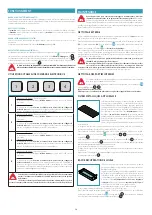
HOOD
The hood is supplied in two versions,
Piano Single Suction hood
(with one suction unit)
and
Piano Double Suction
hood (with two suction units).
For the Piano Single Suction hood the suction unit is normally installed between the two
Domino cooker tops; if it is to be installed in diferent conditions, it is best to position it to the
right of the cooker top so that the ducting for connection to the motor exits from the left
side (see technical speciications on page
For the Piano Double Suction hood only one of the two suction units is equipped with a
push button control panel:
this unit must always be positioned on the right of the
cooker top to allow installation of the conveyor.
CONVEYOR
A conveyor kit must be installed in order to connect the Piano hood with a motor unit.
The conveyor is available in four models,
two to combine only with the
Piano Single
Suction
hood and two to combine only with the
Piano Double Suction
hood
.
Two conveyors with diferent sizes have been manufactured for both the Piano Single Suc-
tion hood and the Piano Double Suction hood. They have been studied to facilitate instal-
lation of the hood if the fumes exhaust pipe needs to be directed towards the right (Piano
Single Suction Conveyor RH output and Piano Double Suction Conveyor RH Conveyor) or
towards the left (Piano Single Suction Conveyor LH output and Piano Double Suction Con-
veyor LH Conveyor). The special shape of the conveyors must be taken into account even
when sizing any drawers or baskets inside the furniture.
MOTOR
The Piano hood can be installed with speciic under furniture motors as well as with all types
of remote motor unit available.
In both cases the motors used can only be those indicated by the Manu-
facturer.
The under furniture motor (connected directly to the conveyor) is available in two models;
1000m³/h Piano under furniture extraction fan must be combined only with the Piano
Single Suction hood, whilst the 1200m³/h Piano under furniture extraction fan
must
be combined only with the Piano Double Suction hood.
To facilitate the correct choice of the various components that form the Piano suction sys-
tem, see also the product coniguration speciications on page
and onwards.
ASSEMBLY INSTRUCTIONS
(only intended for personnel quali-
ied to assemble the hood)
Before installing the hood, make sure the worktop is able to safely support
the hood and the cooker top connected to it: the weight of the hood is re-
ported in the technical speciications inserted in the irst part of this book-
let
The hood must be installed before the cooker top: the hood must not be used in com-
bination with gas cooker tops.
It is strongly recommended to put any wall cabinets above the cooking area at a
distance of at least 65cm from the worktop so that the moisture generated by the
cooking and the higher temperatures do not compromise the aesthetic appearance
and the integrity.
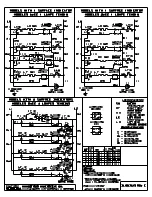
Make sure the furniture on which it is to be installed has the sizes and features compatible
with the hood (see page
and onwards)
:
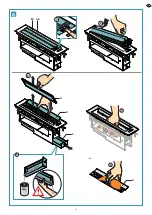
drill a hole (if missing) on the worktop as
shown.
The hood can be surface mounted or lush mounted: for hole sizes for both types of installa-
tion, refer to the technical speciications inserted in the irst part of this booklet.
To install the hood next to the cooker top the hole sizes depend on the features of the
cooker top used: for further information refer to the
“Set-up for installation: examples of
speciications
of this booklet.
Should the instructions of the cooker top specify particular assembly speciications, they
must be taken into consideration.
The hood can be installed in various conigurations (read chap. “
), depending on where the motor unit is placed (under
furniture motor unit or under-roof (URS) or outdoor (URE) remote motor unit) or
whether you wish to install the internal recycling version hood (iltering). Follow
the instructions according to the desired installation.
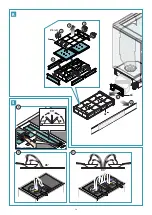
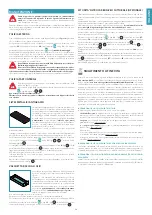
UNDER FURNITURE MOTOR UNIT
The motor unit (UM) is connected directly to the hood by the conveyor.
Check that the motor unit is the model suitable for the version of hood you
wish to install (Piano Single Suction hood or Piano Double suction hood).
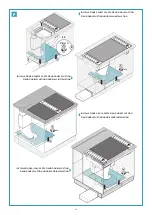
EXTERNAL EXHAUST HOOD VERSION (SUCTION)
on page
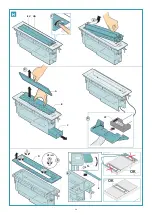
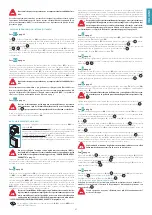
Fig.
1
- Place the motor unit (
UM
) on the loor using the hole on the bottom of the furni-
ture: position it with reference to the furniture on the basis of the heights (X and Y) indicated
on the technical speciications
on page
and in relation to the required air output
direction (Fig.
2
).
Connect the piping (
F
) set up for external discharge to the air outlet itting of the motor unit
(
UM
) (Fig.
3
).
on page
In relation to the dimensions of the furniture, to the type of installation of the cooking area
(wall or island) and to the required air output direction, it is possible that the air output itting
of the motor unit (
UM
) is partly aligned with the furniture legs and it is therefore necessary
to move some.
Make sure that this operation does not compromise stability of the fur-
niture.
To avoid this problem and for all cases in which the position of the external exhaust
piping must be changed, the optional "Double horizontal
(
KDC)" kit is available,
whose dimensions are shown in the technical speciications on page 9.
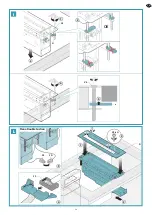
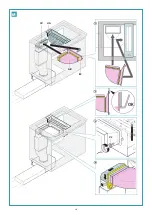
HOOD VERSION WITH INTERNAL RECIRCULATION (FILTERING)
on page
Fig.
1
- Place the motor unit (
UM
) on the loor using the hole on the bottom of the furni-
ture: position it with reference to the furniture on the basis of the heights (X and Y) indicated
on the technical speciications
on page
and in relation to the required air output
direction (Fig.
2
).
Fig.
3
-
4
- Connect the air output itting of the motor unit (
UM
) to the optional "Piano
under furniture carbon-zeo ilter (
KF
)" kit (sold separately) by inserting a piece of rectangular
pipe (
F
) of the required length, necessary for this connection.
Summary of Contents for piano
Page 24: ...24 A1 217mm 87mm UM X F 1 3 Y 2 A2 KDC F UM UM...
Page 28: ...28 3 2 1 EV A UA B D C V2 x4 5 CP OK OK Crack E 4 6 H...
Page 29: ...29 1 3 V3 G 4 5 V3 G 2 OK D CP 5 4 1 3 V2 x4 CS CD 2 Piano Double Suction I L...
Page 30: ...30 M 2 OK 1 3 AB UA V2 EC CV 4...
Page 31: ...31 3 EV 4 1 2 B A CM CC 1 2 N O...
Page 33: ...33 Q 4 5 6 3 2 1 EV A UA B C B...
Page 34: ...34 1 2 3 4 5 6 FK AF A V5 x5 R S 3 2 45 90 45 90 45 1...