background image

CONTENTS

SAFETY PRECAUTIONS ..................1

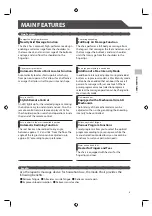
MAIN FEATURES  

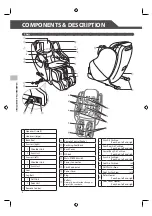
COMPONENTS & DESCRIPTION 

5

BEFORE USE....................................7

POSITION ADJUSTMENT .............10

AFTER USE ....................................13

PROGRAMS & SELECTION ...........14

PRESET PROGRAMS .....................15

MANUAL SELECTION ...................17

TROUBLESHOOTING ....................21

REGULAR MAINTENANCE FOR 

SAFETY .........................................22

FAQ ................................................23

CARE AND STORAGE ....................25

AFTER SALES SERVICE .................26

SPECIFICATIONS AND CALL 

CENTER .....................................Back 

page

1

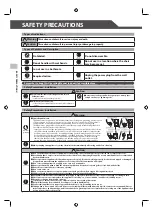
SAFETY PRECAUTIONS

[SAFE

TY PREC

A

UTIONS]

Types of Indications

Warning

This action could result in serious injury or death.

Caution

This action could result in personal injury or damage to property.

Types of Symbols and Description

Prohibited

Prohibited.

Do not

disassemble

Do not disassemble. 

No wet hands

Do not handle with wet hands. 

Do not wet

Do not use in a location where the chair 

may become wet.

Prohibited

Do not use in a bathroom. 

Required Action

Required action.

Unplug

the chair

Unplug the power plug from the wall 

outlet. 

Remember to keep this Operating Manual in an easily accessible place.

Safety Precautions: Installation

Caution

Prohibited

Do not install the chair in an area of high humidity, such as a 

bathroom or sauna.

 Could result in electric shock or damage to the chair.

Prohibited

Never connect the ground wire to gas pipes, water pipes, 

telephone lines, or lightning rods.

Required Action

Install on a flat, level surface only.

 Chair could tip over accidentally if placed on an uneven surface, resulting in an 

accident. 

Safety Precautions: Installation

Warning

Electrical

grounding

 Space Requirements

This product must be grounded. If it should malfunction or breakdown, grounding provides a path  

of least resistance for electric current in order to reduce the risk of electric shock. This product is  

equipped with a cord having an equipment-grounding conductor and a grounding plug.  

The plug must be plugged into an appropriate outlet that is properly installed and grounded in  

accordance with all local codes and ordinances.
•   Improper connection of the equipment-grounding conductor can result in the risk of electric  

shock. Check with a qualified electrician or serviceman if you are in doubt as to whether the  

product is properly grounded. Do not modify the plug provided with the product if it will not  

fit the outlet; have a proper outlet installed by a qualified electrician. This product uses on a  

normal Alternating Current(AC) circuit and has a grounding plug that looks like the plug  

illustrated in the figure to the right. Make sure that the product is connected to an outlet  

having the same configuration as the plug. No adapter should be used with this product.

Required Action

 Always unplug this appliance from the electrical outlet immediately after using and before cleaning.

Caution

Prohibited

 Do not operate under blanket or pillow. Excessive heating can occur and cause fire, electric shock, or injury to persons.

  Use this appliance only for its intended use as described in this Operating Manual. Do not use attachments not recommended 

by the manufacturer.

  Never operate this appliance if it has a damaged cord or plug, if it is not working properly, if it has been dropped or damaged, or 

dropped into water. Return the appliance to a service center for examination and repair.

 Do not carry this appliance by supply cord or use cord as a handle.

 Never operate the appliance with the air openings blocked. Keep the air openings free of lint, hair, and the like.

 Never drop or insert any object into any opening.

 Do not use outdoors.

 Do not operate where aerosol (spray) products are being used or where oxygen is being administered.

 Children should be supervised to ensure that they do not play with the appliance.

Required Action

 An appliance should never be left unattended when plugged in. Unplug from outlet when not in use, and before putting on or taking off parts.

  Close supervision is necessary when this appliance is used by, on, or near children, invalids, or disabled persons.

  Keep the cord away from heated surfaces.

 To disconnect, turn all controls to the off position, then remove plug from outlet.

 Keep children away from extended foot support (or other similar parts).

 Connect this appliance to a properly grounded outlet only. See Grounding Instructions.

  This appliance is not intended for use by persons (including children) with reduced physical, sensory or mental capabilities, or 

lack of experience and knowledge, unless they have been given supervision or instruction concerning use of the appliance by a 

person responsible for their safety.

Summary of Contents for INADA CHAIR

Page 1: ...e This product is designed for home use ENGLISH Thank you for purchasing the INADA CHAIR You can enjoy various types of massage for relieving or soothing fatigue We hope the INADA CHAIR will be a valu...

Page 2: ......

Page 3: ...E AND STORAGE 27 AFTER SALES SERVICE 28 SPECIFICATIONS 29 Thank you for purchasing the INADA CHAIR You can enjoy various types of massage for relieving or soothing fatigue We hope the INADA CHAIR will...

Page 4: ...product uses on a normal Alternating Current AC circuit and has a grounding plug that looks like the plug illustrated in the figure to the right Make sure that the product is connected to an outlet ha...

Page 5: ...s over Do not sit down on the chair with the leg rest raised Any sudden impact on the leg rest could cause damage to the mechanism Also an accident or injury may result if the chair tips over Do not u...

Page 6: ...in damage to the mechanism Unplug the chair If there is a power outage or the possibility of a power outage stop the chair immediately and turn the main POWER switch to OFF Unplug the power plug from...

Page 7: ...rest that massages the feet and calves seat that massages the buttocks and arm shoulder units that massage from the shoulders to the fingertips Boost the power with just one button Addition of a Max I...

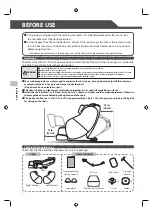
Page 8: ...ocket Reclining Seat Back Back Cover Wheels Main POWER Switch Power Connector Cord Connector Power Cord Plug Rollers Normally stored inside the upper part of the seat back a Arm Air Cushion 2 each on...

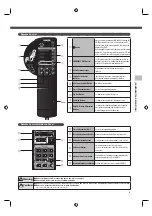
Page 9: ...se to adjust the angle of the reclining seat back ROLLER Position Adjustment Buttons Use to adjust the shoulder position while the shiatsu point locator is operating and to adjust the roller position...

Page 10: ...is 40 C 104 F or over Do not install the chair where it can come into contact with direct heat such as direct sunlight or a radiator Keep fire sources such as cigarettes and ashtrays away from the cha...

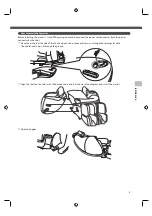
Page 11: ...rd connector from the power connector on the chair Place the armrest at the side of the chair and pass the air hose and harness through the rectangular hole Be careful not to pass it through the groov...

Page 12: ...e direction shown in the diagram Total of 3 locations on each side indicated by circles in the diagram ensure that the washer direction is correct Connect the air hose and harness Close the zipper If...

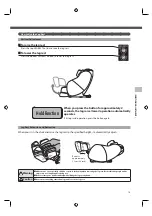
Page 13: ...n power unplug the power plug from the wall outlet and also disconnect the power cord connector from the power connector on the chair The power cord may be damaged resulting in fire or electric shock...

Page 14: ...chair fabric is not damaged Caution Be sure to check for tearing on the chair before every use as shown in the illustration Also check the other parts for tearing Unplug the chair and contact the Repa...

Page 15: ...he chair tips over Before using raise the reclining seat to its fully upright position Then recline the seat back slowly to the most comfortable position remembering to start off with a lighter massag...

Page 16: ...he diagram below so that your elbow is between the arm unit and shoulder unit Insert so that your palm is facing down How to Use the Buffer Pad If you feel that the massage is too intense place the su...

Page 17: ...eful that people and or objects are not caught under the leg rest Do not release your hands suddenly while lifting the leg rest by hand Caution Do not place anything other than legs and feet on the le...

Page 18: ...chair is left unused for a while be sure to unplug it from the wall outlet Be careful not to tangle yourself in the cords and trip over How to Use the Reclining Seat Back To raise the reclining seat...

Page 19: ...feel symptoms such as lack of energy or fatigue These programs are for recovering from muscle fatigue Low Body This massage is focused on the lower half of the body Warm Up This program is for gently...

Page 20: ...buttons flash The shoulder positions can be adjusted while the buttons flash If no adjustment is required do not use these buttons The rollers move up while this button is pressed The rollers move dow...

Page 21: ...om a Preset Program to Manual Selection Mode When one of the buttons for manual selection mode located inside the panel of the remote control is pressed while a preset program is in progress the prese...

Page 22: ...ity Adjustment Rolling Full This performs full stretching of the spine using up and down movements Partial This performs partial stretching of the spine using up and down movements MANUAL SELECTION Sp...

Page 23: ...that you want to massage Button Operation Action Intensity Adjustment Arm Air An air massage from your shoulders to fingers Seat Air An air massage from your lower back to buttocks Leg Air An air mas...

Page 24: ...return to their storage positions upper part of the seat back Then the power to the remote control is shut off However the reclining of the seat back and the up or down adjustment of the leg rest can...

Page 25: ...steps Narrow Medium and Wide Speed Adjustment During a basic operation where speed adjustment is possible the speed of action can be adjusted in 3 steps MANUAL SELECTION Caution If you feel the massag...

Page 26: ...our body or lightly raise the reclining seat back Be especially careful when a person who weighs 100 kg 220 lb or more uses this chair The button of the remote control and the program button flash Set...

Page 27: ...as been cracked or scratched The power cord or plug becomes abnormally hot The chair produces a burnt smell abnormal sound or vibration The auto timer function does not work in some cases Other failur...

Page 28: ...against the reclining seat back Lower the reclining seat back Remove the buffer pad placed on the back pad With the methods above you can intensify the massage How do I make the massage lighter Perfo...

Page 29: ...danger of an electric shock Immediately stop using the chair and perform the following Turn off the main POWER switch on the front right of the chair Unplug the power plug from the wall outlet After p...

Page 30: ...Back Pad and Covers Soak a piece of soft cloth in lukewarm water in which a small amount of mild detergent has been added Then thoroughly wring it out before cleaning off any spots or grime Caution Th...

Page 31: ...ement parts stock We will stock service parts except fabric of this product for at least six years after terminating the production of this model Service parts refer to those necessary for maintaining...

Page 32: ...1 68 inch seconds Back Stroke Range Approx 69 cm 27 6 inch in partial roller massage approx 15 cm 6 inch Preset Programs Healthcare programs 6 types Manual Selection 16 types automatic shiatsu point...

Page 33: ...HCP S333A HCP S333D HCP S333E 1 4 5 7 12 15 16 17 19 23 24 25 27 28 29 INADA CHAIR...

Page 34: ...1 4 5 7 10 13 14 15 17 21 22 23 25 26 1 AC...

Page 35: ...2 38 HCP S333A AC120V HCP S333D AC220 240V HCP S333E AC110V...

Page 36: ...1 4 5 7 10 13 14 15 17 21 22 23 25 26 3 15 5 30...

Page 37: ...4 LED LED LED 115 165 90...

Page 38: ...1 4 5 7 10 13 14 15 17 21 22 23 25 26 5 a g f e d h i c 1 2 3 4 1 2 5 1 2 6 7 1 2 8 9 0 a b c d e f g h a 2 b 1 c 1 d 4 e 2 f 6 g 10 h 1 i 1 1 2 4 1 2 8 9 d c b a g f 3 h 5 1 2 0 6 7 1 2 b e...

Page 39: ...6 4 3 2 0 0 1 2 3 4 5 6 1 7 8 9 10 2 11 12 13 3 14 15 1 2 4 8 9 3 5 6 7 c b a 0 e d...

Page 40: ...1 4 5 7 10 13 14 15 17 21 22 23 25 26 7 1 50 cm 40 AV 1 m 100 kg 1 cm2 2 3 kg AC T 6 6 50 cm 50 cm...

Page 41: ...8...

Page 42: ...1 4 5 7 10 13 14 15 17 21 22 23 25 26 9 T 3...

Page 43: ...10...

Page 44: ...1 4 5 7 10 13 14 15 17 21 22 23 25 26 11...

Page 45: ...12...

Page 46: ...1 4 5 7 10 13 14 15 17 21 22 23 25 26 13...

Page 47: ...14 22 cm 2...

Page 48: ...1 4 5 7 10 13 14 15 17 21 22 23 25 26 15 2...

Page 49: ...16...

Page 50: ...1 4 5 7 10 13 14 15 17 21 22 23 25 26 17 4 3 2 0 0 6 5 3 ON...

Page 51: ...18 ON 30 15 5 30...

Page 52: ...1 4 5 7 10 13 14 15 17 21 22 23 25 26 19 0 0...

Page 53: ...20 4 3 2 0 0...

Page 54: ...1 4 5 7 10 13 14 15 17 21 22 23 25 26 21 4 3 2 0 0 5...

Page 55: ...22 ON 3 4 3 2 3 15 5 30 30 3 ON...

Page 56: ...1 4 5 7 10 13 14 15 17 21 22 23 25 26 23 100 kg 5 2 1 5 1 5...

Page 57: ...24 3 1 2 15 5...

Page 58: ...1 4 5 7 10 13 14 15 17 21 22 23 25 26 25 100 kg 100 kg...

Page 59: ...26 150 cm 180 cm...

Page 60: ...1 4 5 7 10 13 14 15 17 21 22 23 25 26 27...

Page 61: ...28 1 2 23 24 1 2 3 4 5 6...

Page 62: ...21 22 23 25 26 29 HCP S333A HCP S333D HCP S333E AC120V AC220 240V AC110V 140W 110W 140W 60Hz 50 60Hz 60Hz 30 3 6 20 3 180 500 3 26 3 1 cm 4 2 cm 69cm 15 cm 6 16 37 kPa 15 22 cm 115 165 83 cm 133 190 c...

Page 63: ...HCP S333A HCP S333D HCP S333E 1 4 5 7 12 15 16 17 19 23 24 Q A 25 27 28 29 INADA CHAIR...

Page 64: ...1 4 5 7 10 13 14 15 17 21 22 23 25 26 1 AC...

Page 65: ...2 38 2 HCP S333A AC120V HCP S333D AC220 240V HCP S333E AC110V...

Page 66: ...1 4 5 7 10 13 14 15 17 21 22 23 25 26 3 15 5 30...

Page 67: ...4 LED LED LED 115 165 90...

Page 68: ...1 4 5 7 10 13 14 15 17 21 22 23 25 26 5 a g f e d h i c 1 2 3 4 1 2 5 1 2 6 7 1 2 8 9 0 a b c d e f g h a 2 b 1 c 1 d 4 e 2 f 6 g 10 h 1 i 1 1 2 4 1 2 8 9 3 h 5 1 2 6 7 1 2 b g f e d c b a 0...

Page 69: ...6 4 3 2 0 0 1 2 3 4 5 6 1 7 8 9 10 2 11 12 13 3 14 15 1 2 4 8 9 3 5 6 7 c b a 0 e d...

Page 70: ...1 4 5 7 10 13 14 15 17 21 22 23 25 26 7 1 50cm 40 AV 1m 100kg 1c 2 3kg AC T 6 6 50cm 50cm...

Page 71: ...8...

Page 72: ...1 4 5 7 10 13 14 15 17 21 22 23 25 26 9 T 3...

Page 73: ...10...

Page 74: ...1 4 5 7 10 13 14 15 17 21 22 23 25 26 11...

Page 75: ...12...

Page 76: ...1 4 5 7 10 13 14 15 17 21 22 23 25 26 13...

Page 77: ...14 22cm 2...

Page 78: ...1 4 5 7 10 13 14 15 17 21 22 23 25 26 15 2...

Page 79: ...16...

Page 80: ...1 4 5 7 10 13 14 15 17 21 22 23 25 26 17 4 3 2 0 0 6 5 3 ON...

Page 81: ...18 ON 30 15 5 30...

Page 82: ...1 4 5 7 10 13 14 15 17 21 22 23 25 26 19 0 0...

Page 83: ...20 4 3 2 0 0...

Page 84: ...1 4 5 7 10 13 14 15 17 21 22 23 25 26 21 4 3 2 0 0 5...

Page 85: ...22 ON 3 4 3 2 3 15 5 30 30 3 ON...

Page 86: ...1 4 5 7 10 13 14 15 17 21 22 23 25 26 23 100kg 5 2 1 5 1 5...

Page 87: ...24 3 1 2 15 5...

Page 88: ...1 4 5 7 10 13 14 15 17 21 22 23 25 26 25 Q A 100kg 100kg...

Page 89: ...26 150cm 180cm...

Page 90: ...1 4 5 7 10 13 14 15 17 21 22 23 25 26 27...

Page 91: ...28 1 2 23 24 1 2 3 4 5 6 6...

Page 92: ...17 21 22 23 25 26 29 HCP S333A HCP S333D HCP S333E AC120V AC220 240V AC110V 140W 110W 140W 60Hz 50 60Hz 60Hz 30 3 6 20 3 180 500 3 26 3 1cm 4 2cm 69cm 15cm 6 16 37kPa 15 22cm 115 165 83cm 133 190 cm 1...

Page 93: ......

Page 94: ......

Page 95: ......

Page 96: ...TD 2 1 3 Nishi Miyahara Yodogawa ku Osaka 532 0004 Japan FAMILY CO LTD 2 1 3 Nishi Miyahara Yodogawa ku Osaka 532 0004 Japan Manufactured by FAMILY CO LTD 532 0004 2 1 3 Made in JAPAN 778339900 DATE O...

Reviews: