background image

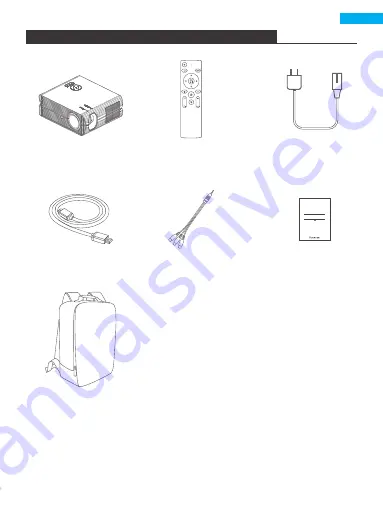
WAS IST IN DER VERPACKUNG ENTHALTEN

Projektor * 1

Netzstecker* 1

HDMI-Kabel* 1

AV-Kable* 1

Benutzerhandbuch* 1

Fernbedienung * 1

Rucksack * 1

V1.0

USER MANUAL

Faminode H2 Projector

18

Deutsch

Summary of Contents for H2

Page 1: ...YPE 产品类别 投影仪 SCALE SHEET 1 1 1 56 A B C D E F A B C D E F 3 4 2 1 3 4 2 1 NOTES 技术要求 UM Item name 物料名 Part No 30017000082 1 Dimension after binding 装订后尺寸 90 120mm 2 Print colour 印刷颜色 4C 3 Material 材质 封面157g哑粉 内页80g书纸 4 Coating 表面处理 封面过哑膜 内页无表面处理 5 Binding process 装订工艺 骑马钉 6 Output lpi 输出网线 200 lpi 7 Tolerance 公差 L 长 W 宽 1 5mm 120 90 USER MANUAL Faminode H2 Projector V1 1 ...

Page 2: ...USER MANUAL Faminode H2 Projector V1 1 ...

Page 3: ......

Page 4: ...CONTENTS 01 17 English 18 34 Deutsch 35 51 日本語 ...

Page 5: ...WHAT S IN THE BOX Projector 1 Power Cable 1 HDMI Cable 1 AV Cable 1 User Manual 1 Remote Control 1 Backpack 1 V1 0 USER MANUAL Faminode H2 Projector 1 English ...

Page 6: ... damp cloth A mild detergent can be used Use a glass cloth or lens paper Do not scratch the lens Clean the vents and speakers evenly with a banister brush to prevent them from becoming blocked High Temperature Warning The temperature near the cooling vent will be high during or after projection Do not touch it to avoid scalding Do not look at the lens directly during projection to avoid hurting yo...

Page 7: ...w to connect the projector and other audio equipment according to your needs 1 2 7 8 9 3 4 5 6 10 11 12 13 14 15 1 2 3 4 5 6 7 8 IR Receiver Lens Power Socket IR Receiver Headphone Jack HDMI1 Port Removable Dust Cover USB Port 9 10 AV Port HDMI2 Port Speaker Cooling Vent Focus Keystone Cooling Vent 11 12 13 14 15 Note Press the dust net lightly and it will pop out for easy cleaning 3 ...

Page 8: ...1 2 3 1 2 Keypads Picture 1 Rating label 3 4 Projector mount holes Level stand adjustment 3 4 OK Key Arrow Keys Return Key Source Key Power Key Picture 1 4 ...

Page 9: ...Remote Control 1 1 2 3 4 5 6 7 8 Power Source Arrow keys Menu Homepage Volume Volume Mute Picture flip Confirmation key Play and Pause Return Previous Next 9 10 11 12 13 9 10 11 12 13 2 3 5 4 6 7 8 5 ...

Page 10: ...Picture size 35 100 200 300 1 50 3 30 6 00 9 00 Please allow the image size error in the above table to be 3 If the distance is less than the minimum data or more than the maximum data the image may be blurry Warning Please check the diagram below for trapezoid adjustment Incorrect Installation Incorrect Installation Correct Installation Projector Screen Symmetry Axis Screen 6 ...

Page 11: ...le mount Rear projection ceiling mount Warning 1 If the projector is incorrectly installed on a ceiling or surface it may be damaged beyond repair 2 The projector should only be used in an environment where the temperature does not exceed the range of 5 35 Otherwise a malfunction may occur 3 Malfunction may occur if the projector is subjected to dusty wet humid or smoky conditions 4 Poor ventilati...

Page 12: ...then slowly rotate it counterclockwise At the same time carefully observe the pixels on the screen When the image particles are clearest the pixels on the screen are the best focus of the lens Keystone If a projected picture has keystone distortion correct the image using keystone adjustment The image will be in a trapezoidal shape if the screen or projector is not level Rotate the keystone trackw...

Page 13: ...control to enter the corresponding source interface How to Connect to Wi Fi Select the Settings icon in the upper right hand corner of the main interface press the OK key on the remote control and select WiFi Setting After entering the interface select the WiFi you wish to connect to from the list below then enter the password Connected will appear next to the name of the successfully connected Wi...

Page 14: ...10 ...

Page 15: ...main interface press the OK key on the remote control and select Bluetooth Setting After entering the interface turn on Bluetooth and search for Bluetooth devices with which to pair Note The projector can connect to Bluetooth speakers and Bluetooth headphones but not Bluetooth mobile phones 11 ...

Page 16: ...ain interface press the OK key on the remote control and select Projection Image Setting After entering the interface select the mode you want in the projection settings Projection modes Front Desktop Rear Desktop Front Ceiling Rear Ceiling Keystone Advanced Front Side C Side 4 Point Keystone 12 ...

Page 17: ...4 Point Keystone Select 4 Point Keystone in the projection settings after entering the interface adjust according to the text prompts in the interface 13 ...

Page 18: ...d to the Internet to use iOS Cast or upgrade the projector for the first time 1 The iOS device and projector must be connected to the same network 2 Open the control center of the iOS device and select Screen Mirroring 3 Select the corresponding projector device name Shows the name of the currently connected WiFi Shows the name of the currently connected device 14 ...

Page 19: ... steps below 1 Turn on the Wi Fi of the Android device it is recommended that the projector is connected to the same router as the Android device or the Wi Fi of the Android device is not connected to any router 2 Go to the Wi Fi settings of the Android device 3 Select the corresponding projector device name 15 ...

Page 20: ... enter the corresponding category Find the file you wish to play and press the OK key the required category cannot be entered if the USB drive is not connected Video Formats 3GP AVI FLV MP4 MPG VOB TS M2TS DAT MKV Audio Formats MP3 APE AAC FLAC OGG WAV WMA MID DTS M4A Image Formats BMP JPG PNG JPEG This model does not support any Dolby audio decoding due to the copyright of the Dolby patent 16 ...

Page 21: ... connected properly The power switch is faulty The power switch is turned off The remote control has no batteries or the batteries are low The remote control is not being aimed at the IR receiver The IR receiver is under strong light The input source may not be correct No input signal The input cable is not connected When using a laptop check that the output signal is HDMI1 or HDMI2 The cooling ven...

Page 22: ...WAS IST IN DER VERPACKUNG ENTHALTEN Projektor 1 Netzstecker 1 HDMI Kabel 1 AV Kable 1 Benutzerhandbuch 1 Fernbedienung 1 Rucksack 1 V1 0 USER MANUAL Faminode H2 Projector 18 Deutsch ...

Page 23: ...das Gehäuse gleichmäßig mit einem feuchten Tuch Verwenden Sie ein Glasreinigungstuch oder Linsenpapier Zerkratzen Sie die Linse nicht Reinigen Sie die Lüftungsöffnungen und die Lautsprecher vorsichtig mit einem Pinsel damit sie nicht verstopft werden Warnung vor zu hoher Temperatur Die Temperatur in der Nähe der Kühlungsöffnung ist während oder nach der Projektion hoch Berühren Sie dort das Gehäuse ...

Page 24: ...udiogeräte entsprechend Ihren Bedürfnissen richtig anzuschließen 1 2 7 8 9 3 4 5 6 10 11 12 13 14 15 1 2 3 4 5 6 7 8 IR Receiver Linse Steckdose IR Receiver Kopfhöreranschluss HDMI 1 Anschluss Abnehmbare Staubschutzhülle USB Anschluss 9 10 AV Anschluss HDMI 2 Anschluss Lautsprecher Lüfter Schärfeeinstellung Trapezverzeichnung Lüfter 11 12 13 14 15 Notiz Drücken Sie leicht auf das Staubfilter und es...

Page 25: ...1 2 3 1 2 Tastaturenfeld Bewertungsetikett 3 4 Projektor Befestigungslöcher Dosenlibelle 3 4 Ok Taste Pfeiltasten Eingabetaste Wahl der Eingangsquelle Einschaltknopf Foto 1 21 ...

Page 26: ...nung 1 1 2 3 4 5 6 7 8 Einschalter Quelle Pfeiltasten Menü Hauptmenü Lautstärke Lautstärke Stumm Bildumkehr Taste für Wiedergabe und Pause Zurücktaste vorher nächste 9 10 11 12 13 9 10 11 12 13 2 3 5 4 6 7 8 22 ...

Page 27: ...50 3 30 6 00 9 00 Bitte beachten Sie dass der Fehler bei der Bildgrößenangabe in der obigen Tabelle 3 beträgt Wenn der Abstand kleiner als die Mindestdaten oder größer als die Höchstdaten ist kann das Bild unscharf sein Warnung Bitte prüfen Sie das nachstehende Diagramm für die Einstellung der Trapezverzerrung Fehlerhafte Installation Fehlerhafte Installation Korrekte Installation Projektor Leinwa...

Page 28: ...tion Deckenhalterung Warnung 1 Wenn der Projektor nicht korrekt an einer Decke oder Oberfläche installiert wird kann er irreparabel beschädigt werden 2 Der Projektor sollte nur in einer Umgebung verwendet werden in der die Temperatur den Bereich von 5 35 C nicht überschreitet Andernfalls kann es zu einer Fehlfunktion kommen 3 Es kann zu Fehlfunktionen kommen wenn der Projektor staubigen nassen feuc...

Page 29: ... Pixel auf dem Bildschirm Wenn die Bildpartikel am klarsten sind sind ist die Einstellung optimal Grundeinstellung Wenn ein projiziertes Bild Trapezverzerrungen aufweist korrigieren Sie das Bild mit der Trapezkorrektur Das Bild hat eine trapezförmige Form wenn die Leinwand oder der Projektor nicht waagerecht ausgerichtet ist Drehen Sie das Trapezfehlerkorrekturrad im oder gegen den Uhrzeigersinn u...

Page 30: ...sprechende Quellschnittstelle aufzurufen Verbinden mit Wifi Wählen Sie das Symbol Einstellungen in der oberen rechten Ecke der Hauptschnittstelle drücken Sie die OK Taste auf der Fernbedienung und wählen Sie Wifi Setting Wählen Sie nach dem Aufrufen der Schnittstelle das Wifi mit dem Sie sich verbinden möchten aus der Liste unten aus und geben Sie dann das Passwort ein Neben dem Namen des erfolgreich...

Page 31: ...27 ...

Page 32: ...e OK Taste auf der Fernbedienung und wählen Sie Bluetooth Einstellung Nach dem Aufrufen der Schnittstelle schalten Sie Bluetooth ein und suchen nach Bluetooth Geräten mit denen Sie eine Verbindung herstellen können Notiz Der Projektor kann mit Bluetooth Lautsprechern und Bluetooth Kopfhörern verbunden werden aber nicht mit Bluetooth Handys 28 ...

Page 33: ... Sie die OK Taste auf der Fernbedienung und wählen Sie Projektionsbildeinstellung Wählen Sie nach dem Aufrufen der Benutzeroberfläche den gewünschten Modus für die Projektionseinstellungen aus Projektionsmodi Front Desktop Rear Desktop Front Ceiling Rear Ceiling Trapezkorrektur Erweitert Vorne Seite C Seite 4 Punkt Trapezkorrektur 29 ...

Page 34: ...4 Punkt Grundeinstellung Wählen Sie in den Projektionseinstellungen die Option 4 Punkt Trapezkorrektur und passen Sie die Einstellung entsprechend den Textaufforderungen auf der Benutzeroberfläche an 30 ...

Page 35: ...verbunden sein um iOS Cast zu verwenden oder den Projektor zum ersten Mal zu aktualisieren 1 Das iOS Gerät und der Projektor müssen mit demselben Netzwerk verbunden sein 2 Öffnen Sie das Kontrollzentrum des iOS Geräts und wählen Sie Screen Mirroring 3 Wählen Sie den entsprechenden Gerätenamen des Projektors zeigt den Namen des aktuell verbundenen Wifi an zeigt den Namen des aktuell verbundenen Gerät...

Page 36: ...chstehenden Schritte 1 Schalten Sie das Wifi des Android Geräts ein es wird empfohlen dass der Projektor mit demselben Router wie das Android Gerät verbunden ist oder das Wi Fi des Android Geräts mit keinem Router verbunden ist 2 Gehen Sie zu den Wifi Einstellungen des Android Geräts 3 Wählen Sie den entsprechenden Gerätenamen des Projektors 32 ...

Page 37: ...hende Kategorie aufzurufen Suchen Sie die Datei die Sie abspielen möchten und drücken Sie die OK Taste die gewünschte Kategorie kann nicht eingegeben werden wenn das USB Laufwerk nicht angeschlossen ist Video Formate 3GP AVI FLV MP4 MPG VOB TS M2TS DAT MKV Audio Formate MP3 APE AAC FLAC OGG WAV WMA MID DTS M4A Bildformate BMP JPG PNG JPEG Dieses Modell unterstützt aufgrund des Urheberrechts des Do...

Page 38: ... ist defekt Der Netzschalter ist ausgeschaltet Die Fernbedienung hat keine Batterien oder die Batterien sind schwach Die Fernbedienung ist nicht auf den IR Empfänger gerichtet Der IR Empfänger steht unter starkem Lichteinfluss Die Eingangsquelle ist möglicherweise nicht korrekt Kein Eingangssignal Das Eingangskabel ist nicht angeschlossen Wenn Sie einen Laptop verwenden überprüfen Sie ob das Ausgan...

Page 39: ...パッケージの内容 プロジェクター 1 電源ケーブル 1 HDMIケーブル 1 AVケーブル 1 ユーザーマニュアル 1 リモコン 1 バックパック 1 V1 0 USER MANUAL Faminode H2 Projector 35 日本語 ...

Page 40: ...でください 電源コードを抜く前に 電源を切ってください 掃除 まずは電源ケーブルを抜きます 湿らせた布で本体を均等に拭きます 中性洗剤を使用することができます ガラスクロスまたはレンズペーパーを使用してく ださい レンズを傷つけないでく ださい 通気口とスピーカーが詰まらないように 手すりブラシで均等に掃除します 高温注意 冷却ベント付近の温度は 投影中または投影後に高くなります やけどを防ぐために 触れないでください 目を傷つけないように 投影中にレンズを直視しないでください ご注意 感電の恐れがあり 保証対象外となるため プロジェクターを分解しないでください プロジェクターに液体や重いものを置かないでください 安定した熱放散を確保するために 投影する前にプロジェクターの下部にある高さブ ラケッ トを開いてください 36 ...

Page 41: ...に対応します 必要に応じてプロジェクターとその他 のオーディオ機器を接続するには 次の図を参照してください 1 2 7 8 9 3 4 5 6 10 11 12 13 14 15 1 2 3 4 5 6 7 8 IRレシーバー レンズ 電源ソケット IRレシーバー ヘッドフォンジャック HDMI1ポート 取り外し可能なダストカバー USBポート 9 10 AVポート HDMI2ポート スピーカー 冷却ベント 焦点 台形補正 冷却ベント 11 12 13 14 15 ご注意 ダストネットを軽く押すと飛び出し 掃除がしやすくなります 37 ...

Page 42: ...1 2 3 1 2 キーパッド 図1 定格銘板 3 4 プロジェクター設置穴 水平スタンド調整 3 4 OKキー 矢印キー 戻るキー ソースキー 電源キー 図1 38 ...

Page 43: ...リモコン 1 1 2 3 4 5 6 7 8 電源 ソース 矢印キー メニュー ホームページ 音量 音量 ミュート 画像反転 確認キー 再生と一時停止 戻る 前へ 次へ 9 10 11 12 13 9 10 11 12 13 2 3 5 4 6 7 8 39 ...

Page 44: ... を調整するには 次の表を参照してく ださい アスペク ト比 16 9 投影距離 m 画像サイズ 35 100 200 300 1 50 3 30 6 00 9 00 上記の表に記載されている画像サイズについて 3 の誤差が生じる場合があります 距離が最小データよりも小さいか 最大データよりも大きい場合 画像がぼやける可能 性があります 警告 台形調整については 次の図を参照してください 正しくない設置 正しくない設置 正しい設置 プロジェクター 画面対称軸 画面 40 ...

Page 45: ...ェ クター プロジェクター 画面 画面 画面 画面 正面投影 天井設置 正面投影 卓上設置 背面投影 卓上設置 プロジェクター 警告 1 プロジェクターが天井や表面に正しく設置されていない場合 修理できないほど損傷 する可能性があります 2 このプロジェクターは 温度が5 35 の範囲を超えない環境でのみ使用してください そうしない場合 誤動作が発生する可能性があります 3 このプロジェクターがほこ り 湿気 または煙の多い環境にさらされると 誤動作が発生 する可能性があります 4 換気が不十分な場合 過熱により プロジェクターが損傷し 深刻な状況が発生する 可能性があります 41 ...

Page 46: ...タが 青から赤に変わり プロジェクターの電源が切れます 焦点調整 トラックホイールを時計回りに限界まで回してから ゆっく りと反時計回りに回転させま す 同時に 画面上のピクセルを注意深く観察します 画像の粒子が最も鮮明な場合 画面上のピクセルがレンズの最適な焦点になります キース トーン 投影された画像に台形の歪みがある場合は 台形調整を使用して画像を補正してくだ さい 画面またはプロジェクターが水平でない場合 画像は台形になります キーストー ントラックホイールを時計回りまたは反時計回りに回転させ 位置を調整します プロ ジェクターの位置を変え 画面に対する角度を改善します 画像の周囲にまだピントが 合っていない可能性があります 焦点ダイヤル キーストーン調整機能で台形の歪みを補正できない場合は プロジェクターを画面中央 まで垂直に下げてください キーストーン 42 ...

Page 47: ...メインメニューの左側にある一覧で HDMI1 HDMI2 AVなどの必要なソースチャネ ルを選択し リモコンのOKキーを押して 対応するソースメニューに入ります Wi Fiに接続する方法 メインメニューの右上にある設定アイコンを選択し リモコンのOKキーを押して WiFi設定 を選択します メニューに入ったら 下の一覧から接続したいWiFiを選択し パスワードを入力します 正常に接続されたWi Fi名の横には 接続済み と表示されます 43 ...

Page 48: ...44 ...

Page 49: ...toothで接続する方法 メインメニューの右上にある設定アイコンを選択し リモコンのOKキーを押して Bluetooth設定 を選択します メニューに入ったら Bluetoothをオンにし ペアリングしたいBluetoothデバイスを検索 します ご注意 このプロジェクターはBluetoothスピーカーとBluetoothヘッ ドフォンに接続で きますが Bluetoothで携帯電話には接続できません 45 ...

Page 50: ...投影設定の使用方法 メインメニューの右上にある設定アイコンを選択し リモコンのOKキーを押して 投影画像の設定 を選択します メニューに入ったら 投影設定で必要なモードを選択します 投影モード 正面 卓上 背面 卓上 正面 天井 背面 天井 キーストーン調整 正面 側面C 側面 4ポイントキーストーン 46 ...

Page 51: ...4点台形補正 投影設定で 4点台形補正補正 を選択し インターフェースに入った後 インターフェー スのテキストプロンプトに従って調整を行います 注意 側面から投影すれば 四角のピント或いは一部のピントが合わなくなりま す それはLCDプロジェクター業界の一般的な問題です 不良ではありません ご 了承ください 47 ...

Page 52: ...ューで iOS Cast を選択し リモコンのOKキーを押して 次の手順に従います ご注意 iOS Castを使用したり プロジェクターを初めてアップグレードする時は プロ ジェクターをインターネッ トに接続する必要があります 1 iOSデバイスとプロジェクターを同じネッ トワークに接続する必要があります 2 iOSデバイスでコントロールセンターを開き 画面ミラーリング を選択します 3 対応するプロジェクターデバイス名を選択します 48 ...

Page 53: ...使用方法 メインメニューで Miracast を選択し リモコンのOKキーを押して 次の手順に従います 1 AndroidデバイスのWi Fiをオンにします プロジェクターとAndroidデバイスを同じル ーターに接続するか AndroidデバイスのWi Fiをどのルーターにも接続しないことをお 勧めします 2 AndroidデバイスのWi Fi設定に移動します 3 対応するプロジェクターデバイス名を選択します 49 ...

Page 54: ...なカテゴリを選 択し リモコンのOKキーを押して 対応するカテゴリに入ります 再生したいファイルを見つけ出し OKキーを押します USBドライブが接続されていな い場合は 必要なカテゴリに入ることができません ビデオ形式 3GP AVI FLV MP4 MPG VOB TS M2TS DAT MKV オーディオ形式 MP3 APE AAC FLAC OGG WAV WMA MID DTS M4A 画像形式 BMP JPG PNG JPEG ドルビー特許権により 本製品はドルビーオーディオのデコードに対応し ていません 50 ...

Page 55: ...い 4 プロジェクターは自動 的にオフになる 考えられる原因 電源ケーブルが正しく接続されていません 電源スイッチが故障しています 電源スイッチがオフになっています リモコンに電池がないか 電池残量が少なくなっています リモコンをIRレシーバーに向けていません IRレシーバーは強い光にさらされています 入力ソースが正しくない可能性があります 入力信号がありません 入力ケーブルが接続されていません ノートパソコンを使用する場合は 出力信号がHDMI1またはHDMI2であ ることを確認してください 冷却ベントが塞がれています 電圧が安定していません PCモードの場合 PCの出力周波数は50 60Hzではありません PC出力がプロジェクターに接続されていることを確認してください プロジェクターが過熱しています ファンが損傷していないことを確認 してください 51 日本語 ...

Page 56: ......

Page 57: ...Please read this manual carefully before operating the projector 30017000082 ...

Reviews: