background image

  Fanaway ORBIT Installation Instructions 


4  | 

P a g e                                                         V 1 . 0   7 / 2 0 2 1  


INSTALLING THE MOUNTING BRACKET


If there isn’t an existing outlet box, then install one using the following instructions: 


Disconnect the power by removing the fuses or turning off the circuit breakers. 


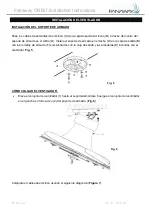
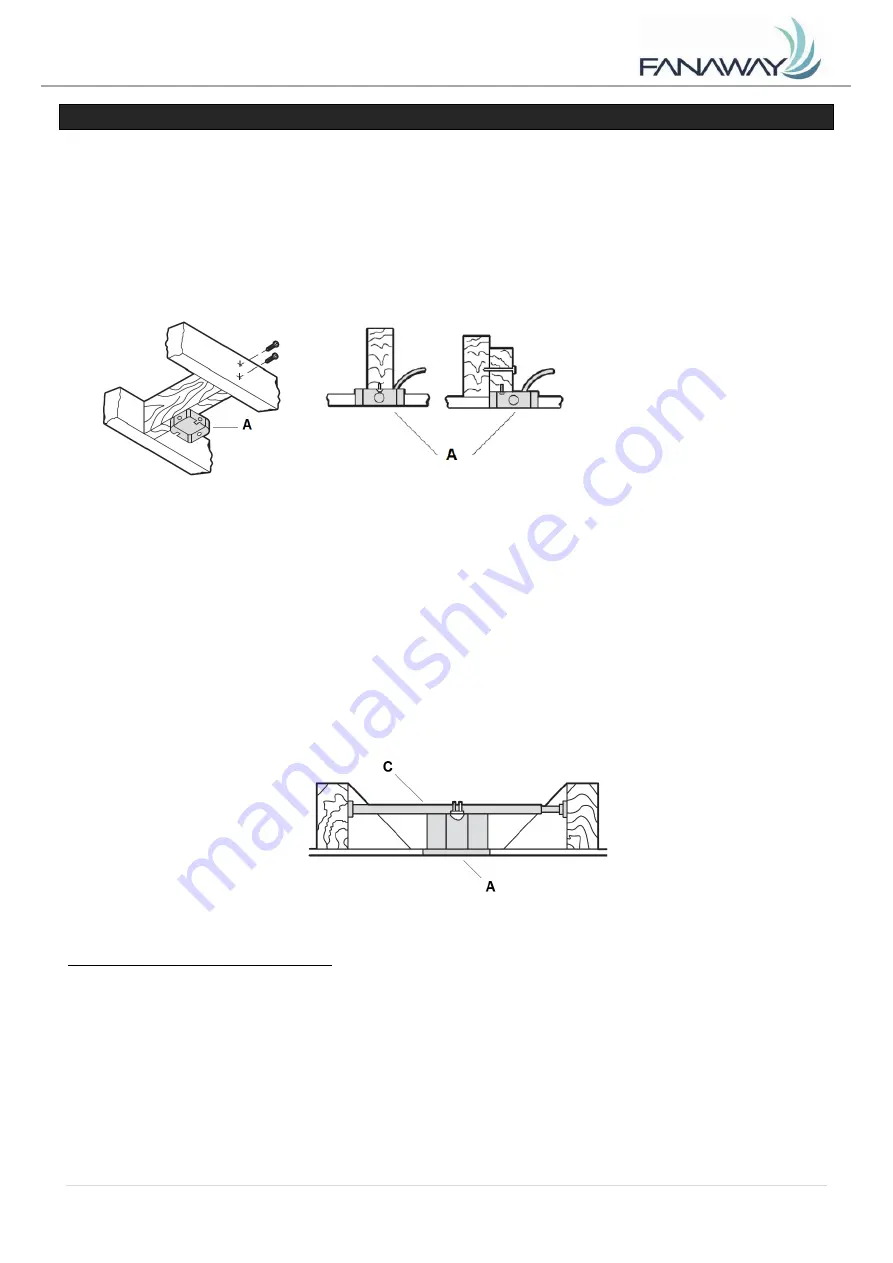
Secure the outlet box (A) (not included) directly to the building structure. Use appropriate fasteners 
and materials (not included). The outlet box and its bracing must be able to fully support the weight 
of the moving fan (at least 35 lbs). Do not use a plastic outlet box. 


Figures 2-3

 below show different ways to mount the outlet box (A) (not included). 


NOTE: The ceiling fan must be installed in a location so that the blades are spaced 300mm from the tip 
of the blade to the nearest objects or walls. 


To  hang  your  fan  where  there  is  an  existing  fixture  but  no  ceiling  joist,  you  may  need  an  installation 
hanger bar (C) as shown in 

Fig.4

. Make sure the hanger bar you purchase has been designed for use 

with ceiling fans. 


ANGLED CEILING INSTALLATION 

The hanging system of this fan is ONLY suitable for flat ceiling installation.   

DO NOT install the fan on an angled ceiling

.   


Fig. 2 

Fig. 4 

Fig. 3 

Summary of Contents for ORBIT

Page 1: ...port beaconlighting us www beaconlighting us US Patent 8317470 8807938 8790085 9255584 8851841 V1 0 7 2021 FANAWAY ORBIT CEILING FAN INSTALLATION OPERATION MAINTENANCE WARRANTY INFORMATION CAUTION REA...

Page 2: ...stalling the blade brackets balancing the blades or cleaning the fan Do not insert foreign objects in between rotating fan blades 5 CAUTIONS All wiring must be in accordance with the National Electric...

Page 3: ...or replacement Check whether the ceiling fan has been damaged during transport Do not operate install any product which appears damaged in any way Return the complete product to the place of purchase...

Page 4: ...e moving fan at least 35 lbs Do not use a plastic outlet box Figures 2 3 below show different ways to mount the outlet box A not included NOTE The ceiling fan must be installed in a location so that t...

Page 5: ...ceiling mounting bracket D Install the ceiling mounting bracket D on the outlet box B with the mounting screws F provided with the outlet box and washers E provided with fan Fig 5 HANGING THE FAN ASSE...

Page 6: ...upply wire white to the receiver input wire white AC IN N 3 Connect the household ground wire to the fan mounting bracket ground wire green and fan body ground wire 4 Connect the reveiver output wire...

Page 7: ...the mounting bracket and let the L shape slot on the hanging canopy 3 go through the two canopy screws with star washer 2 Fig 8b Turn the hanging canopy 3 until it locks in place at the end section of...

Page 8: ...ure screw 2 to the light kit plate Tighten all three screws Do not over tighten 4 Connect the quick connector of fan assembly to the quick connector of the light kit assembly Fig 9 5 Loosen the screw...

Page 9: ...ter by the holder USING YOUR CEILING FAN SETTING DIP SWITCHES When two or more fans are located near each other you may desire to have the receiver transmitter for each fan set to a different code so...

Page 10: ...MOTE Before you start using the remote take the time to read through this section and get familiar with the buttons and function of each button LED Indicator The red LED indicator on the top of the tr...

Page 11: ...operation due to the fact that they are mounted on a rubber grommet If the fan was mounted rigidly to the ceiling it would cause excessive vibration Movement of a few centimetres is quite acceptable...

Page 12: ...ectrical shock 3 Ensure that the fan does not come in contact with any organic solvents or cleaners 4 To clean the fan blade wipe with only a damp clean cloth with NO organic solvents or cleaners 5 Th...

Page 13: ...es de velocidad de estado s lido 4 ADVERTENCIA Para disminuir el riesgo de que se produzcan lesiones personales no doble los soportes de las aspas al instalarlos para equilibrar las aspas o al limpiar...

Page 14: ...educir el riesgo de descarga el ctrica desconecte el circuito de suministro el ctrico del ventilador antes de instalar el juego de luces 10 El peso de la placa del juego de luces es de 1 56 kg 11 Use...

Page 15: ...el ventilador de techo se da durante el transporte No ponga en funcionamiento ni instale ning n producto que presente cualquier tipo de da o Regrese el producto completo al lugar donde lo adquiri par...

Page 16: ...de salida de pl stico Las figuras 2 3 siguientes muestran tres tipos distintos de armado de la caja de salida A no incluida NOTA El ventilador de techo debe instalarse en un lugar donde las puntas de...

Page 17: ...techo D Instale el soporte de armado en el techo D en la caja de salida B con los tornillos de armado F suministrados con la caja de salida y las arandelas E incluidas con el ventilador Fig 5 C MO CO...

Page 18: ...a tierra del armaz n del ventilador 4 Conecte el cable de salida del receptor negro AL MOTOR L al cable de entrada vivo del motor negro AL MOTOR L 5 Conecte el cable de salida del receptor blanco AL M...

Page 19: ...de armado y deje que la ranura en forma de L del flor n 3 pase por los dos tornillos del flor n con una arandela de estrella 2 Fig 8b Gire el flor n 3 hasta que encaje en su lugar en la secci n final...

Page 20: ...conjunto de luces Apriete los tres tornillos No los apriete en exceso 4 Conecte el conector r pido del conjunto del ventilador al conector r pido del conjunto del juego de luces Fig 9 5 Afloje el tor...

Page 21: ...otencia nominal m xima Fig 11 9 Para terminar instale la pantalla de la l mpara en la placa del juego de luces gir ndola en sentido horario INSTALACI N DEL SOPORTE DEL TRANSMISOR Fig 12 Instale el sop...

Page 22: ...Cambie de posici n los interruptores DIP en el transmisor y receptor remotos Compruebe que los interruptores DIP del transmisor y receptor remotos se corresponden Si no se corresponden el transmisor n...

Page 23: ...antenga presionado el bot n para acceder a la funci n de atenuaci n de la luz El control remoto tiene funci n de memoria Si el ventilador o la luz se apagan mediante el interruptor de aislamiento lo m...

Page 24: ...te de 24 horas y la mayor a de los ruidos asociados con el nuevo ventilador desaparecer n en dicho periodo de tiempo Todos los motores el ctricos producen un cierto ruido Tenga en cuenta que esto no e...

Page 25: ...VENTILADOR ORBIT E26 XXX Extra alta 120 0 46 54 92W 285 3042 43 55 4 17 2 3 05 Media alta 120 0 34 27 35W 219 2146 70 78 49 17 2 3 05 Baja 120 0 23 12 48W 170 1332 89 106 8 17 2 3 05 Estas medidas so...

Page 26: ...ricien qualifi en cas de doute 3 Convient pour une utilisation avec des commandes de vitesse semi conducteurs 4 AVERTISSEMENT Pour r duire les risques de blessures ne tordez pas les supports de pale l...

Page 27: ...our r duire le risque de choc lectrique d branchez le circuit d alimentation lectrique du ventilateur avant d installer le kit d clairage 10 Le poids de la plaque du kit d clairage est de 1 56 kg 11 U...

Page 28: ...rifiez si le ventilateur de plafond a t endommag pendant le transport N utilisez n installez aucun produit qui semble endommag de quelque mani re que ce soit Renvoyez le produit complet au lieu d acha...

Page 29: ...sch mas 2 et 3 ci dessous illustrent diff rentes mani res de monter le bo tier de sortie A non fourni REMARQUE Le ventilateur de plafond doit tre install dans un endroit tel que les pales soient espac...

Page 30: ...z le support de montage au plafond D sur le bo tier de sortie B l aide des vis de montage F fournies avec le bo tier de sortie et les rondelles E fournies avec le ventilateur Sch ma 5 SUSPENSION DE L...

Page 31: ...de terre du bo tier du ventilateur 4 Connectez le fil de sortie du r cepteur noir VERS LE MOTEUR SOUS TENSION au fil d alimentation sous tension du moteur noir VERS LE MOTEUR SOUS TENSION 5 Connectez...

Page 32: ...de montage et laissez la fente en forme de L du cache suspendu 3 passer travers les deux vis du cache avec la rondelle en toile 2 Sch ma 8b Tournez le cache suspendu 3 jusqu ce qu il se verrouille en...

Page 33: ...is 2 la plaque du kit d clairage Serrez les trois vis Ne serrez pas trop 4 Connectez le connecteur rapide du ventilateur au connecteur rapide du kit d clairage sch ma 9 5 Desserrez la vis 6 de la plaq...

Page 34: ...ez pas la puissance nominale maximale Sch ma 11 9 Enfin installez l abat jour sur la plaque de la lampe en le tournant dans le sens des aiguilles d une montre INSTALLATION DU SUPPORT DE LA T L COMMAND...

Page 35: ...inir le code Modifiez la position des commutateurs DIP dans la t l commande et le r cepteur Assurez vous que les commutateurs DIP correspondent dans le r cepteur et dans la t l commande S ils ne corre...

Page 36: ...e Appuyez sur le bouton et maintenez le enfonc pour acc der la fonction de variation de la lumi re La t l commande a une fonction de m moire Si le ventilateur ou l indicateur est teint par le commutat...

Page 37: ...ventilateur disparaissent apr s cette p riode Tous les moteurs lectriques sont audibles dans une certaine mesure Veuillez noter qu il ne s agit pas d un d faut du produit et que de ce fait il n est p...

Page 38: ...de 120 0 46 54 92 W 285 3042 43 55 4 17 2 3 05 Moyenne ment rapide 120 0 34 27 35 W 219 2146 70 78 49 17 2 3 05 Faible 120 0 23 12 48 W 170 1332 89 106 8 17 2 3 05 Ce sont des mesures approximatives E...

Reviews: