background image

2. Erase the transmitter codes stored in the Wall control memory

The ceiling fan receiver may be holding multiple wall control/transmitter codes in its memory. Assuming the steps 

outlined above in (1) have been tried and correctly followed, there could still be a situation where Wall control B is con-

trolling both Fan A and Fan B, while Wall control A only controls Fan A.

This might be because Receiver A (installed in Fan A) still “remembers” Wall control B, despite the re pairing process 

having been completed with Wall control A.

When pairing the wall control with the receiver for the very first time you generally only need to press and hold the fan 

ON/OFF button for 5 seconds before it responds. This is the correct procedure to add a new wall control to a receiver BUT 

it does not cause the receiver to “forget” previously paired wall controls. So you could in theory add several wall controls 

to a receiver.

Pressing and holding the ON/OFF button for a longer period (e.g. 15 seconds) will:

a) wipe the receiver’s memory (removing any previously paired wall controls)

b) then add the pairing wall control to the receiver’s memory

This is typically the desired pairing behaviour required.
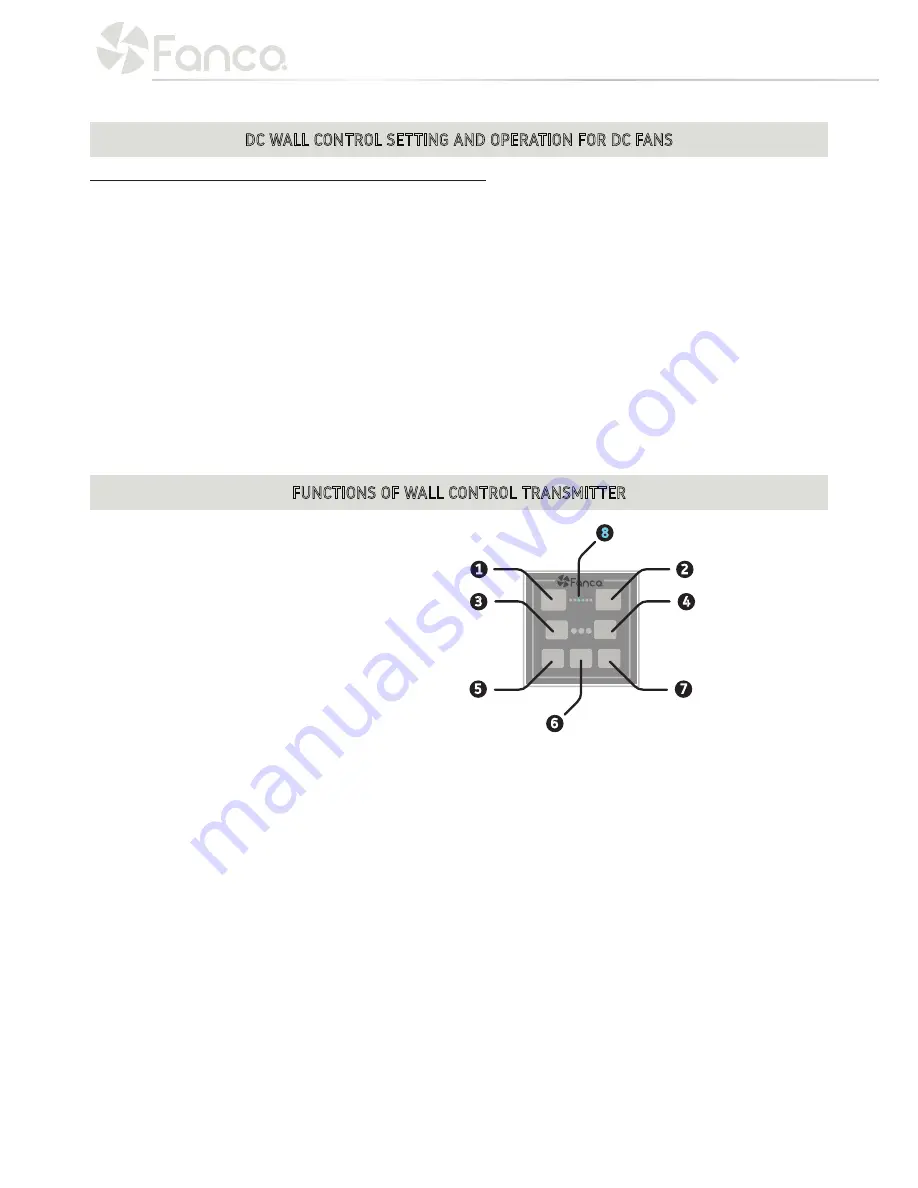
1.  TO LOWER SPEED 

2.  TO INCREASE SPED

3.  REVERSE DIRECTION (SUMMER/WINTER)

4.  TIMER FOR FAN 

5.  ON/OFF LIGHT

6.  NATURAL WIND

7.  ON/OFF FAN

8.  INDICATOR OF CURRENT SPEED

To operate CCT (Colour Changing Technology) function; Use Light On/Off button to turn light on. Turn light off and on 

again immediately to change CCT setting, until desired CCT setting is found. There are 3 colour options; 3000K (Warm), 

4000K (Natural) and 5000K (Cool).

DC WALL CONTROL SETTING AND OPERATION FOR DC FANS

FUNCTIONS OF WALL CONTROL TRANSMITTER

1

3

4

5

7

2

6

8

Summary of Contents for CFFCHZ3BRR

Page 1: ...CHZ4WHW CFFCHZ4WHR CFFCHZ4BRW CFFCHZ4BRR CFFCHZ3WHW CFFCHZ3WHR CFFCHZ3BRW CFFCHZ3BRR C E I L I N G F A N I N S T A L L A T I O N M A N U A L F A N C O H O R I Z O N D C THIS IS NOT A DIY PRODUCT THIS...

Page 2: ...the fan should be installed under cover and at least 1 5m from the edge of the eave roof Installing the fan in a position where it could be exposed to water or moisture is dangerous and will void the...

Page 3: ...e included NB You may need to remove all foam packaging material to ensure there are no missing components 1 1 x Installation and Warranty manual 2 1 x Finished Motor 3 1 x Mounting Bracket 4 1 x Moto...

Page 4: ...Installing the fan in a position where it could be exposed to water or moisture is dangerous and will void the warranty 4 If the location you have chosen does not have a suitable support beam capable...

Page 5: ...oved in step 1 1 1 3 Tighten all the blade screws securely and evenly 2 Install Motor Housing 2 1 Remove 3 Screws from flat ring at the top of the downrod connected to the motor 2 2 Remove 2 screws th...

Page 6: ...ter Pin on the other side of the cross pin to secure the downrod to the motor bush 3 5 Secure with two screws removed in 2 2 on either side to make the downrod rigid in the motor bush 3 6 Install York...

Page 7: ...the Remote or Wall Control Receiver 5 1 Connect the Motor wire couplings to the correct positions in the receiver 5 2 Connect the Grounding Wire Electricity Supply wire to correct position in the rec...

Page 8: ...l to base of the light using magnet system to secure 7 3 Fit light diffuser by placing under motor and twisting gently to lock into place 8 Wall Control Installation 8 1 The Wall control must be hard...

Page 9: ...g and as such is maintenance free NOISE The manufacturer warranty covers actual faults that may develop but NOT minor complaints e g motor operation noise ALL ELECTRIC MOTORS ARE AUDIBLE TO SOME EXTEN...

Page 10: ...fans For the purposes of this trouble shooting guide Fan A uses Remote control A and Receiver A while Fan B uses Remote control B and Receiver B 1 Isolate power to one fan only when pairing the remot...

Page 11: ...the correct speed This is normal behaviour for DC fans Considerations 1 If the receiver is not receiving a signal from the transmitter control please check if there are any other similarly transmitter...

Page 12: ...ol to a receiver BUT it does not cause the receiver to forget previously paired wall controls So you could in theory add several wall controls to a receiver Pressing and holding the ON OFF button for...

Page 13: ...r circuit breaker tripped B Loose wire connections or plug to fan controller C Battery flat in remote control A Fan blades are not horizontal to the ceiling B Blade screws are loose C Blades are not b...

Page 14: ...ak hot water and street lights Filters for blocking reducing such signals are available in Australia at the customer s expense IMPORTANT The in home repair replacement service is carried out by Fanco...

Page 15: ...by external factors such as but not limited to power supply faults surges water damage lighting and other Acts of God is not covered by this warranty Fanco fans must only be installed and used with co...

Page 16: ...WWW FANCO COM AU...

Reviews: