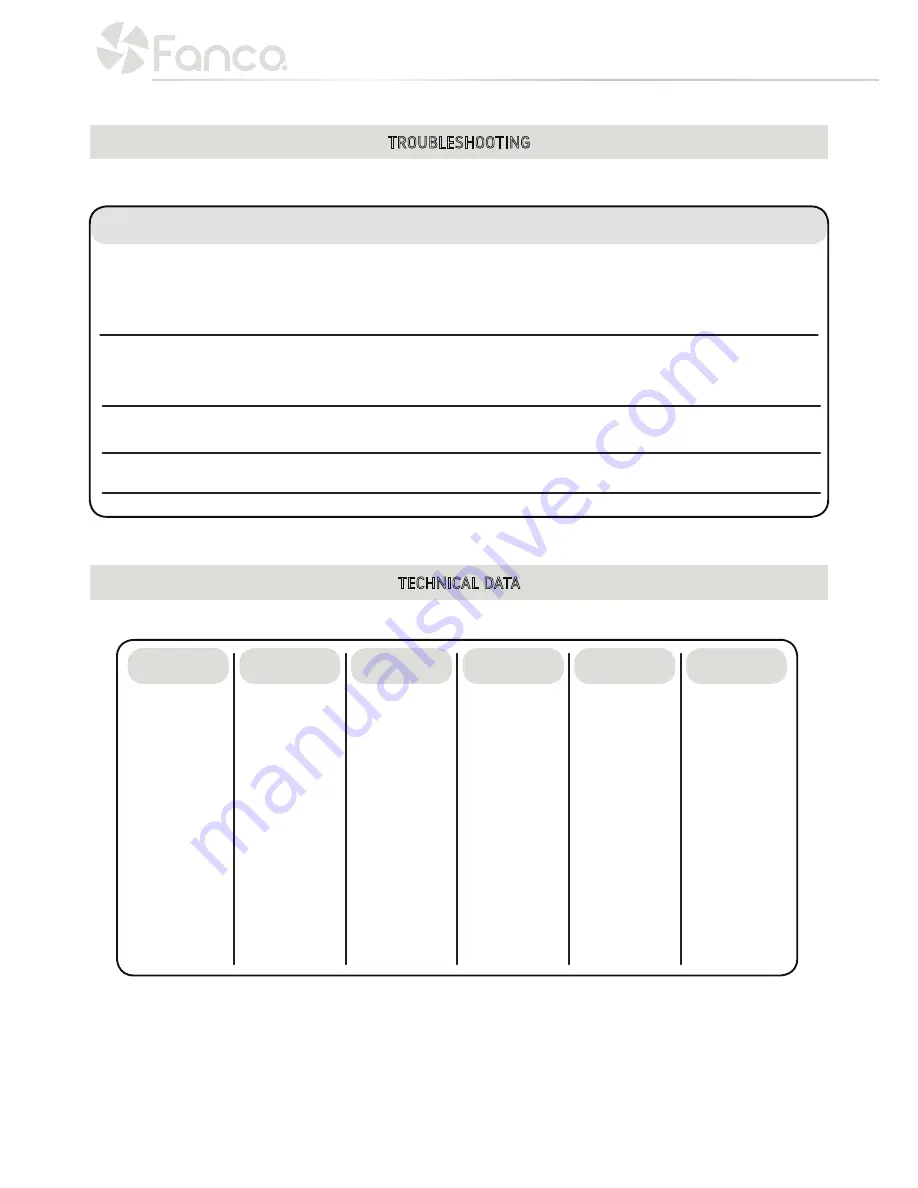
background image

TECHNICAL DATA

TROUBLESHOOTING

TROUBLE

Fan will not start

Fan wobbles

Fan sounds noisy

Mechanical noise

MODEL NO.

CFFCHZ4WHW

CFFCHZ4WHR

CFFCHZ4BRW

CFFCHZ4BRR

CFFCHZ3WHW

CFFCHZ3WHR

CFFCHZ3BRW

CFFCHZ3BRR

CURRENT

0.28 A

0.28 A

0.28 A

0.28 A

0.28 A

0.28 A

0.28 A

0.28 A

RATED VOLTAGE

220-240v

220-240v

220-240v

220-240v

220-240v

220-240v

220-240v

220-240v

LIGHT POWER

12W (Light Kit)

12W (Light Kit)

12W (Light Kit)

12W (Light Kit)

12W (Light Kit)

12W (Light Kit)

12W (Light Kit)

12W (Light Kit)

DC MOTOR POWER

35W

35W

35W

35W

35W

35W

35W

35W

DIMMABLE

N / A

N / A

N / A

N / A

N / A

N / A

N / A

N / A

POSSIBLE CAUSE

A) Fuse blown or circuit breaker tripped

B) Loose wire connections or plug to 

fan / controller

C) Battery flat in remote control

A) Fan blades are not horizontal to the ceiling

B) Blade screws are loose

C) Blades are not balanced enough 

A) Loose fan blades

B) Ceiling fan not secured against ceiling 

A) Fan has not settled in fully

SUGGESTED REMEDY

A) Check fuses and circuit breakers 

B) Check wire connections and ensure plugs are 

positively connected 

C) Replace 12V battery in remote control 

A) Retighten all screws on blades* 

B) Make sure all screws are tightened 

C) 

Use provided balancing kit to balance blades 

A) Retighten all screws on blades.

B) Retighten screws on the mounting bracket 

A) Allow at least 8hrs of use for the fan to settle in

*DO NOT make any adjustments by applying pressure up or down on blades

CLFCHZLED

Summary of Contents for CFFCHZ3BRR

Page 1: ...CHZ4WHW CFFCHZ4WHR CFFCHZ4BRW CFFCHZ4BRR CFFCHZ3WHW CFFCHZ3WHR CFFCHZ3BRW CFFCHZ3BRR C E I L I N G F A N I N S T A L L A T I O N M A N U A L F A N C O H O R I Z O N D C THIS IS NOT A DIY PRODUCT THIS...

Page 2: ...the fan should be installed under cover and at least 1 5m from the edge of the eave roof Installing the fan in a position where it could be exposed to water or moisture is dangerous and will void the...

Page 3: ...e included NB You may need to remove all foam packaging material to ensure there are no missing components 1 1 x Installation and Warranty manual 2 1 x Finished Motor 3 1 x Mounting Bracket 4 1 x Moto...

Page 4: ...Installing the fan in a position where it could be exposed to water or moisture is dangerous and will void the warranty 4 If the location you have chosen does not have a suitable support beam capable...

Page 5: ...oved in step 1 1 1 3 Tighten all the blade screws securely and evenly 2 Install Motor Housing 2 1 Remove 3 Screws from flat ring at the top of the downrod connected to the motor 2 2 Remove 2 screws th...

Page 6: ...ter Pin on the other side of the cross pin to secure the downrod to the motor bush 3 5 Secure with two screws removed in 2 2 on either side to make the downrod rigid in the motor bush 3 6 Install York...

Page 7: ...the Remote or Wall Control Receiver 5 1 Connect the Motor wire couplings to the correct positions in the receiver 5 2 Connect the Grounding Wire Electricity Supply wire to correct position in the rec...

Page 8: ...l to base of the light using magnet system to secure 7 3 Fit light diffuser by placing under motor and twisting gently to lock into place 8 Wall Control Installation 8 1 The Wall control must be hard...

Page 9: ...g and as such is maintenance free NOISE The manufacturer warranty covers actual faults that may develop but NOT minor complaints e g motor operation noise ALL ELECTRIC MOTORS ARE AUDIBLE TO SOME EXTEN...

Page 10: ...fans For the purposes of this trouble shooting guide Fan A uses Remote control A and Receiver A while Fan B uses Remote control B and Receiver B 1 Isolate power to one fan only when pairing the remot...

Page 11: ...the correct speed This is normal behaviour for DC fans Considerations 1 If the receiver is not receiving a signal from the transmitter control please check if there are any other similarly transmitter...

Page 12: ...ol to a receiver BUT it does not cause the receiver to forget previously paired wall controls So you could in theory add several wall controls to a receiver Pressing and holding the ON OFF button for...

Page 13: ...r circuit breaker tripped B Loose wire connections or plug to fan controller C Battery flat in remote control A Fan blades are not horizontal to the ceiling B Blade screws are loose C Blades are not b...

Page 14: ...ak hot water and street lights Filters for blocking reducing such signals are available in Australia at the customer s expense IMPORTANT The in home repair replacement service is carried out by Fanco...

Page 15: ...by external factors such as but not limited to power supply faults surges water damage lighting and other Acts of God is not covered by this warranty Fanco fans must only be installed and used with co...

Page 16: ...WWW FANCO COM AU...

Reviews: