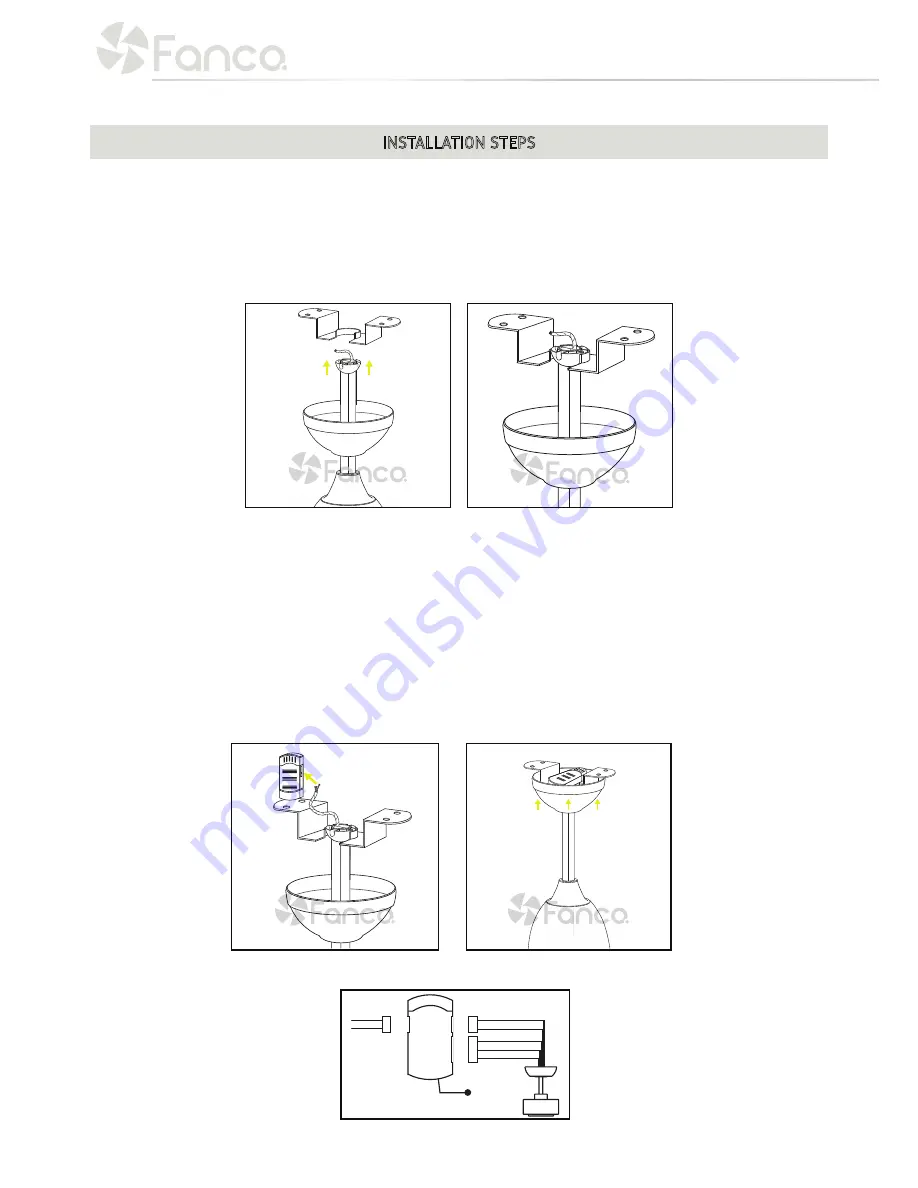
background image

4. Hang the fan


4.1. Secure the hanger bracket to the ceiling joist or suitable piece of timber inserted between the  


       ceiling joists. The Hanger bracket should be secured using the screws provided.


4.2. Note - Fan and hanger bracket must be earthed during installation.


4.3. Carefully lift motor assembly (with blades) onto hanger bracket. Rotate fan until notch on down- 


       rod ball engages the ridge on the hanger bracket. This will allow hands free wiring.

5. Connect the Remote or Wall Control Receiver


5.1. Connect the Motor wire couplings to the correct positions in the receiver. 


5.2. Connect the Grounding Wire (Electricity Supply wire) to correct position in the receiver.


5.2.1. Please see wiring diagram below 


5.3. Fit the receiver in the gap in the Hanger Bracket


5.4. Fit the canopy cover to the Hanger bracket, by inserting the screws where the large part of the  


       holes are and slide over to lock. Note: When installing the canopy be careful not to press down the  


       antenna or other wires as these may break easily or short-circuit


5.5. Tighten screws.

4.1

5.1

5.2.1

4.3

5.4

INSTALLATION STEPS

AC IN

Antenna wire

Black wire

Summary of Contents for CFFCHZ3BRR

Page 1: ...CHZ4WHW CFFCHZ4WHR CFFCHZ4BRW CFFCHZ4BRR CFFCHZ3WHW CFFCHZ3WHR CFFCHZ3BRW CFFCHZ3BRR C E I L I N G F A N I N S T A L L A T I O N M A N U A L F A N C O H O R I Z O N D C THIS IS NOT A DIY PRODUCT THIS...

Page 2: ...the fan should be installed under cover and at least 1 5m from the edge of the eave roof Installing the fan in a position where it could be exposed to water or moisture is dangerous and will void the...

Page 3: ...e included NB You may need to remove all foam packaging material to ensure there are no missing components 1 1 x Installation and Warranty manual 2 1 x Finished Motor 3 1 x Mounting Bracket 4 1 x Moto...

Page 4: ...Installing the fan in a position where it could be exposed to water or moisture is dangerous and will void the warranty 4 If the location you have chosen does not have a suitable support beam capable...

Page 5: ...oved in step 1 1 1 3 Tighten all the blade screws securely and evenly 2 Install Motor Housing 2 1 Remove 3 Screws from flat ring at the top of the downrod connected to the motor 2 2 Remove 2 screws th...

Page 6: ...ter Pin on the other side of the cross pin to secure the downrod to the motor bush 3 5 Secure with two screws removed in 2 2 on either side to make the downrod rigid in the motor bush 3 6 Install York...

Page 7: ...the Remote or Wall Control Receiver 5 1 Connect the Motor wire couplings to the correct positions in the receiver 5 2 Connect the Grounding Wire Electricity Supply wire to correct position in the rec...

Page 8: ...l to base of the light using magnet system to secure 7 3 Fit light diffuser by placing under motor and twisting gently to lock into place 8 Wall Control Installation 8 1 The Wall control must be hard...

Page 9: ...g and as such is maintenance free NOISE The manufacturer warranty covers actual faults that may develop but NOT minor complaints e g motor operation noise ALL ELECTRIC MOTORS ARE AUDIBLE TO SOME EXTEN...

Page 10: ...fans For the purposes of this trouble shooting guide Fan A uses Remote control A and Receiver A while Fan B uses Remote control B and Receiver B 1 Isolate power to one fan only when pairing the remot...

Page 11: ...the correct speed This is normal behaviour for DC fans Considerations 1 If the receiver is not receiving a signal from the transmitter control please check if there are any other similarly transmitter...

Page 12: ...ol to a receiver BUT it does not cause the receiver to forget previously paired wall controls So you could in theory add several wall controls to a receiver Pressing and holding the ON OFF button for...

Page 13: ...r circuit breaker tripped B Loose wire connections or plug to fan controller C Battery flat in remote control A Fan blades are not horizontal to the ceiling B Blade screws are loose C Blades are not b...

Page 14: ...ak hot water and street lights Filters for blocking reducing such signals are available in Australia at the customer s expense IMPORTANT The in home repair replacement service is carried out by Fanco...

Page 15: ...by external factors such as but not limited to power supply faults surges water damage lighting and other Acts of God is not covered by this warranty Fanco fans must only be installed and used with co...

Page 16: ...WWW FANCO COM AU...

Reviews: