background image

Selecting a Location

DO NOT use outdoors.
Installing the fan in a position where it could be exposed to water or moisture is dangerous.
Choose a location for mounting the fan where the blades will have at least 2.1 metres of clearance 
from the floor.
If the location you have chosen does not have a suitable support beam capable of supporting 
45kg, install a brace at least 2” x 4” between the ceiling joists as a support medium.
Make sure that the installation site will not allow the rotating fan blades to come into contact with 
any object and that there is a minimum clearance of 150mm (6”) from the blade tip to the wall. 
Please note that the bigger this clearance is the better the airflow from your fan will be.

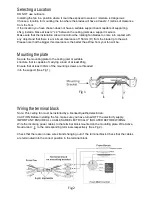
Mounting the plate

Secure the mounting plate to the ceiling joist or suitable 
structure that is capable of carrying a load of at least 45kg, 
Ensure that at least 30mm of the mounting screws are threaded 
into the support (See Fig 1).

Wiring the terminal block

Note: This ceiling fan must be installed by a licensed/qualified electrician.
CAUTION: Before installing the fan, make sure you have turned OFF the electricity supply.
IMPORTANT: ENSURE ALL CABLES ARE ELECTRICALLY ISOLATED BEFORE WIRING.
Wire the incoming power cables to the terminal block mounted on the mounting plate. Wire Active, 
Neutral and        to the corresponding terminals respectively (See Fig 2).

Check that there are no lose wire strands hanging out of  the terminal block. Check that the cables 
are terminated into the correct position in the terminal block.

Fig 1

Fig 2

Summary of Contents for CFFCLP2WH-48"

Page 1: ...ANCO Ceiling Fan Before installation it is most important that you read and follow the instructions in this use and care booklet even if you feel you are quite familiar with this type of product Find...

Page 2: ...s may give an unsatisfactory performance motor hum and cause damage to the motor Use ONLY the provided wall controller 10 This appliance is not intended for use by young children or infirm persons wit...

Page 3: ...loth or soft surface to avoid damage DO NOT lay the motor housing on its side the housing may get damaged Before commencing installation check that all parts are included NB You may need to remove all...

Page 4: ...oth or soft surface to avoid damage DO NOT lay the motor housing on its side the housing may get damaged Before commencing installation check that all parts are included NB You may need to remove all...

Page 5: ...he better the airflow from your fan will be Mounting the plate Secure the mounting plate to the ceiling joist or suitable structure that is capable of carrying a load of at least 45kg Ensure that at l...

Page 6: ...r 2 Remove the 4 side screws and 2 mounting screws from the mounting bracket and keep for later use 3 Twist the single screw end of the mounting bar through the rectangular opening on the mounting bra...

Page 7: ...racket using the 4 screws as previously removed Assembling the blades With the motor housing in place the blades can now be assembled onto the motor Attach blade to motor with plastic plate iron plate...

Page 8: ...y tight Light Kit Installation 1 Connect the light kit plugs to the plugs from the bottom of the fan 2 Loosen the 3 light kit mounting screws on the light kit mounting plate 3 Align the Light kit key...

Page 9: ...is fan includes a blade balancing kit Upon initial installation the balance kit should be used on the fan blades to reduce wobble 2 The balance kit includes instructions on how to perform the balancin...

Page 10: ...ty Certificate The manufacturer will not accept in home expenses unless authorisation is granted prior to work commencing and a CA number allocated The in home component of this warranty covers only a...

Page 11: ...oor related issues such as rusting or failure clearly caused by water moisture or wind The Warranty will not cover external appearance or finish of any part of the ceiling fan The Warranty will not co...

Reviews: