background image

36

Figura 1

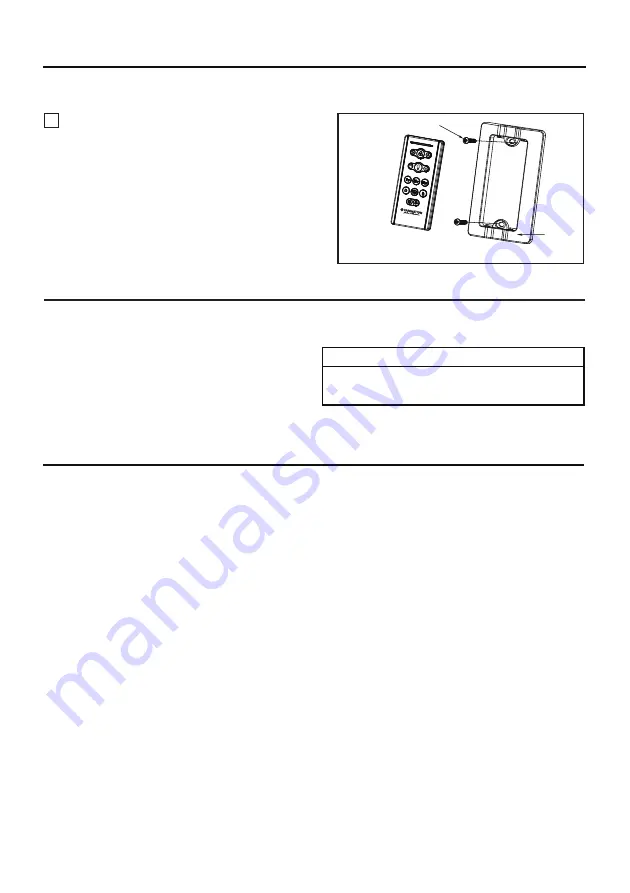
Cómo instalar su mando a  distancia

1. Instalación de la placa de la pared:

 (Figura 1)

Fije la placa de la pared usando los dos tornillos
suministrados. 

Se recomienda limpiar el polvo de las aspas
periódicamente. Lo mejor es utilizar un plumero.

Mantenimiento

El único mantenimiento necesario para el ventilador de
techo es una limpieza periódica.
Al llevar a cabo la limpieza, use sólo un cepillo suave o un
paño sin pelusas, para evitar rayar el acabado.
No se requieren agentes abrasivos de limpieza; los
mismos deben evitarse para prevenir daños en el acabado.


PRECAUCIÓN

No utilice solventes para limpiar el ventilador de
techo. Podrían dañar el motor o las aspas y ocasionar
posibles descargas eléctricas.


Limpieza de las aspas

Evite usar agua, productos de limpieza o trapos
ásperos, que pueden combar o dañar las aspas.


Tornillos (2)

Placa de
la pared

Summary of Contents for AIREFLUSH LP6804 Series

Page 1: ...TTACH YOUR RECEIPT HERE AND REGISTER YOUR FAN AT FANIMATION COM READ AND SAVE THESE INSTRUCTIONS Date Code Purchase Date For best and quickest service please provide date code You can find the date co...

Page 2: ...ng A 3D Printer 1 Read your owner s manual and safety information before installing your new fan Review the accompanying assembly diagrams 2 Before servicing or cleaning unit switch power off at servi...

Page 3: ...air or replace at our option the defective part free of charge for parts and labor performed at our national service center 4 Because of varying climate conditions this warranty does not cover changes...

Page 4: ...parts from the loose parts bags in a small container to keep them from being lost If any parts are missing contact your local retailer 4 Hardware Bags Wire Connectors 4 Light Kit Glass Assembly 1 Lig...

Page 5: ...space Remember to adjust your thermostat when using your ceiling fan additional energy and dollar savings could be realized with this simple step 5 Energy Efficient Use of Ceiling Fans Electrical and...

Page 6: ...wall switch is not sufficient To avoid possible electrical shock be sure electricity is turned off at the main fuse box before wiring All wiring must be in accordance with National and Local codes and...

Page 7: ...lt in damage to the fan blades 1 Securely attach the outlet box acceptable for ceiling fan support into the building structure Outlet box is not supplied with the fan Figure 3 2 Remove the three screw...

Page 8: ...upply wires are different colors than indicated have this unit installed by a qualified electrician Ceiling Bracket Assembly Motor Assembly How to Hang and Wire Your Ceiling Fan Continued 4 Hang the m...

Page 9: ...GRAY YELLOW GROUND NOTE If you feel that you do not have enough electrical wiring knowledge or experience have your fan installed by a licensed electrician WARNING The blades must be installed first...

Page 10: ...Washer 2 each per blade Figure 1 HARDWARE USED X 8 1 4 20 Pan Head Screw With Lock Washer Flat Washerr Blade Figure 1 How to Assemble Your Ceiling Fan NOTE Periodically check blade hardware and resec...

Page 11: ...ree screws Figure 3 4 Assemble the switch housing cover to the bottom of the blade using the 1 4 20 pan head screw with lock washer flat washer from the hardware bag Figure 4 Blade 5 Attach the steel...

Page 12: ...lade hardware and resecure if necessary Figure 2 Figure 3 Figure 4 1 4 20 Pan Head Screw With Lock Washer Flat Washer 3 each per blade Figure 1 Blade Motor Assembly 3 Assemble the switch housing assem...

Page 13: ...assembly using the two key slots Replace the removed screw and secure all three screws Figure 6 Figure 7 7 Secure the glass to the LED assembly by twisting in a clockwise direction Twist the glass gr...

Page 14: ...trol by screwdriver and retain the screw for later Figure 3 Figure 4 4 To make fan operational install two 3V batteries included in hand held remote transmitter with fan power off Then follow the remo...

Page 15: ...rn off the fan Press and hold this button for 5 seconds to turn on or turn off the buzzer Turn on fan and turn speed up Turn on fan and turn speed down Home Away Tap this button the light will blink t...

Page 16: ...stalling Wall Plate Figure 1 Attach wall plate using the two provided screws Periodic cleaning of your new ceiling fan is the only maintenance that is needed When cleaning use only a soft brush or lin...

Page 17: ...signals from solid state variable speed controls Solid state controls are not recommended choose an alternative control method 1 Blades not attached to fan 2 Loose screws in motor housing 3 Wire conne...

Page 18: ...rew With Lock Washer Flat Washer 13 Before discarding packaging material be certain all parts have been removed HOW TO ORDER REPAIR PARTS When ordering repair parts always give the following informati...

Page 19: ...LP6804 Exploded View Illustration NOTE The illustration shown is not to scale or its actual configuration may vary Product parts are subject to change without notice AireFlush 10 11 12 2 3 6 12 4 7 8...

Page 20: ...Copyright 2022 Fanimation 2022 08 V 01 10983 Bennett Parkway Zionsville IN 46077 Phone 888 567 2055 Outside U S 317 733 4113 www fanimation com FAX 866 482 5215...

Page 21: ...viernes C digo de fecha Fecha de compra ADJUNTE SU RECIBO AQU Y REGISTRE SU VENTILADOR EN FANIMATION COM LEA Y GUARDE ESTAS INSTRUCCIONES Peso neto 5 80 kgs 12 79 lbs Para ofrecer un servicio r pido y...

Page 22: ...medidas Modificar la orientaci n o ubicaci n de la antena de recepci n Aumentar la separaci n entre el equipo y el receptor Conectar el equipo a una toma de corriente o circuito diferente al del rece...

Page 23: ...r son responsabilidad exclusiva del propietario y no de la tienda que vendi el ventilador ni de Fanimation 7 Fanimation se reserva el derecho de modificar o discontinuar un producto en cualquier momen...

Page 24: ...este producto podr a ocasionar lesiones personales o da os en el ventilador P ngase en contacto con su tienda si faltan piezas o hay piezas da adas Verifique que haya recibido las siguientes piezas NO...

Page 25: ...gunas sugerencias para asegurar un rendimiento eficiente del producto Selecci n del lugar de montaje adecuado Los ventiladores de techo se deben instalar en el centro de la habitaci n a 2 13 m 7 pies...

Page 26: ...oporte de l mparas no son aptas para soporte de ventiladores y es posible que deban reemplazarse Consulte a un electricista calificado si tiene dudas ADVERTENCIA ADVERTENCIA Apagar el interruptor de p...

Page 27: ...TENCIA Es fundamental que la caja de distribuci n el ctrica y los tornillos est n bien asegurados a la estructura armada y que sean capaces de soportar una carga de al menos 15 9 kg 35 lb Si los torni...

Page 28: ...cho cont Unidad de soporte del ventilador NOTA Se omiten los cables de suministro para mayor claridad Receptor Interruptores Interruptores Mando a distancia 6 Para configurar el c digo de unidad del r...

Page 29: ...Negro Blanco Azul Rojo Gris Amarillo Rojo Gris Amarillo Amarillo Verde 2 Receptor Rojo ADVERTENCIA Las aspas debe ser instalarse primero antes de programaci n Conductor verde del suministro puesta a t...

Page 30: ...e techo y la tapa NOTA Si desea instalar el kit de iluminaci n s ltese este al p gina 32 ADVERTENCIA NOTA DE INSTALACI N No conecte las aspas hasta que el ventilador est totalmente instalado Instalar...

Page 31: ...s a un im n Figura 5 ADVERTENCIA Para evitar cualquier da o a sus manos tenga cuidado cuando instale la tapa de acero al im n del cubierta del la carcasa de interruptor ya que la fuerza del im n atrae...

Page 32: ...cuito de suministro el ctrico al ventilador antes de instalar el kit de iluminaci n ADVERTENCIA NOTA DE INSTALACI N No conecte las aspas hasta que el ventilador est totalmente instalado Instalar el ve...

Page 33: ...tido de las agujas del reloj Gire el vidrio gradualmente hasta que encaje en la unidad de luz LED Sin apretar demasiado Figura 7 C mo ensamblar las aspas del ventilador de techo y el kit de iluminaci...

Page 34: ...con un controlador variable de pared Rheostat o un regulador de intensidad Si lo hiciera podr a da ar la unidad del mando a distancia del ventilador de techo ADVERTENCIA Solo para referencia visual n...

Page 35: ...n Temporizador de apagado autom tico El ventilador debe estar encendido al configurar el temporizador Lejos de casa Toque este bot n la luz parpadear dos veces para indicarle que se habr completado e...

Page 36: ...es una limpieza peri dica Al llevar a cabo la limpieza use s lo un cepillo suave o un pa o sin pelusas para evitar rayar el acabado No se requieren agentes abrasivos de limpieza los mismos deben evita...

Page 37: ...gotada del mando a distancia 4 Algunos motores de ventilador son sensibles a las se ales de los controles de velocidad de estado s lido variables Los controles de estado s lido no son recomendables Es...

Page 38: ...o de aspas Unidad del motor Unidad del carcasa de interruptor Unidad de luz LED Cubierta del la carcasa de interruptor Tapa de acero Unidad de soporte del ventilador Ensamble del kit de iluminaci n vi...

Page 39: ...39 NOTA La ilustraci n que se muestra no est hecha a escala y su c guraci n real y o terminaci n puede variar Modelo N LP6804 Ilustraci n del despiece AireFlush 10 11 12 2 3 6 12 4 7 8 9 12 5 1...

Page 40: ...Copyright 2022 Fanimation 2022 08 V 01 10983 Bennett Parkway Zionsville IN 46077 Llame Sin Cargo al 888 567 2055 Desde fuera de los EE UU llame al 317 733 4113 www fanimation com FAX 866 482 5215...

Reviews: