background image

4

Energy Efficient Use of Ceiling Fans

Ceiling fan performance and energy savings rely 
heavily on the proper installation and use of the ceiling 
fan. Here are a few tips to ensure efficient product 
performance.

Choosing the Appropriate Mounting Location

Ceiling fans should be installed, or mounted, in the middle 
of the room and at least 7 feet above the floor and 18 
inches from the walls. If ceiling height allows, install the fan 
8 - 9 feet above the floor for optimal airflow. Consult your 
Fanimation Retailer for optional mounting accessories.

Turn Off When Not in the Room

Ceiling fans cool people, not rooms. If the room is 
unoccupied, turn off the ceiling fan to save energy.

Using the Ceiling Fan Year Round
Summer Season:

Use the ceiling fan in the counter-

clockwise direction. The airflow produced by the ceiling 
fan creates a wind-chill effect, making you “feel” cooler. 
Select a fan speed that provides a comfortable breeze, 
lower speeds consume less energy.

Winter Season:

Reverse the motor and operate the ceiling 

fan at low speed in the clockwise direction. This produces 
a gentle updraft, which forces warm air near the ceiling 
down into the occupied space.Remember to adjust your 
thermostat when using your ceiling fan - additional energy 
and dollar savings could be realized with this simple step!

Electrical and Structural Requirements

Your new ceiling fan will require a grounded electrical 
supply line of 120 volts AC, 60 HZ, 15 Amp Circuit. 
Electrical code requires use of a fan-rated outlet box to 
support the extra weight and motion associated with a 
ceiling fan. A fan-rated box will be labeled as such and 
typically supports up to a 70lb ceiling fan. Fan-Rated 
Outlet Boxes vary in ratings and design. Ensure the 
ratings of your ceiling fan outlet box meet the 
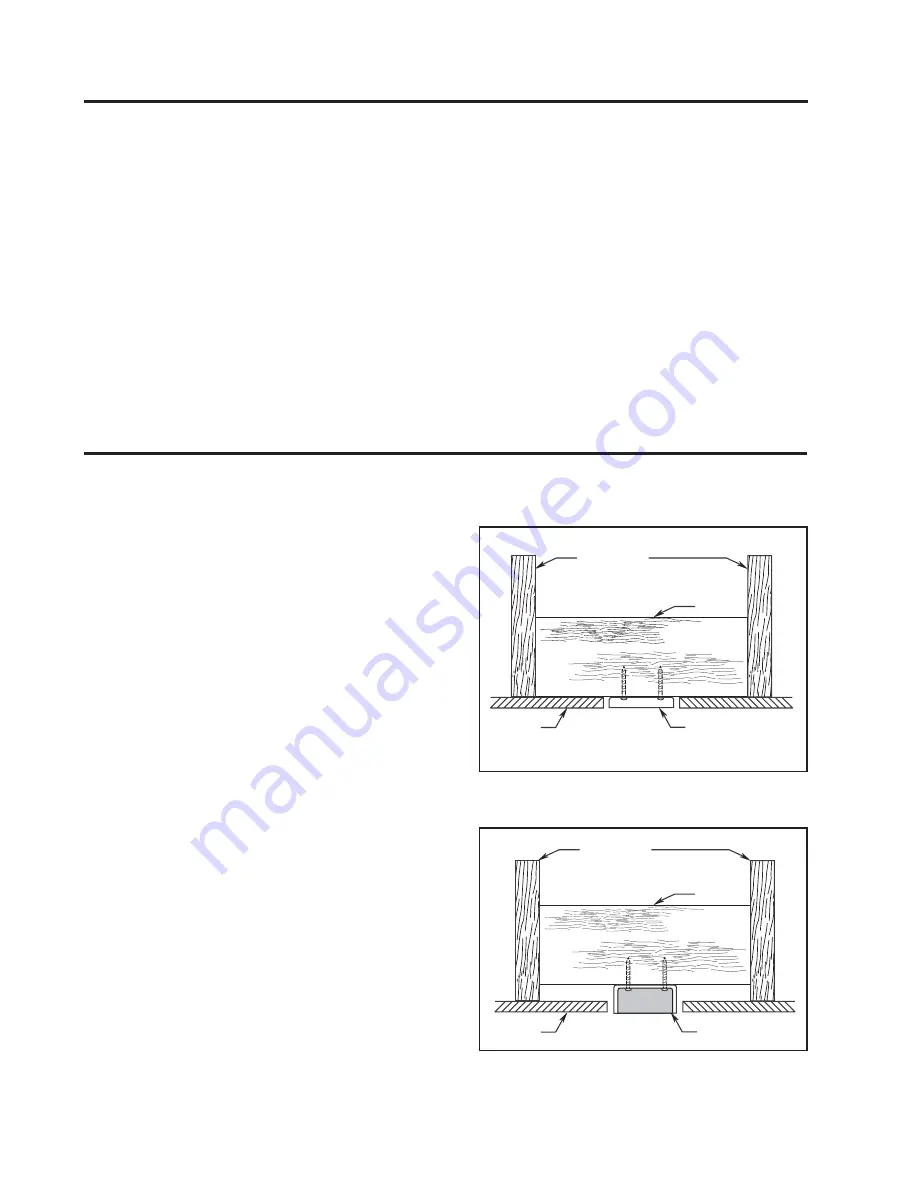
requirements for the ceiling fan being installed. Figure 1,
Figure 2 and Figure 3 depicts different structural 
configurations that may be used for mounting the 
outlet box.

Low profile usage diagram idea (Figure 1)

A 1

»

2-in.-deep pancake box is meant to be screwed to a 

joist or block. It’s used if only one cable is coming into 
the box. It is also available in a saddle-mount 
configuration.

CEILING

2" x 4"

CEILING JOIST

OUTLET BOX

Figure 1

Figure 2

2" x 4"

CEILING JOIST

CEILING

OUTLET BOX

Deeper profile usage diagram idea (Figure 2)

A 2-1

»

4-in.-deep box can be attached to blocking

between joists and is roomy enough to handle more 
than one cable. 

Summary of Contents for Belleria

Page 1: ...OWNER S MANUAL READ AND SAVE THESE INSTRUCTIONS Model No FP4320 1 The Belleria Ceiling Fan Wet Location Model Net Weight 9 9 kg 21 78 lbs ...

Page 2: ... limited to those of merchantability and fitness for a particular purpose to the extent permitted by law Some states do not allow limitations on implied warranties Fanimation will not be liable for incidental consequential or special damages arising out of or in conjunction with product use or performance except as may otherwise be accorded by law This warranty gives you special legal rights and y...

Page 3: ...roduct is designed to use only those parts supplied with this product and or any accessories designated specifically for use with this product by Fanimation Substitution of parts or accessories not designated for use with this product by Fanimation could result in personal injury or property damage Contact your retail store for missing or damaged parts ʆWARNING Before assembling your ceiling fan r...

Page 4: ...s warm air near the ceiling down into the occupied space Remember to adjust your thermostat when using your ceiling fan additional energy and dollar savings could be realized with this simple step Electrical and Structural Requirements Your new ceiling fan will require a grounded electrical supply line of 120 volts AC 60 HZ 15 Amp Circuit Electrical code requires use of a fan rated outlet box to s...

Page 5: ...sible electrical shock be sure electricity is turned off at the main fuse box before wiring All wiring must be in accordance with National and Local codes and the ceiling fan must be properly grounded as a precaution against possible electrical shock WARNING WARNING No blocking Figure 3 Paired with a deep box this hanger is meant to span between two joists and takes the place of wooden blocking To...

Page 6: ... 4 WARNING It is critical that the clevis pin in the downrod support is properly installed and the setscrews are securely tightened Failure to verify that the pin and setscrews are properly installed could result in the fan falling 5 y p o n a c r e v o c g n i l p u o c r o t o m h g u o r h t s e r i w e t u o R e d i s n e p o h t i w n w o h s n a f n o r e v o c w e r c s y p o n a c h t i w ...

Page 7: ... Be sure the groove in the ball is lined up with tab on the hanger bracket Figure 11 WARNING Failure to seat tab in groove could cause damage to electrical wires and possible shock or fire hazard WARNING To avoid possible shock do not pinch wires between the hanger ball assembly and the hanger bracket 1 Securely attach the hanger bracket to the outlet box using the outlet box screws and washers su...

Page 8: ...connectors supplied 2 Securely connect the white fan motor wire to the white supply neutral wire using wire connector supplied Securely connect the black fan motor wire and blue wire to the black supply wire using wire connector supplied Figure 12 After connections have been made turn leads upward and carefully push leads into the outlet box with the white and green leads on one side of the outlet...

Page 9: ... result in damage to the fan blades CAUTION 2 Lay flat side of blade holder arm on a flat surface with the inside of the blade holder arm facing XS This is the side with the threaded posts and pitched h t i w r e d l o h e d a l b e h t r e v o c e d a l b e h t n o i t i s o P t o o f the threaded posts VKRZLQJ 0DNH sure the bottom edge of the blade is fully seated against the blade holder DUP Pl...

Page 10: ...17 2 Install the fan pull chain coupler Figure 18 Figure 18 10 Maintenance Blade Cleaning Periodic cleaning of your new ceiling fan is the only maintenance that is needed When cleaning use only a soft brush or lint free cloth to avoid scratching the nish Abrasive cleaning agents are not required and should be avoided to prevent damage to nish Periodic light dusting of the Palm Leaf Woven Bamboo or...

Page 11: ...anger Ball Assembly 3 R1 6 3 Ceiling Canopy 3 3 0RWRU RXSOLQJ RYHU VVHPEO 33 4 DQRS 6FUHZ RYHr VVHPEO 6 DQ 0RWRU RXVLQg VVHPEO 0 7 Blade Holder Set Blade Holder Cover Set 3 8 3 9 Blade Mounting Hardware Bag Containing 3 for TB fans 3 for 1 T TS fans 3 0 for MW fan Phillips Head SFrews 3 16 24 x 10 mm 11 3KLOOLSV 6FUHZGULYHr 4 Blade Holder Mounting Hardware Bag Containing 20 x ǫ 6RFNHW HDG 6FUHZ ZL...

Page 12: ...12 NOTE The illustration shown is not to scale or its actual con guration may vary The Belleria FP4320 1 Exploded View 1 Figure 1 2 3 4 5 6 8 7 9 ...

Page 13: ...are sensitive to signals from solid state variable speed controls Solid state controls are not recommended choose an alternative control method 6 Tighten screws securely 3 FAN WOBBLES EXCESSIVELY 1 Setscrew and nut in downrod support is loose 2 Setscrew in downrod hanger ball assembly is loose 3 Screws securing fan blade holders to motor hub are loose 4 Blade holders not seated properly 5 Hanger b...

Page 14: ......

Page 15: ...10983 Bennett Parkway Zionsville IN 46077 888 567 2055 FAX 866 482 5215 Outside U S call 317 733 4113 Visit Our Website www fanimation com Copyright 2014 Fanimation 2014 04 V 01 ...

Page 16: ...MANUAL DEL PROPIETARIO LEA Y GUARDE ESTAS INSTRUCCIONES Modelo N º FP4320 1 The Belleria Ventilador de techo Modelo para lugares húmedos Peso neto 9 9 kg 21 78 lb ...

Page 17: ...nal Se requiere comprobante de venta El cliente se hará responsable de todos los gastos de remoción o reinstalación y envío del producto para reparaciones o sustitución 2 GARANTÍA DE MANO DE OBRA DEL MOTOR POR UN AÑO si el motor de su ventilador falla antes de cumplirse un año a partir del momento de su compra original debido a defectos en los materiales o en la fabricación se efectuará la reparac...

Page 18: ...esarias para el ensamblaje Materiales tamaño del cable según el A W G Calibre de Alambre Estadounidense longitud del cable instalado 14 12 hasta 15 2 m 50 pies de 15 2 a 30 5 m 50 a 100 pies NOTA si no está seguro de la descripción de una pieza consulte la ilustración del despiece Figura 1 página 28 1 VHUL TXH TXH KD D UHFLELGR ODV VLJXLHQWHV SLH DV Destornillador Phillips Escalera de tijera HVWRU...

Page 19: ...rectainstalación yuso Acontinuaciónlepresentamosalgunassugerencias para asegurar un rendimiento eficiente del producto Selección del lugar de montaje adecuado Los ventiladores de techo se deben instalar en el centro de la habitación a 2 13 m 7 pies de altura del piso como mínimo y 0 5 m 18 pulgadas de las paredes Si la altura del techo lo permite instale el ventilador a 2 5 m 8 9 pies por encima d...

Page 20: ... ADVERTENCIA Apagar el interruptor de pared no es suficiente Para evitar posibles descargas eléctricas asegúrese de que la electricidad esté desconectada en la caja de fusibles principal antes de realizar la instalación eléctrica Toda instalación eléctrica debe cumplir con los códigos nacionales y locales y el ventilador de techo debe tener la conexión a tierra adecuada como forma de precaución an...

Page 21: ...lador o un barral optativo comprado por separado 4 Afloje los dos tornillos de fijación del soporte del barral Alinee los orificios del pasador en el barral con los orificios del soporte del mismo Instale el pasador y asegúrelo con el pasador de horquilla Asegúrese de empujar la pata recta del pasador de horquilla a través del orificio cerca de la punta del pasador hasta que la parte curva del pas...

Page 22: ...or de la misma Empuje la semiesfera hacia arriba bien ajustada contra el pasador Ajuste firmemente el tornillo de fijación de la semiesfera Si el tornillo está flojo podría provocar oscilación del ventilador Figura 6 NOTA Se deben revisar todos los tornillos y volver a 7 El ventilador viene con cables de color azul negro y blanco Antes de instalar el ventilador mida aproximadamente de 15 a 23 cm 6...

Page 23: ...rmemente contra la caja de distribución eléctrica Si la caja de distribución eléctrica está empotrada retire la tablaroca hasta que el soporte haga contacto con la caja Si el soporte o la caja de distribución eléctrica no están bien asegurados el ventilador podría oscilar o caerse 2 Con cuidado levante el ventilador y apoye la unidad del barral de la semiesfera en el soporte de suspensión que acab...

Page 24: ...ión a tierra es importante para un funcionamiento seguro ʆADVERTENCIA Verifique que todas las conexiones estén bien ajustadas incluida la conexión a tierra y que no haya ningún cable desnudo visible en los conectores de cables a excepción del cable de conexión a tierra No haga funcionar el ventilador hasta que las aspas estén colocadas Podrían producirse ruidos y daños en el motor Suministro domés...

Page 25: ...nillos de cabeza hueca con arandelas de seguridad de x 10 3 16 24 x 10mm tornillos con cabeza de arandela phillips No conecte las aspas hasta que el ventilador esté totalmente instalado Instalar el ventilador con las aspas colocadas podría ocasionar daños en las mismas PRECAUCIÓN 3 Ajuste los soportes de aspas a la parte inferior del buje delmotor con los tornillos de cabeza hueca de 20 x ǫÝ conar...

Page 26: ...corriente eléctrica en la caja de distribución eléctrica mediante la conexión de la electricidad en la caja de fusibles principal Figura 17 26 Mantenimiento El único mantenimiento necesario para el ventilador de techo es una limpieza periódica Al llevar a cabo la limpieza use sólo un cepillo suave o un paño sin pelusas para evitar rayar el acabado No se requieren agentes abrasivos de limpieza los ...

Page 27: ...n arandelas de seguridad de ó ǫÝ llave Allen con mango en T Bolsa de accesorios que contiene cadena y acoplador de cadena kit de balanceo tornillos para caja de conexiones 8 32 x 3 4Ý conectores de cables 4 aspas que contiene HDWFP4320BL para ventiladores AZ TB HDWFP4320GZ para ventiladores AG AN LT TS HDWFP4320MW para ventiladores MW Antes de desechar los materiales de embalaje asegúrese de haber...

Page 28: ...28 1 Figura 1 2 3 4 5 6 8 7 9 The Belleria FP4320 1 Despiece NOTA la ilustración que se muestra no está hecha a escala y su con JXUDFLyQ UHDO SXHGH YDULDU ...

Page 29: ...controles de velocidad de estado sólido variables Los controles de estado sólido no son recomendables Escoja un método de control alternativo 6 Ajuste bien los tornillos 3 EL VENTILADOR OSCILA EN EXCESO 1 El tornillo de fijación y la tuerca del soporte de barral están flojos 2 El tornillo de fijación en la unidad del barral de la semiesfera está flojo 3 Los tornillos que aseguran los soportes de l...

Page 30: ...0983 Bennett Parkway Zionsville IN 46077 888 567 2055 FAX 866 482 5215 Desde fuera de los EE UU llame al 317 733 4113 Visite nuestro sitio Web en www fanimation com Copyright 2014 Fanimation 2014 04 v 01 ...

Reviews: