background image

13

How to Assemble Your Light Kit (Continued)

Motor 
Assembly

Light Shade
Assembly

Light Shade
Assembly

Figure 3

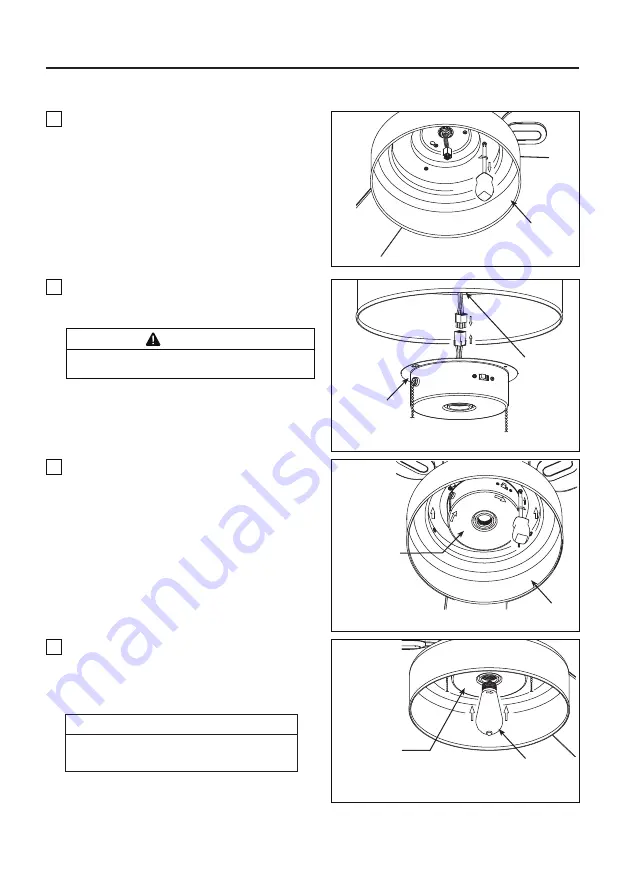
3. 

Remove one of the three screws in the light

shade assembly. Retain the screw for later and
slightly loosen the remaining two screws. (Figure 3)

Figure 4

Figure 5

Figure 6

Switch Housing
Assembly

Switch Housing
Assembly

Switch Housing
Assembly

LED Bulb

4. 

Securely attach 9-pin connector from motor assembly 

to wiring harness socket within switch housing assembly. 
(Figure 4)

5. 

Assemble the switch housing assembly to the light

shade assembly using the two key slots in the switch 
housing assembly. Replace the third screw and secure  
all three screws. (Figure 5)

WARNING

The color label on these two connectors must 
correspond to each other.

NOTE: 


When relamping is required, USE ONLY 

MAX 6W, TYPE ST48 DIMMABLE LISTED LED 
(LIGHT) BULB.

RISK OF FIRE. USE ONLY LED LAMPS IN THIS 
LIGHT KIT. INCANDESCENT AND HALOGEN LAMPS 
MAY CAUSE SEVERE THERMAL DAMAGE.

CAUTION

6. 

Install LED light bulb into socket by threading in a 

clockwise direction. (Figure 6)


Summary of Contents for BLUSH LP7678LMW

Page 1: ... at 1 888 567 2055 8 a m 5 p m EST Monday Friday Date Code For best and quickest service please provide date code You can find the date code on the carton or top of fan housing Purchase Date ATTACH YOUR RECEIPT HERE AND REGISTER YOUR FAN AT FANIMATION COM READ AND SAVE THESE INSTRUCTIONS Español p MODEL LP7678LMW BLUSH CEILING FAN 21 ...

Page 2: ...quipment into an outlet on a circuit different from that to which the receiver is connected Consult the dealer or an experienced radio TV technician for help ceiling fan s remote control unit operate the equipment CAUTION Changes or modifications not expressly approved by the party responsible for compliance could void the user s authority to WARNING This product is designed to use only those part...

Page 3: ... r a w s i h t s n o i t i d n o c e t a m i l c g n i y r a v f o e s u a c e B 4 tarnishing or peeling f o s e m e r t x e o t e r u s o p x e e s u s i m t n e d i c c a t c e l g e n n o i t a l l a t s n i r e p o r p m i m o r f e g a m a d o t y l p p a t o n s e o d d n a d i o v s i y t n a r r a w s i h T 5 heat or humidity or as a result of any modification to the original product r o n...

Page 4: ...uded One Phillips head screwdriver One blade screwdriver One stepladder One wire stripper 1 Check to see that you have received the following parts NOTE If you are uncertain of part description refer to exploded view illustration WARNING Do not install or use fan if any part is damaged or missing This product is designed to use only those parts supplied with this product and or any accessories des...

Page 5: ...stall the fan 8 9 feet from floor to the blade for optimal airflow Consult your Fanimation Retailer for optional mounting accessories Turn Off When Not in the Room Ceiling fans cool people not rooms If the room is unoccupied turn off the ceiling fan to save energy Your new ceiling fan will require a grounded electrical supply line of 120 volts AC 60 HZ 15 Amp Circuit Electrical code requires use o...

Page 6: ...nt to span between two joists and takes the place of wooden blocking To avoid fire or shock follow all wiring instructions carefully Any electrical work not described in these instructions should be done or approved by a licensed electrician Figure 3 CEILING JOIST CEILING OUTLET BOX To reduce the risk of fire electric shock or personal injury mount to outlet box marked acceptable for fan support o...

Page 7: ...e the hairpin clip and clevis pin from the bottom of the downrod Retain the pin and clip for reinstallation in Step 5 Figure 3 Figure 3 Figure 4 4 Loosen the two set screws and locking nuts in the downrod support of the motor assembly Route the black white and blue wires through the downrod Figure 4 Downrod Set Screws 2 Black White and Blue wires 1 Remove and discard the six rubber motor stops fro...

Page 8: ...r Motor Coupling Cover 8 Cut off excess lead wire approximately 6 to 9 inches above top of the downrod Strip insulation off 1 2 inch from the end of each lead wire Figure 8 9 Remove one of the two shoulder screws in the hanger bracket and retain the screw for later Loosen the second shoulder screw without fully removing it Figure 9 Figure 9 Hanger Bracket 7 Reinstall the hanger ball on the downrod...

Page 9: ...ushmount options are not available For angled ceilings note the angle can be no more than 19 WARNING To avoid possible fire or shock be sure electricity is turned off at the main fuse box before hanging Figure 1 WARNING The fan must be hung with at least 7 of clearance from floor to blades Figure 2 WARNING Failure to seat tab in groove could cause damage to electrical wires and possible shock or f...

Page 10: ...you feel that you do not have enough electrical wiring knowledge or experience have your fan installed by a licensed electrician How to Wire Your Ceiling Fan WARNING To avoid possible electrical shock be sure electricity is turned off at the main fuse box before wiring Figure 1 WARNING Check to see that all connections are tight including ground and that no bare wire is visible at the wire connect...

Page 11: ...pletely inside the canopy housing and not pinched between the housing and the ceiling 11 Figure 1 Figure 2 1 Position the blade over the blade holder with threaded posts showing Make sure the bottom edge of the blade is fully seated against the blade holder With a phillips screwdriver tighten 3 16 24 truss head screw with spring washer flat washer and fiber washer to secure the blade to the blade ...

Page 12: ...een the rotating blades WARNING CAUTION To reduce the risk of electric shock disconnect the electrical supply circuit to the fan before installing your light kit X 6 1 4 20 Screws HARDWARE USED How to Assemble Your Light Kit Figure 1 1 Remove one of the three screws in the support bracket at the bottom of the motor assembly Retain the screw for later and slightly loosen the remaining two screws Fi...

Page 13: ... wiring harness socket within switch housing assembly Figure 4 5 Assemble the switch housing assembly to the light shade assembly using the two key slots in the switch housing assembly Replace the third screw and secure all three screws Figure 5 WARNING The color label on these two connectors must correspond to each other NOTE When relamping is required USE ONLY MAX 6W TYPE ST48 DIMMABLE LISTED LE...

Page 14: ...the main fuse box Figure 1 3 Check the operation of the fan by gently pulling on the fan pull chain Figure 3 Fan Pull Chain Operating Sequence 1 st Pull High 2nd Pull Medium 3 rd Pull Low 4 th Pull Off Figure 1 Figure 2 Figure 3 Figure 4 4 Slide the switch to CH when use the pull chain to operate the fan Slide the switch to RC to operate the fan using the optional CR500 remote control sold separat...

Page 15: ...r duster will work best Avoid using water cleansers or harsh rags which can warp and ruin the blades Maintenance How to Operate Your Ceiling Fan Continued How to Clean Your Ceiling Fan Blades CAUTION Do not use solvents when cleaning your ceiling fan It could damage the motor or the blades and create the possibility of electrical shock 6 If airflow is desired in the opposite direction turn the fan...

Page 16: ...cket and or ceiling outlet box is not securely fastened 4 NOT ENOUGH AIR MOVEMENT 3 CAUTION Make sure main power is turned off Make sure reverse switch position is all the way to one side 1 If possible consider using a longer downrod not included you can buy the longer downrod from fanimation com 1 Fuse or circuit breaker blown 2 Loose power line connections to the fan or loose switch wire connect...

Page 17: ...ing Canopy Light Kit Pull Chain PullChain Containing Ref Description Part 1 4 20 Pan Head Screws with Lock Washers 7 Blade Holder Mounting Hardware Bag Containing APP799004BL ADRAC4GT1 45LMW P767801LMW APPCP1101LMW APPCP1403LMW AMA7678LMW AP767813LMW HDWLP7678LMW AP767805WH AP767804BH PPJYE26L0600 AP767803MW 17 Refer to fan model number located on down rod support Parts List Before discarding pack...

Page 18: ... 6 9 10 8 7 12 12 12 12 11 12 12 NOTE The illustration shown is not to scale or its actual configuration may vary Product parts are subject to change without notice Model LP7678LMW Exploded View Illustration BLUSH ...

Page 19: ......

Page 20: ...2020 12 V 01 Copyright 2020 Fanimation 10983 Bennett Parkway Zionsville IN 46077 Phone 888 567 2055 Outside U S 317 733 4113 FAX 866 482 5215 FANIMATION COM ...

Page 21: ...liente al 1 888 567 2055 8 a m 5 pm hora del Este de lunes viernes Código de fecha Fecha de compra ADJUNTE SU RECIBO AQUÍ Y REGISTRE SU VENTILADOR EN FANIMATION COM LEA Y GUARDE ESTAS INSTRUCCIONES Para ofrecer un servicio rápido y de calidad por favor suministre el código de fecha Puede encontrar el código de fecha en el paquete o en la parte superior de la carcasa del ventilador ...

Page 22: ...or es apto para usar con controles de velocidad de estado sólido opcional CR500 PRECAUCIÓN Los cambios o las modificaciones no aprobadas expresamente por la parte responsable de conformidad podría anular la autoridad del usuario para operar el equipamiento ADVERTENCIA PARA REDUCIR EL RIESGO DE DESCARGAS ELÉCTRICAS ESTE VENTILADOR SE DEBE INSTALAR CON UN CONTROL INTERRUPTOR DE PARED AISLADO ADVERTE...

Page 23: ...instalación del ventilador son responsabilidad exclusiva del propietario y no de la tienda que vendió el ventilador ni de Fanimation 7 Fanimation se reserva el derecho de modificar o discontinuar un producto en cualquier momento o sustituir cualquier pieza según lo establecido por esta garantía 8 En ningún caso se podrá devolver un ventilador sin previa autorización por parte de Fanimation Las dev...

Page 24: ...a cada paso coloque una marca de verificación Con esto se asegurará de completar todos los pasos y podrá saber desde dónde retomar si fuera interrumpido 1 Verifique que haya recibido las siguientes piezas NOTA Si no está seguro de la descripción de una pieza consulte la ilustración del despiece Unidad del soporte de suspensión 1 Cubierta de unión del motor 1 Bolsas de accesorios Unidad del motor 1...

Page 25: ... flujo de aire óptimo Consulte en su tienda minorista de Fanimation para obtener accesorios de montaje opcionales Apague el ventilador cuando no se encuentre en la habitación Los ventiladores son para refrescar a la gente no a las habitaciones Si la habitación está vacía apague el ventilador de techo para ahorrar energía Su nuevo ventilador de techo requiere una línea de suministro eléctrico con c...

Page 26: ...oporte de lámparas no son aptas para soporte de ventiladores y es posible que deban reemplazarse Consulte a un electricista calificado si tiene dudas ADVERTENCIA Apagar el interruptor de pared no es suficiente Para evitar posibles descargas eléctricas asegúrese de que la electricidad esté desconectada en la caja de fusibles principal antes de realizar la instalación eléctrica Toda instalación eléc...

Page 27: ... de fijación y las tuercas El incumplimiento de dicho paso podría hacer que el ventilador se caiga Figura 3 Figura 5 4 Afloje los dos tornillos de fijación del soporte del barral de soporte para techo a través de la varilla Lntroduzca los cables de color negro azul y blanco cables a través de la varilla Figura 4 Pasador de horquilla Varilla Tornillo de fijación y las tuercas de seguridad 2 Clip de...

Page 28: ...cm 6 a 9 pulgadas por encima de la parte superior del barral Pele 1 2 cm 1 2 del aislamiento en cada extremo del cable Figura 8 Se deben revisar todos los tornillos de fijación y volver a ajustarlos cuando sea necesario antes de realizar la instalación 9 Extraiga una de los tornillos de hombro en el soporte del gancho y guarde los tornillos para pasos posteriores Afloje el segundo tornillo de homb...

Page 29: ...arga eléctrica asegúrese de cortar la alimentación eléctrica de la caja de fusibles principal antes de colgar el ventilador Figura 1 ADVERTENCIA La caja de salida debe estar bien asegurada La abrazadera para colgar debe estar bien asentada contra la caja de salida Si la caja de salida está empotrada retire el panel hasta que la abrazadera haga contacto con la caja Si la abrazadera y o la caja de s...

Page 30: ...ra colgar puesta a tierra Conductor verde de la bola para colgar puesta a tierra Conductor verde de la bola para colgar puesta a tierra Conductor blanco del suministro Conductor blanco del suministro Caja de salida homologada Suministro eléctrico Conductor negro del suministro Conductor azul del ventilador Conductor negro del ventilador Caja de salida homologada Suministro eléctrico Conductor negr...

Page 31: ...completamente empujarse con cuidado en el cuadro de juntura y de que no estén aprisio el techo Figura 1 Figura 2 Cómo ensamblar las aspas del ventilador de techo Figura 1 Aspas Soporte de aspas 1 Coloque el aspa sobre el soporte de aspas con los pilotes roscados a la vista Asegúrese de que la parte inferior del aspa se encuentre bien apoyada sobre el soporte Con un destornillador Phillips fije los...

Page 32: ...entilador No coloque objetos extraños entre las aspas del ventilador en funcionamiento ADVERTENCIA Aditamentos utilizados Cómo ensamblar las aspas del ventilador de techo cont PRECAUCIÓN A fin de reducir el riesgo descargas eléctricas desconecte el circuito de suministro eléctrico al ventilador antes de instalar el kit de iluminación Cómo ensamblar su el kit de iluminación 1 Retire uno de los tres...

Page 33: ...de la unidad de carcasa de interruptor Figura 4 Unidad de carcasa de interruptor Unidad de carcasa de interruptor Unidad de carcasa de interruptor ADVERTENCIA La etiqueta de color de estos dos conectores debe corresponder mutuamente 5 Instale la unidad de carcasa de interruptor en el ensamble de pantallas de luz usando las dos ranuras principales de la unidad de carcasa de interruptor Vuelva a col...

Page 34: ...stén colocadas en su lugar ya que de lo contrario se podría causar ruido y daños 3 Verifique el funcionamiento del ventilador jalando suavemente de la cadena del tirador del ventilador Figura 3 1 ª tirada 2 ª tirada 3 ª tirada 4 ª tirada Secuencia de funcionamiento de la cadena del tirador del ventilador Alta Media Baja Apagado Figura 1 Figura 2 Figura 3 Figura 4 Cadena del tirador del ventilador ...

Page 35: ...usar agua productos de limpieza o trapos ásperos que pueden combar o dañar las aspas Mantenimiento Limpieza de las aspas 6 Si desea que el flujo de aire corra en la dirección opuesta apague el ventilador y espere hasta que las aspas dejen de girar Deslice el interruptor de reversa del unidad carcasa de interruptor a la posición opuesta y vuelva a encender el ventilador Figura 6 PRECAUCIÓN No utili...

Page 36: ...portes de las aspas del ventilador estén colocados firmemente y de manera uniforme en relación con la superficie de la caja del motor Si los soportes están mal colocados afloje los tornillos y vuelva a ajustarlos 4 Los soportes de aspas no están colocados correctamente 1 Las aspas no están sujetas al ventilador 1 Ajuste bien los dos tornillos de fijación y las tuercas en el soporte de barral 1 El ...

Page 37: ...le de pantallas de Luz Unidad de carcasa de interruptor Bombilla de LED 12 8 9 Juego de soporte de aspas Arandela de fibra 10 Cadena del tirador del ventilador Conectores de cables 4 Bolsa de accesorios para el montaje de aspas que contiene 3 16 24 Tornillo de cabeza troncocónica con arandela plana arandela de resorte 10 Bolsas de accesorios Cubierta de unión del motor Unidad del motor Unidad del ...

Page 38: ...OTA La ilustración que se muestra no está hecha a escala y su c guración real y o terminación puede variar 38 1 2 3 4 5 6 9 10 8 7 12 12 12 12 11 12 12 BLUSH Modelo N º LP7678LMW Ilustración del despiece ...

Page 39: ......

Page 40: ...2020 12 V 01 Copyright 2020 Fanimation 10983 Bennett Parkway Zionsville IN 46077 Llame Sin Cargo al 888 567 2055 Desde fuera de los EE UU llame al 317 733 4113 www fanimation com FAX 866 482 5215 ...

Reviews: