background image

7

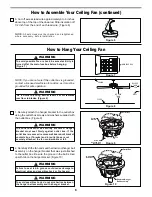
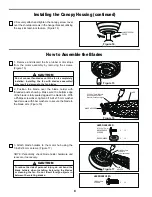
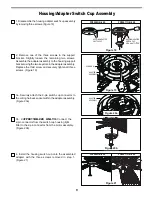
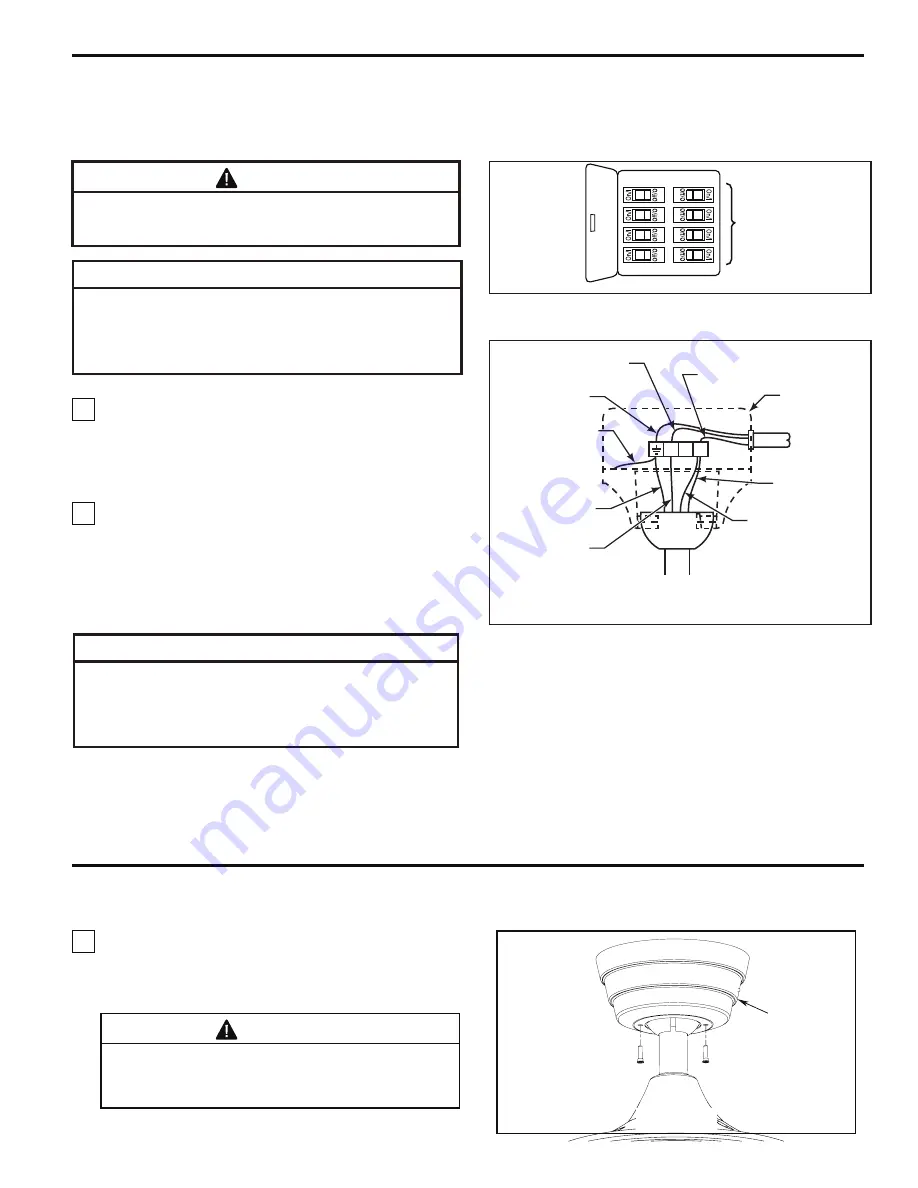
Installing the Canopy Housing

1.  Remove  the  two  shoulder  screws  in  the  hanger 

bracket.  Align  holes  in  the  canopy  with  holes  in  the 

hanger bracket and securely attach canopy using the two 

shoulder screws from the hanger bracket. (Figure 13) 

WARNING

To  avoid  possible  fire  or  shock,  make  sure  that  the 

electrical  wires  are  completely  inside  the  canopy 

housing and not pinched between the housing and the 

ceiling.

Figure 13

CEILING CANOPY

How to Wire Your Ceiling Fan

WARNING

To avoid possible 

re or shock, be sure electricity is 

turned off at the main fuse box before wiring. 

(Figure 11)

Figure 11

MAIN FUSE BOX

If you feel that you do not have enough electrical wiring knowledge or experience, have your fan installed by a 

licensed electrician. 

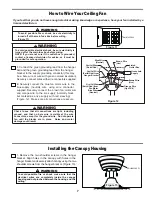
     ball and the green grounding lead from the hanger 

1.

 Connect the green grounding lead from the hanger 

     bracket to the supply grounding conductor (this may 

     be a bare wire or  wire  with  green  colored  insulation). 

     Securely  connect wires with wire connectors supplied.

WARNING

To avoid possible electrical shock, be sure electricity is 

turned off at the main fuse box before wiring.

NOTE: If you are not sure if the outlet box is grounded, 

contact a licensed electrician for advice, as it must be 

grounded for safe operation.

WARNING

Check  to  see  that  all  connections  are  tight,  including 

ground,  and  that  no  bare  wire  is  visible  at  the  wire 

connectors, except for the ground wire.  Do not operate 

fan  until  the  blades  are  in  place.    Noise  and  motor 

damage could result.

2.

  Securely  connect  the  blue  fan  motor  wire  to  the 

blue supply  (neutral)  wire  using  wire  connector 

supplied. Securely  connect  the  brown  fan  motor  wire 

and  orange wire  to  the  live  supply  (normally  black 

but  marked  as  a live  supply  with  red  sleeving) 

(Figure  12).  Make  sure  all connections are secure.

N L1 L

Household

Supply

Listed

Outlet Box

Brown Wire

(Live)

Grn/Yel Wire

(Earth/Gnd) from

Hanger Bracket

Grn/Yel Wire

(Earth/Gnd)

Blue Wire

(Neutral)

Figure 12

Brown Wire

(Live)

Orange Wire

(Light Kit)

Grn/Yel Wire

(Earth/Gnd) from

Fan Motor

Blue Wire

(Neutral)

Summary of Contents for Cancun FP8009OB-220

Page 1: ...OWNER S MANUAL READ AND SAVE THESE INSTRUCTIONS Model Nos FP8009OB 220 FP8011OB 220 The Cancun Ceiling Fans FP8009OB Net Weight 11 50 kgs Net Weight 13 50 kgs FP8011OB 220 220...

Page 2: ...IME WARRANTY Extends to the original purchaser of a Fanimation Fan Important Safety Instructions WARNING To avoid fire shock and serious personal injury follow these instructions 1 Read your owner s m...

Page 3: ...y Light Bulb FP8011OB 220 only One Phillips head screwdriver One stepladder One blade screwdriver One wire stripper Three wire connectors supplied Hardware bags 20 x 14 screws with lock washers blade...

Page 4: ...to be replaced Consult a qualified electrician if in doubt Energy Ef cient Use of Ceiling Fans Ceiling fan performance and energy savings rely heavily on the proper installation and use of the ceilin...

Page 5: ...ith holes in the downrod Se cure clevis pin with hairpin clip Tighten the two set screws with nuts in the downrod support Figure 3 BLUE BROWN AND ORANGE LEADS DOWNROD Figure 2 SET SCREWS AND LOCKING N...

Page 6: ...ING Failure to seat tab in groove could cause damage to electrical wires and possible shock or re hazard WARNING To avoid possible shock do not pinch wires between the hanger ball assembly and the han...

Page 7: ...with green colored insulation Securely connect wires with wire connectors supplied WARNING To avoid possible electrical shock be sure electricity is turned off at the main fuse box before wiring NOTE...

Page 8: ...edge of the blade is fully seated against the blade arm With a Phillips screwdriver tighten 3 16 24x7 5 mm washer head screws with ber washers to secure the blade to the blade arm Figure 16 3 16 24 x...

Page 9: ...curely tighten all three screws Figure 19 Figure 19 SCREWS 3 ADAPTER ASSEMBLY 3a Securely attach the 9 pin switch cup connector to the wiring harness socket within the adapter assembly Figure 20a Figu...

Page 10: ...s Figure 22 Next install trim cover followed by the nial Do not over tighten Figure 23 3 Install pull chains and fobs Figure 24 Figure 24 Figure 23 To reduce the risk of electric shock disconnect the...

Page 11: ...ting Instructions 1 Restore electrical power to the outlet box by turning the electricity on at the main fuse box Figure 25 Figure 25 MAIN FUSE BOX 2 Check the operation of the fan by gently pulling o...

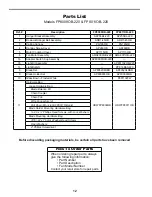
Page 12: ...220 AP800901OB 220 AP805204DBR AP800903OB HDWFP8009OB AP255BL 220 ADR1 45OB PG165OB AP260OB AP1115OB AMA8011OB 220 AP801102OB 220 AP805204DBR PPE14B60 220 AP800903OB P801102FW HDWFP8011OB Loose Hardwa...

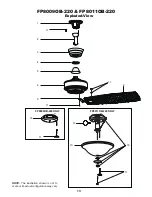
Page 13: ...3 FP8009OB 220 FP8011OB 220 Exploded View NOTE The illustration shown is not to scale or its actual con guration may vary 1 2 3 4 5 6 7a 7c 7b 11 11 11 11 11 10 FP8009OB 220 ONLY FP8011OB 220 ONLY 9 8...

Page 14: ...other or against the interior wall of the switch housing CAUTION Make sure main power is turned off 5 Some fan motors are sensitive to signals from solid state variable speed controls Solid state cont...

Page 15: ......

Page 16: ...Copyright 2010 Fanimation 2010 07 10983 Bennett Parkway Zionsville IN 46077 Toll Free 888 567 2055 FAX 866 482 5215 Outside U S call 317 733 4113 Visit Our Website www fanimation com...

Reviews: