background image

Energy Efficient Use of Ceiling Fans

Ceiling fan performance and energy savings rely 

heavily on the proper installation and use of the ceiling 

fan. Here are a few tips to ensure efficient product 

performance.

Turn Off When Not in the Room

Ceiling fans cool people, not rooms. If the room is 

unoccupied, turn off the ceiling fan to save energy.

Using the Ceiling Fan Year Round

Summer Season:

Use the ceiling fan in the counter-

clockwise direction. The airflow produced by the ceiling 

fan creates a wind-chill effect, making you “feel” cooler. 

Select a fan speed that provides a comfortable breeze, 

lower speeds consume less energy.

Winter Season:

Reverse the motor and operate the ceiling 

fan at low speed in the clockwise direction. This produces 

a gentle updraft, which forces warm air near the ceiling 

down into the occupied space.Remember to adjust your 

thermostat when using your ceiling fan - additional energy 

and dollar savings could be realized with this simple step!

Electrical and Structural Requirements

Your new ceiling fan will require a grounded electrical 

supply line of 120 volts AC, 60 HZ, 15 Amp Circuit. 

Electrical code requires use of a fan-rated outlet box to 

support the extra weight and motion associated with a 

ceiling fan. A fan-rated box will be labeled as such and 

typically supports up to a 70lb ceiling fan. Fan-Rated 

Outlet Boxes vary in ratings and design. Ensure the 

ratings of your ceiling fan outlet box meet the 

requirements for the ceiling fan being installed. Figure 1,

Figure 2 and Figure 3 depicts different structural 

configurations that may be used for mounting the 

outlet box.


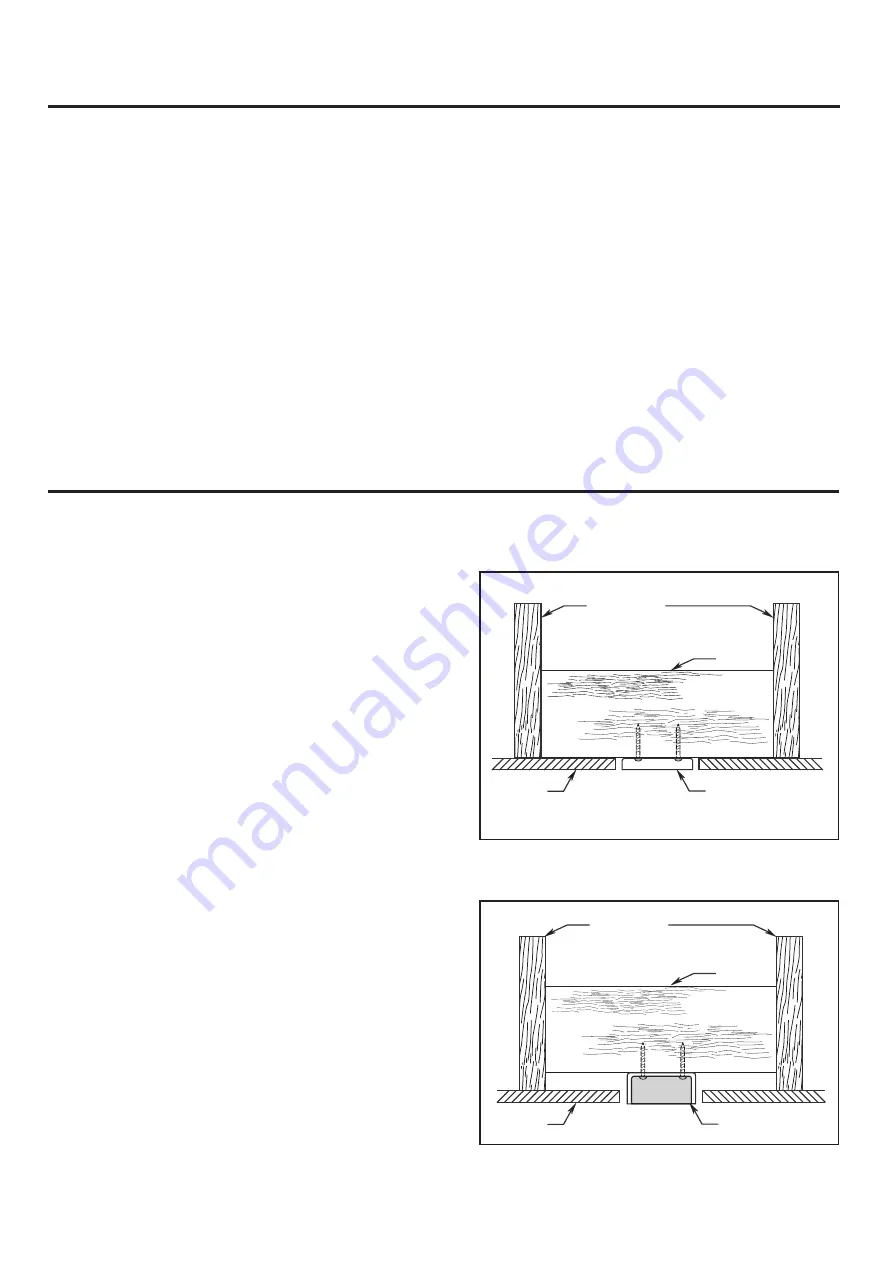
Low profile box (Figure 1)

A 1⁄2-in.-deep pancake box is meant to be screwed to a 

joist or block. It’s used if only one cable is coming into 

the box. It is also available in a saddle-mount 

configuration. 

CEILING

2" x 4"

CEILING JOIST

OUTLET BOX

Figure 1

Figure 2

2" x 4"

CEILING JOIST

CEILING

OUTLET BOX

Deep box (Figure 2)

A 2-1⁄4-in.-deep box can be attached to blocking 

between joists and is roomy enough to handle more 

than one cable. 

5

Choosing the Appropriate Mounting Location

Ceiling fans should be installed, or mounted, in the middle 

of the room and at least 7 feet from floor to the blade and 

18 inches from wall to the blade. If ceiling height allows, 

install the fan 8 - 9 feet from floor to the blade for optimal   

airflow. Consult your Fanimation Retailer for optional  

mounting accessories. 

Summary of Contents for SPITFIRE MA6721BMW

Page 1: ...ILING FAN Questions problems missing parts Before returning to your retailer call our customer service department at 1 888 567 2055 8 a m 5 p m EST Monday Friday ATTACH YOUR RECEIPT HERE READ AND SAVE...

Page 2: ...hile the fan is operating 5 Do not operate reversing switch until fan blades have come to a complete stop Additional Safety Instructions 1 To avoid possible shock be sure electricity is turned off at...

Page 3: ...Fan Installing the Canopy Housing Energy Efficient Use of Ceiling Fans 4 5 5 6 7 8 9 How to Assemble the Ceiling Fan Blades 9 How to Operate Your Remote Control 10 How to Install Your Remote Control...

Page 4: ...see that you have received the following parts Hardware Bag blade screwdriver Four wire connectors WARNING Do not install or use fan if any part is damaged or missing This product is designed to use...

Page 5: ...15 Amp Circuit Electrical code requires use of a fan rated outlet box to support the extra weight and motion associated with a ceiling fan A fan rated box will be labeled as such and typically support...

Page 6: ...tion against possible electrical shock WARNING WARNING Deep box with brace Figure 3 Paired with a deep box this hanger is meant to span between two joists and takes the place of wooden blocking To avo...

Page 7: ...screw Figure 4 Cut off excess safety cable r r r r r of 4 WARNING The fan must be hung with at least 7 of clearance from floor to blades Figure 2 WARNING The outlet box must be securely anchored and c...

Page 8: ...ward and carefully push leads into the outlet box with the white and green leads to one side of the box and the black leads to the other side Figure 4 CAUTION INCORRECT WIRE CONNECTION WILL DAMAGE THI...

Page 9: ...ture Figure 2 NOTE This step is applicable after the neccessary wiring is completed Ceiling Canopy Figure 2 Canopy Screw Cover 1 Remove one of the two shoulder screws in the hanger bracket Loosen the...

Page 10: ...e fan operational install 23A 12V battery included in hand held remote transmitter with fan power off Then follow the remote code setting process If not used for long periods of time remove battery to...

Page 11: ...Figure 1 Attach wall holder using the two provided screws Maintenance Do not use water when cleaning your ceiling fan It could damage the motor or the finish and create the possibility of electrical...

Page 12: ...ssembly with Screws 2 Motor Assembly 2a 2b 2c 2d Ball Downrod Assembly Canopy Canopy Screw Cover Assembly Motor Coupler Cover Assembly 6 Hardware Bag Containing Allen Wrench 3 32 Wire Connector 4 APGA...

Page 13: ...E r a v y a m n o i t a r u g i f n o c s t r a p l a u t c a s t i r o e l a c s o t t o n s i n w o h s n o i t a r t s u l l i e h T y Exploded View Illustration 13 MA6721B 1 3 2b 2e 2c 2a 2 6 2d 5...

Page 14: ...carding packaging materials be certain all parts have been removed How To Order Parts When ordering repair parts always give the following information Part Number Part Description Fan Model Number Con...

Page 15: ...to the motor assembly are tight 3 Check to make sure the screws which attach the fan blade to the motor assembly are tight CAUTION Make sure main power is turned off 4 Tighten set screw securely 1 Bl...

Page 16: ...Copyright 2019 Fanimation 2019 01V 01 10983 Bennett Parkway Zionsville IN 46077 Phone 888 567 2055 Outside U S 317 733 4113 FANIMATION COM FAX 866 482 5215...

Page 17: ...UCCIONES N mero de serie Fecha de compra VENTILADOR DE TECHO SPITFIRE MODELO MA6721B Peso neto 7 41 kg 16 34 lbs Preguntas problemas piezas faltantes Antes de volver a la tienda llame a nuestro Depart...

Page 18: ...ional puede ser clasificado como un dispositivo digital de clase B o un perif rico del ordenador entonces se deber n incluir los siguientes o equivalentes Nota Tras someterlo a las pruebas correspondi...

Page 19: ...luminaci n opcional 32 Paquete de las ocho palas opcional 32 Soluci n de problemas 33 Lista de piezas 30 C mo limpiar las palas de su ventilador de techo C mo utilizar su ventilador de techo C mo inst...

Page 20: ...DVERTENCIA Antes de ensamblar el ventilador de techo consulte la secci nsobreelm todocorrectodeinstalaci nel ctricadel ventilador p gina 25 Si siente que no posee la experiencia o los conocimientos el...

Page 21: ...unassugerencias para asegurar un rendimiento eficiente del producto Apague el ventilador cuando no se encuentre en la habitaci n Los ventiladores son para refrescar a la gente no a las habitaciones Si...

Page 22: ...NCIA A fin de evitar incendios o descargas el ctricas siga con cuidado todas las instrucciones de instalaci n el ctrica Cualquier trabajo el ctrico que no se describa en estas instrucciones deber ser...

Page 23: ...de sortie doit tre solidement ancr e et acceptable pour supporter un ventilateur de 15 9 kg 35 livres au moins Le support de suspension doit reposer fermement contre la bo te de sortie Si la bo te de...

Page 24: ...ERTISSEMENT Si no coloca la leng eta en la ranura podr an da arse los cables el ctricos y podr an ocurrir ncendios o descargas el ctricas 4 Levante cuidadosamente el ventilador y coloque el ensamble d...

Page 25: ...e el conductor azul de la unidad receptora al conductor azul de la iluminaci n del ventilador con el conector de cables que se adjunta con la unidad receptora Figura 3 Interruptores Unidad del recepto...

Page 26: ...base sobre los tornillos de reborde de la abrazadera para colgar mediante el mecanismo de seguro por giro del chavetero Figura 2 1 Retire uno de los dos tornillos de reborde de la abrazadera para colg...

Page 27: ...lador Tornillos de 1 4 20 con arandelas planas 2 por soporte de aspas Cubierta embellecida 1 El uso de un regulador de la intensidad completa no incluido para controlar la velocidad del ventilador da...

Page 28: ...or durante un largo periodo de tiempo extraiga la bater a para evitar cualquier da o alejado del calor o la humedad excesiva Figrua 3 4 Para configurar el c digo del mando a distancia Mueva los interr...

Page 29: ...peri dicamente Lo mejor es utilizar un plumero Mantenimiento El nico mantenimiento necesario para el ventilador de techo es una limpieza peri dica Al llevar a cabo la limpieza use s lo un cepillo suav...

Page 30: ...nidad del motor del ventilador Unudad de carcasa del motor Unidad del barral de la semiesfera Capuch n de techo Cubierta para el tornillo del capuch n Cubierta de uni n del motor C mo hacer un pedido...

Page 31: ...4 NOTA La ilustraci n que se muestra no est hecha a escala y su c guraci n real y o terminaci n puede variar Ilustraci n del despiece Figura 1 31 MA6721B 1 3 2b 2e 2c 2a 2 6 2d 5...

Page 32: ...de haber extra do todas las piezas Paquete de las ocho palas opcional C mo hacer un pedido de piezas Al hacer un pedido de piezas de repuesto proporcione siempre la siguiente informaci n N mero de pie...

Page 33: ...tilador antes de ponerlo en funcionamiento 2 Aseg rese de que todos los tornillos de la caja del motor est n bien ajustados pero no en exceso 3 Aseg rese de que los tornillos que fijan los soportes de...

Page 34: ...19 Fanimation 2019 01 V 01 Visite nuestro sitio Web en www fanimation com 10983 Bennett Parkway Zionsville IN 46077 Llame sin cargo al 888 567 2055 FAX 866 482 5215 Desde fuera de los EE UU llame al 3...

Reviews: